Baby’s Room Gets A Palace With This CNC Castle Decoration

castle decoration

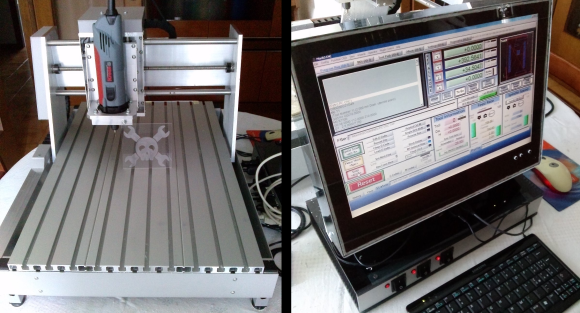
[Vegard] and his wife were expecting a baby girl, and decided to build a castle for their new daughter. As a prototyping geek with his own CNC machine in his apartment, he decided to take to Google Sketchup to design this well-crafted castle decoration for his daughter’s room.

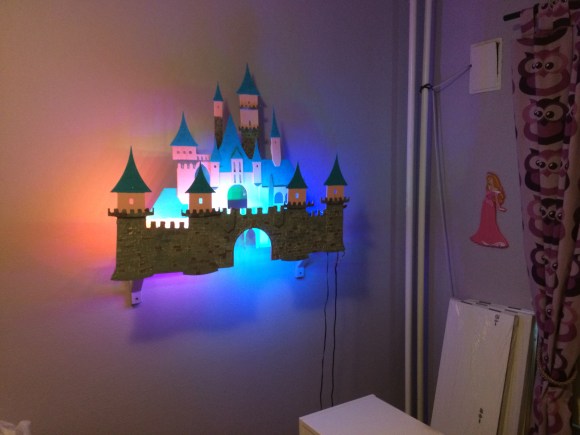
The first challenge was figuring out what the castle would look like. [Vegard] had never been to Disney Land or World, and so had never actually seen any of the fairy-tale castles in real life. After experimenting with some paper versions, he settled on a design which incorporates multiple layers and can house lights within them.

The next step was to cut the final version on the CNC machine, then sand and paint the parts. After figuring out a way to mount the castle to the wall, some LEDs were added for effect, driven by an Arduino. The final version looks pretty good!

Hacking your kids’ room is great fun, and you get to keep making new stuff to remain age appropriate. We bet [Vegard] can’t wait until she’s old enough to enjoy a marble-run that wraps the entire room. In the mean time he can work on a classic robot stroller.

THP Semifinalist: Retro Populator, A Pick And Place Retrofit For A 3D Printer

A huge theme of The Hackaday Prize entries is making assembly of electronics projects easier. This has come in the form of soldering robots, and of course pick and place machines. One of the best we’ve seen is the Retro Populator, a project by [Eric], [Charles], [Adam], and [Rob], members of the Toronto Hacklab. It’s a machine that places electronic components on a PCB with the help of a 3D printer

The Retro Populator consists of two major parts: the toolhead consists of a needle and vacuum pump for picking up those tiny surface mount parts. This is attaches to a quick mount bolted right to the extruder of a 3D printer. The fixture board attaches to the bed of a 3D printer and includes tape rails, cam locks, and locking arms for holding parts and boards down firmly.

The current version of the Retro Populator, with its acrylic base and vacuum pen, is starting to work well. The future plans include tape feeders, a ‘position confirm’ ability, and eventually part rotation. It’s a very cool device, and the ability to produce a few dozen prototypes in an hour would be a boon for hackerspaces the world over.

You can check out a few videos of the Retro Populator below.


SpaceWrencherThe project featured in this post is a semifinalist in The Hackaday Prize. 

Continue reading “THP Semifinalist: Retro Populator, A Pick And Place Retrofit For A 3D Printer”

Super Nice CNC Router Build Leaves Little To Be Desired

Aluminum CNC Router
[Enzo] wrote in to tell us about his recently completed CNC Router (translated). This is an excellent high-quality, all-aluminum build with no cut corners. The work envelope is a respectable 340 by 420 mm with 80 mm in the Z direction. Linear ball bearings make for smooth travel and lead screws with both axial and radial bearings give a solid foundation of accurate and repeatable movements.

Aluminum CNC Router

We’ve had a bunch of CNC Router projects on Hackaday in the past, including other nicely made aluminum ones, but [Enzo] is the only one who spent just as much effort on his computer and machine control system as he did on the CNC machine itself. The computer, which is running Windows and Mach3, is an all-in-one style build that starts out with an old LCD screen from a broken laptop. Along with the reused screen, a very small ETX form factor motherboard was stuffed inside a custom made plexiglass enclosure. A Compact Flash card handles the storage requirements.

Underneath the monitor is another great looking custom made enclosure which houses the stepper motor drivers. There are 3 switches on the front panel to send main’s power out to the PC, spindle and an AUX for future use. On the back panel there are D-sub connectors for each stepper motor, the limit switches and the PC connection. Oh yeah, by the way [Enzo] designed his own bipolar motor drivers (translated) and sent the design out for fabrication. These boards use an A4989 IC and mosfets to control the motors. The schematics are on his site in case you’d like to make some yourself.

Continue reading “Super Nice CNC Router Build Leaves Little To Be Desired”

Dampen Workshop Noise With Paper Pulp And Kool-Aid — OH YEAH!

noise dampener

If you’re fortunate enough to have a garage and a workshop, you probably also have neighbors. The truly blessed must work within the confines of an HOA that restricts noise, porch couches, and most types of fun. [Mike] is among the truly blessed, and when he decided to design a cabinet for his CNC equipment, he took noise dampening into consideration.

[Mike]’s design isn’t a blanket noise dampener; it’s specifically designed for the high-pitch symphony of his router, compressor, and vacuum. He also sought to avoid vibrating the cabinet. To achieve this, the sound-dampening panels are hung on eye hooks with a 1/2″ gap between them and the frame. The backer boards are cut from 3/4″ plywood. [Mike] considered using cement board, but thought it might be overkill since he plants to shell the cabinet in a layer of 3/4″ plywood.

The deadening material is paper pulp made from various shredded papers. After soaking the shreds in water and blending the mixture to an oatmeal consistency, he drained most of the water through a cloth bag. Then he added just enough wood glue to hold the pulpy goo together. The tropical punch Kool-Aid powder isn’t just for looks; it provides visual confirmation of even glue distribution.

[Mike] made some tape walls around the edge of his backer boards to hold the mixture in place and painted on some wood glue to hold the pulp. He spread the tropical concoction to 1/2″ thickness with a tiling trowel to avoid compressing it. The peaks and valleys help scatter any sound that isn’t absorbed. Pudding awaits you after the jump.

Continue reading “Dampen Workshop Noise With Paper Pulp And Kool-Aid — OH YEAH!”

Brushless DC Motor Used For High Speed CNC Spindle

Brushless DC Motor CNC Spindle

Brushless DC motors are common place in RC Vehicles. They are small, light, fast and can be inexpensive. [Raynerd] wanted a new spindle for his CNC machine and thought that a brushless DC motor would be a great platform to build from.

[Raynerd] started with an off the shelf motor that had an 8mm shaft. This shaft size was important because the motor shaft was to be replaced with an ER16 collet arbor of the same size. A collet is a device used to hold cutting tools by collapsing a segmented ring around the tool. Collets allows for quick tool changes while providing a strong clamping force. ER16 is a designation of one of many collet standards.

The main housing was machined out of aluminum specifically for this project. This housing holds two radial load ball bearings that support the new rotating collet arbor. There’s another bearing in this assembly, a thrust washer this time, that keeps the arbor from moving axially in the housing.

The 12 volt output of a standard ATX power supply was used to power the system for testing purposes. A general RC Vehicle electronic speed control and a servo tester work in conjunction to manually regulate the spindle speed. Check out the bench test video and an exploded photo after the break.

Continue reading “Brushless DC Motor Used For High Speed CNC Spindle”

Fischertechnik CNC Machine Looks Innocent Whilst Cutting Your Face

FischerTechnik + Arduino CNC Milling Machine

Hallo iedereen! All the way from the Netherlands comes this fairly unique CNC milling machine built by a handful of Mechanical Engineering students over at the Delft University of Technology. These guys only had one week to build the mill in order to fulfill a requirement of their Mechtronics class. Unfortunately, directly after showing the machine worked, it had to be disassembled.

If the frame looks a little toy-ish, it’s because it is. This particular system is called Fischertechnik and the main support beams are similar to that of aluminum extrusion (ex 80/20, Misumi) except that it is made from nylon. Notice the extremely long cutting bit and comparatively abnormal large Z axis travel capability. What this system lacks in rigidity is made up by being able to carve a very 3D shape with steep sides without the machine hitting the work piece. The loss of rigidity was totally acceptable since the team was only planning on cutting foam and the project’s purpose was to learn mechanics and automation.

Continue reading “Fischertechnik CNC Machine Looks Innocent Whilst Cutting Your Face”

Milling Curved Objects With A G-Code Ripper

HaD Mouse

Milling and routing flat surfaces is pretty much the point of a CNC router, but how about curved surfaces? Auto leveling of hobby CNC machines and 3D printers is becoming commonplace, but Scorch Works is doing just the opposite: using a probe touch probe on a CNC machine to transform a G-Code file into something that can be milled on a curved surface.

The technique is pretty much the complete opposite of Autoleveller, the tool of choice for milling and routing objects that aren’t completely flat or perpendicular to the bed with a MACH3 or LinuxCNC machine. In this case, a touch probe attached to the router scans a curved part, applies bilinear interpolation to a G-Code file, and then starts machining.

The probe can be used on just about anything – in the videos below, you can see a perfect engraving in a block of plastic that’s about 30 degrees off perpendicular to the bed, letters carved in a baseball bat, and a guaranteed way to get your project featured on Hackaday.

Continue reading “Milling Curved Objects With A G-Code Ripper”