Pi Pico Throws Us For A (MIDI) Loop

Modern micro-controllers are absolute marvels, but it isn’t too many projects use one and nothing else. For an example of such simplicity, take a look at [oyama]’s Pi Pico MIDI looper.

It uses the PicoW to interface with a synth via MIDI-BLE, which can be anything from pro equipment to an app on your smartphone. The single control button is already provided by the Pico W– the bootsel button is wearing a lot of hats here, allowing one to select betwixt 4 tracks (all different drums), set the tempo, and input notes on the selected track.

The action is simple: pound out the rhythm for each track, and it will repeat forever, or at least until you press the single button again to change it. There’s also a nice serial interface so you can see what’s going on via UART or USB. For what it does, it is amazingly simple: the BOM is one item, the Pi Pico W. To see it in action, check out the demo video below.

Given the ADC chops on the Pico, it would probably be easy to extend this build with a speaker to make a tiny stand-alone, one-button synth. Or you could add more buttons buttons, but then it’s no longer the beautifully simple single-line BOM project that [oyama] showed us.

Of course, everything is open-source on GitHub, under the BSD license, and forking is encouraged, so [oyama] would doubtless be more than happy to see you go nuts hacking and extending this tiny MIDI looper.

We’ve actually seen the MIDI-BLE standard used before, like this hack adding it to a Eurorack. If you like synths, you may be interested to see what it takes to design one from scratch, sans microcontroller. Continue reading “Pi Pico Throws Us For A (MIDI) Loop”

A Pipe Organ For The MIDI Generation

If you are a musician and you are also a Hackaday reader, there’s a good chance you’ll own at least one MIDI instrument. A synthesizer of some description, maybe a keyboard, or perhaps a drum machine. A pipe organ? Probably not.

If you answer to the name of [Wendell Kapustiak] though, you’d say yes to that question. He’s built himself a beautiful pipe organ from scratch, with hand-tuned wooden pipes, and for a modern touch he’s made it MIDI controlled. An Arduino Due sends its commands to a set of solenoid drivers, the solenoids then control the air flow from his wind chest through a set of plastic tubes to his organ pipes. Air supply comes from a shop vac in a sound-insulated box, with a pressure regulating chamber. The result is not perfect, he believes that the pipes are too close together and this somehow makes them difficult to tune, but to an outsider’s eye it’s a pretty impressive instrument.

[Wendell] is both a skilled and prolific maker, and his blog is rather a good read. The organ project is spread over a few years, so to get the full picture it is best to read his previous posts on the subject as well as the one first linked. He recounts his early experiments as well as giving us details of the electronics and the pipes. He’s put up a video showing the completed instrument which you can see below the break, and another more recently showing a recent one-LED-per-note modification.
Continue reading “A Pipe Organ For The MIDI Generation”

DIY ‘midi’ Footpedal


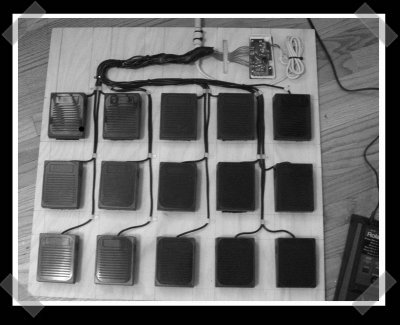
[forrest] passed along this diy foot-pedal ‘midi’ controller. It’s a good re-use of hardware, but not a true midi controller. The pcb was gutted from an old keyboard, and the pedals were scored from a mad 60 mile tour of the local radio shacks clearance bin. Since the pedals are simple momentary on switches, it was a matter of wiring them to the controller and using a laptop to generate signals via usb midi interface. Replace the keyboard pcb with a drum controller and you’d have an interesting stand alone solution.

Just so I could enjoy some extra crow, I managed to leave one other entry out of my published list of Design Challenge entries. [Jason] sent in this MEGA32 programmer/dev board. He kept it single sided, but you’ll need a parallel port to use it.