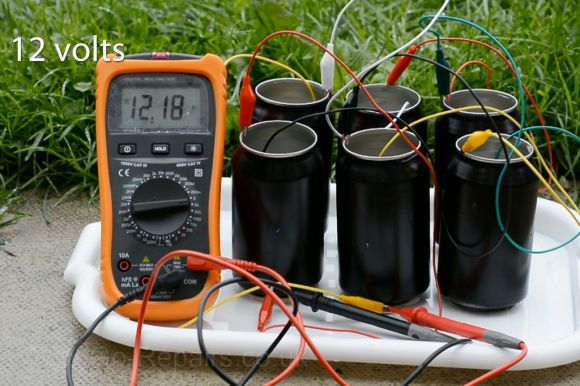
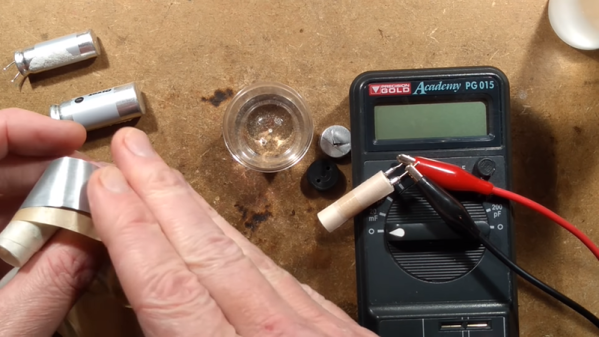
Amiga Repairs Put One Tough Little Machine Back In Service

Returning a piece of retro hardware to factory condition is generally a labor of love for the restorationist. A repair, on the other hand, is more about getting a piece of equipment back into service. But the line between repair and restoration is sometimes a fine one, with the goals of one bleeding over into the other, like in this effort to save an otherwise like-new Amiga 2000 with a leaky backup battery.

Having previously effected emergency repairs to staunch the flow of electrolyte from the old batteries and prevent further damage, [Retromat] entered the restoration phase of the project. The creeping ooze claimed several caps and the CPU socket as it spread across the PCB, but the main damage was to the solder resist film itself. In the video below you can clearly see flaky, bubbly areas in the mask where the schmoo did its damage.

Using a fiberglass eraser, some isopropyl alcohol, and far more patience than we have, [Retromat] was able to remove the damaged resist to reveal the true extent of the damage below. Thankfully, most of the traces were still intact; only a pair of lines under the CPU socket peeled off as he was removing it. After replacing them with fine pieces of wire, replacing the corroded caps and socket, and adding a coin-cell battery holder to replace the old battery, the exposed traces were coated with a varnish to protect them and the machine was almost as good as new.

Amigas were great machines in their day and launched more than one business. They’ve proved their staying power too, some even in mission-critical roles.

Continue reading “Amiga Repairs Put One Tough Little Machine Back In Service”

Getting The Lead Out Of Lithium Battery Recycling

When that fateful morning comes that your car no longer roars to life with a quick twist of the key, but rather groans its displeasure at the sad state of your ride’s electrical system, your course is clear: you need a new battery. Whether you do it yourself or – perish the thought – farm out the job to someone else, the end result is the same. You get a spanking new lead-acid battery, and the old one is whisked away to be ground up and turned into a new battery in a nearly perfect closed loop system.

Contrast this to what happens to the battery in your laptop when it finally gives up the ghost. Some of us will pop the pack open, find the likely one bad cell, and either fix the pack or repurpose the good cells. But most dead lithium-based battery packs are dropped in the regular trash, or placed in blue recycling bins with the best of intentions but generally end up in the landfill anyway.

Why the difference between lead and lithium batteries? What about these two seemingly similar technologies dictates why one battery can have 98% of its material recycled, while the other is cheaper to just toss? And what are the implications down the road, when battery packs from electric vehicles start to enter the waste stream in bulk?

Continue reading “Getting The Lead Out Of Lithium Battery Recycling”

Morbid Battery Uses Blood Electrolyte

Building a battery out of common household products is actually pretty simple. All that is required is two dissimilar metals and some sort of electrolyte to facility the transfer of charge. A popular grade school science experiment demonstrates this fairly well by using copper and zinc plates set inside a potato or a lemon. Almost anything can be used as the charge transfer medium, as [dmitry] demonstrates by creating a rather macabre battery using his own blood.

The battery was part of an art and science exhibition but it probably wouldn’t be sustainable on a large scale, as it took [dmitry] around 18 months to bank enough blood to make a useful battery. Blood contains a lot of electrolytes that make it perfect for this application though, and with the addition of the copper anode and aluminum cathode [dmitry] can power a small speaker which plays a sound-generating algorithm that frankly adds a very surreal element to the art installation.

While we can’t recommend that you try to build one of these batteries on your own without proper medical supervision, the video of the art piece is worth checking out. We’ve seen a few other hacks that involve blood, but usually they are attempting to use it for its intended purpose rather than as an alternative energy source.

DIY Soda Can Battery

sodaCanBattery

It may not be particularly useful to create some makeshift batteries out of soda and soda cans, but it’s a good introduction to electrodes and electrolytes as well as a welcomed break from lemons and potatoes. The gang at [Go-Repairs] lopped off the can’s lid and temporarily set the soda aside, then took steel wool to the interior of the can to remove the protective plastic coating. The process can be accelerated by grabbing your drill and cramming the steel wool onto the end of a spade bit, although pressing too hard might rip through the can.

With the soda poured back in, you can eek out some voltage by clipping one lead to the can and another to a copper coin that’s dunked into the soda. Stringing along additional cans in series can scale up the juice, but you’ll need a whole six pack before you can get an LED working—and only just. The instructions suggest swapping out the soda for a different electrolyte: drain cleaner, which can pump out an impressive 12 volts from a six pack series. You’ll want to be careful, however, as it’s likely to eat through the can and is one lid away from being dangerous.

Stick around for a quick video after the break, and if you prefer the Instructables format, the [Go-Repairs] folks have kindly reproduced the instructions there.

Continue reading “DIY Soda Can Battery”

Halloween Props: Pumpkin Battery

This one would make a nice centerpiece for your Halloween party. It’s a battery with tiny pumpkins serving as the cells. [EM Daniels] shows us how to clear out the pumpkins, fill them with some freshly mixed electrolyte, and he even throws in the directions for baking the pumpkin seeds.

Each pumpkin will need a pair of conductors made of dissimilar metals to serve as the anode and cathode. Copper wire is used for one, aluminum for the other, and both wires have a spiral pattern bent on one end to increase the surface area that contacts the electrolytic solution. Now just boil up a slurry of vinegar, gelatin, and salt, then let it sit in the fridge over night. [EM Daniels] was able get 1.5V out of this project (enough to light one LED) for two hours, and 1.4V for six hours by using seven of the pumpkin cells in series.

[Thanks Karen]