An electric eraser built into a mechanical pencil

Power Up Your Pencil With The 30,000 RPM Erase-O-Matic

There are some inventions that look completely pointless to the untrained eye: who would ever need a motorized garbage can, an electric pencil sharpener or a battery-powered eraser? Quite often, it turns out that there is some niche use case where such tools make complete sense, as is the case for motorized erasers. Having a tiny piece of rubber spinning at high speed gives artists and drafters a way to very precisely delete or lighten bits of their drawing, something that’s nearly impossible to do with a regular eraser.

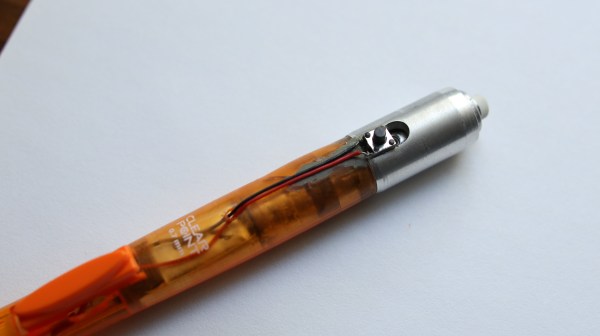
[Franklinstein] however decided to design a high-speed eraser integrated into a mechanical pencil that brings the whole concept straight back to the pointless category, although not without showing off his advanced engineering skills. The Erase-O-Matic contains a miniature electric motor sourced from a quadcopter, together with an ultra-small lithium-ion battery and a power switch. The spinning bit is held by a tiny bearing, with the whole setup covered by a machined aluminium housing.

Tests with a laser tachometer show a rotational speed of about 30,000 RPM, which is almost three times as fast as a commercial electric eraser. And although it has very good erasing performance, it also wears out its tip in a few seconds, so a bit less speed could actually make this device more useful. If you’re planning to build one of these yourself, you might want to first read our primer on small DC motors.

Continue reading “Power Up Your Pencil With The 30,000 RPM Erase-O-Matic”

EPROM Timer

[glitch] had a cheap EPROM eraser with very few features. Actually, that might be giving it too much credit: it’s barely more than a UV light that turns on when it’s plugged in and turns off when it’s plugged out unplugged. Of course it would be nice to implement some safety features, so he decided he’d hook it up to a software-controlled power outlet.

Of course, controlling a relay that’s wired to mains is old hat around here, and in fact, we’ve covered [glitch]’s optoisolated mains switch already. He’s gone a little beyond the normal mains relay project with this one, though. Rather than use a microcontroller to run the relay, [glitch] wrote a simple Ruby script on his computer to turn the EPROM eraser on for the precise amount of time that is required to erase the memory.The Ruby script drives the relay control directly over a USB to serial adapter’s RTS handshake pin.

[glitch]’s hack reminds us that if you just need a quick couple bits of slow output, a USB-serial converter might be just the ticket. You could imagine driving everything from standard lamps to your 3D printer’s bed heater (provided you use similar hardware), but it’s especially helpful for [glitch] who claims to forget to turn off the eraser when it’s done its job, which leaves a potentially dangerous UV source just lying about. It’s always a good idea to add safety features to a dangerous piece of equipment!

Fabricate Your Own 7-Segment Displays

We see more and more projects that use custom molds and casting materials. The latest is this custom seven segment display which [Ray74] put together. The idea of making your own LED displays couldn’t be much easier than this — everything but the LEDs and wire is available at the craft store.

He started by making models of each segment out of pink erasers. The lower left image of the vignette above shows the eraser segments super glued to some poster board. The decimal is a pencil eraser, with a fence of wood to contain the molding material. Amazing Mold Putty was mixed and pressed into place resulting in the mold shown in the upper right.

From there, [Ray] cast the clear epoxy three times. Once dried the clear pieces were sanded, which will shape them up physically but also serves to diffuse the light. They were then placed inside of another mold form and an epoxy pour — this time doped with black enamel paint — finishes the 7-segment module. The final step is to glue the LEDs on the back side and wire them up.

This definitely trumps the build which Hackaday Alum [Kevin Dady] pulled off using hot glue sticks as light pipes.


UV EPROM Eraser In A Toolbox

[Devon Croy] belongs to a hackerspace that works hard to keep hardware from going to the landfill. He found they were in possession of over a hundred Erasable Programmable Read Only Memory chips (EPROM). Not to be confused with EEPROM, which are electronically erasable, these EPROM chips require a strong source of UV light to blank the old data before they can be written again.

Instead of buying a tool to erase two or three chips at a time he built his own bulk EPROM eraser from an old metal toolbox. He used parts from a fluorescent black light and acquired a new bulb that generates light in the UVC spectrum, the band which works as an eraser for the chips. After bolting the parts into the case he added a spring-loaded timer knob and a safety switch that kills the power when the case is opened, similar to the UV exposure box we looked at yesterday.

Of course, if you don’t need a bulk eraser you could shop some garage sales for a UV pacifier cleaner which can also erase EPROM chips.