Fail Of The Week: The Deadliest Multimeter

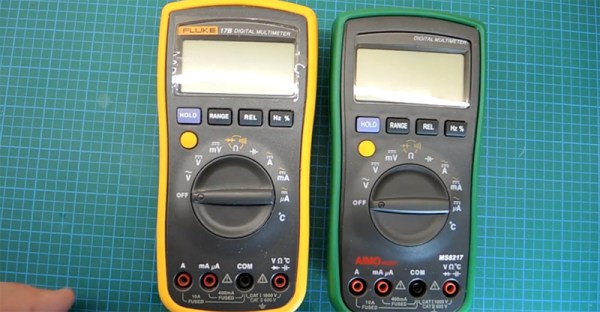
Need a good multimeter? The Fluke 17B is an excellent basic meter that will last your entire career. It’s also $100 USD. Need something cheaper? Allow me to introduce the AIMOmeter MS8217. On the outside, it’s a direct copy of the Fluke 17b, right down to the screen printing but understandably lacking the yellow enclosure. $30 USD will get you an exact copy of a Fluke 17B, it would seem. Right? Not a chance. [electronupdate] did a teardown of the AIMOmeter, and while this meter looks like a Fluke on the outside, it’s probably going to kill somebody.

The teardown begins with a look at the ratings on the back of this off-brand meter. It does have two fuses, but the engraving on the back strangely claims ‘Wrrebt insurance limit’. If anyone has any idea what a ‘wrrebt’ is, please leave a note in the comments. The only references to this word in Google are mis-OCRed blackletter type in a book from the early 1800s.

Opening up the meter reveals – surprisingly – two real fuses in the meter. There were no markings on the bigger fuse, which could be a problem for verifying if the fuse is of the proper value. That’s not really a problem, though: the fuse isn’t even between ground and the amp probe socket. Yes, this fuse is completely useless, and testing the resistance with the fuse out of the circuit confirms this.

After putting the meter back together, [electron] tests the accuracy of the meter. With a 1 mA current source, the mA setting seems to work, but when testing the larger Amp range of this meter, the results display in milliVolts. Don’t worry, there’s an easy fix for that: just press the dial down just right and the correct setting will be displayed. Wow.

You get what you pay for, and if you only ever use an AIMOmeter for measuring Arduinos and batteries, you might – might – be alright. This is not the kind of meter you want to measure line voltage, motors, or anything else with, though.

Hackaday Fail: A $3000 Prototype That Doesn’t Work

[Dan Royer] is hard at work building his own personal robot army. Robots mean motors, and motors mean gearboxes. In [Dan]’s case, gearboxes mean $3000 wasted on a prototype that doesn’t work. Why doesn’t it work? He doesn’t know, and we don’t either.

[Dan] would like to use small but fast DC motors for his robots coupled to a gearbox to step down the speed and increase the torque. The most common way of doing this is with a planetary gear set, but there’s a problem with the design of planetary gears – there is inherent backlash and play between the gears. This makes programming challenging, and the robot imprecise.

A much better way to gear down a small DC motor is a hypocycloid gear. If you’ve ever seen the inside of a Wankel engine, this sort of gearing will look very familiar: a single gear is placed slightly off-axis inside a ring gear. On paper, it works. In reality, not so much.

[Dan] spent $3000 on a prototype hypocycloid gearbox that doesn’t turn without binding or jamming. The gear was made with incredible tolerances and top quality machining, but [Dan] has a very expensive paper weight sitting on his desk right now.

If anyone out there has ever designed or machined a hypocycloid gearbox that works, your input is needed. The brightest minds [Dan] met at the Bring A Hack event at Maker Faire last weekend could only come up with. ‘add more lasers’, but we know there’s a genius machinist out there that knows exactly how to make this work.


2013-09-05-Hackaday-Fail-tips-tileHackaday Fail is a column which runs every now and again. Help keep the fun rolling by writing about your past failures and sending us a link to the story — or sending in links to fail write ups you find in your Internet travels.

Fail Of The Week: Re-addressing Your RAM DIMM

It doesn’t work and we’re not surprised considering the can of worms that comes with RAM addressing. Right off the bat we assume timing problems due to variance in the trace lengths and EM issues. But you have to hand it to [cyandyedeyecandy] for even trying. The self-proclaimed upgrade seeks to readjust how the DIMM works without changing the edge pinout.

The stick shown here is a 512 MB module that, because of the computer using it (unspecified in the post), is only allowing access to 256 MB. The added chips and free-form circuit make up an AND for the chip-select line, and flip-flop for the bank address.

The post is a gorgeous cry for help. We already weighed in from the peanut gallery at the top (seriously, that’s somewhat baseless guessing) so step up to the computer-engineering plate and let us know what needs to be done to make this most-awesome-of-non-working hacks actually work.

Once you’ve figured this out, here’s another one to scratch at your brain with.

Fail Of The Week: Easy Cheese? Printer Says No

Well, this is timely. We saw a lot of things at Midwest RepRap Festival this year on both the printer and the material fronts. We told you about the delicious offerings made possible through remote extruder setups, strong and heavy filaments infused with copper and other metals, and a printer built out of K’NEX. No one was printing with canned cheese, though, and maybe for good reason.

[Andrew] here has created a 3D-printed arm that holds a can of aerosol cheese-like substance in place. A motor causes the holder to move the spout to the side, dispensing the goo. At first he squirts it in a coiled pile on to a cracker. That goes pretty well until it’s time to move away from the cracker. [Andrew]’s later attempt to build up four cheesy walls had us cheering. You can see what we mean after the break.

There are a couple of issues at play. Sometimes the add-on just plain falls off the end of the spout. Other times, air in the can interrupts the flow, just as it does during manual operation. And every once in a while, it just seems that the spout was too close to the substrate.

What do you think about the viability of cheese printing? Would it work better if the extrusion took place remotely, and the cheese was pushed through a thinner tip? Would a cooled print bed help? Let us know.

Continue reading “Fail Of The Week: Easy Cheese? Printer Says No”

Fail Of The Week : Measuring DC Current Has To Be Easy, Right?

[DainBramage] needed a DC ammeter to check how long his amateur radio station would be able to stay powered on battery backup power. The one’s he already had on hand were a Clamp Meter, which could only measure AC, and another one that measured just a few milliamps. Since he didn’t have one which could measure up to 25A, he decided to build his own DIY DC Ammeter with parts scavenged from his parts bin. Measuring DC current is not too difficult. Pass the current to be measured through a precision resistor, and measure the voltage drop across it using a sensitive voltmeter.

I = V/R

So far, so good. If it’s late at night and you’ve had a lot of coffee, busy building your DC ammeter, things could head south soon. [DainBramage]’s first step was to build a suitable Shunt. He had a lot of old, 1Ω, 10W resistors lying around. He made a series-parallel combination using nine of them to create a hefty 1Ω, 90W shunt (well, 0.999999999 Ohms if you want to be picky). This gave him a nice 1 Volt per Amp ratio, making it easy to do his measurements.

Next step was to hook up the shunt to a suitable voltmeter. Luckily, he had a Micronta voltmeter lying around, ripped out from a Radio Shack product. Since he didn’t have the voltmeter data, he hooked up a 10k resistor across the meter inputs, and slowly increased the voltage applied to the meter. At 260mV, the needle touched full-scale and the voltage across the inputs of the voltmeter was 33mV. [DainBramage] then describes the math he used to calculate the resistors he would need to have a 10A and a 25A measurement range. He misses his chance to catch the fail. His project log then describes some of the boring details of putting all this together inside a case and wrapping it all up.

A while later, his updates crop up. First thing he probably realized was that he needed more accurate readings, so he added connectors to allow attaching a more accurate voltmeter instead of the analog Micronta. At this point, he still didn’t catch the fail although it’s staring him straight in the face.

His head scratching moment comes when he tries to connect his home made ammeter in series with the 12V DC power supply to his amateur radio station. Every time he tries to transmit (which is when the Radio is drawing some current), the Radio shuts off.  If you still haven’t spotted the fail, try figuring out how much voltage gets dropped across the 1Ω shunt resistor when the current is 1A and when it is 5A or more.

Fail Of The Week: Hair Dryer As Light Switch

Home electrical, it’s really not that hard. But when you’re dealing with the puzzles left for your by someone else things can get really weird. [Daniel’s] sister and her husband ran into this recently. The video demonstration of their fail includes a lot of premature laughter, but it’s worth hanging in there… you’ll quickly see why she can’t contain her amusement.

The project at hand is a replacing a bathroom fan with a simple light fixture. Once the swap was made the light switch works just as anticipated. But a second switch which used to control a different light now behaves strangely. It doesn’t activate the original light, but instead switches the new fixture. Even stranger is that the original switch apparently now acts as a bizarre dimmer when the second switch is on. That’s odd, but the coup d’état of the fail is when they plug in a hair dryer and switching it on illuminates the light but doesn’t activate the hair dryer.

As with all Fail of the Week segments, the goal here is not to criticize but to commiserate. What do you think is causing this? We can’t wait to see what you come up with. Posting simple diagrams is encouraged (you can use HTML img tags in the comments). Ladies and gentlemen, start your conjecture.

Continue reading “Fail Of The Week: Hair Dryer As Light Switch”

Fail Of The Week: WinCE Is A Noun And A Verb

A few years ago, [localroger] found some incredible hardware on sale: a very tiny laptop with a seven-inch screen, full keyboard, trackpad, Ethernet, WiFi, USB (with support for a lot of HID devices), and a battery that would last hours. They were on sale for $30 USD, and [localroger] bought four of them. A great deal, you say? These machines ran Windows CE. No, owning a WinCE device is not the Fail of the Week.

Figuring he should do something with these machines, [roger] thought, ‘a clock will do’, and began to figure out how to program or write an app for these things. These tiny netbooks did come with a programming language, JavaScript, in the form of the built-in IE6 web browser. This was actually a really, really good solution – WinCE apps formatted for portrait displays just didn’t work with the ‘widescreen’ laptop, and a hand-coded HTML table is probably the best solution anyone could have hoped for.

These machines – [roger] used three of them over the years as alarm clocks – did their job well, even if NTP had been left out of the OS image. The real fail here comes from buying a $30 WinCE netbook, and using it for something as mission critical as an alarm clock. The displays burned in, the batteries began puffing up, one unit somehow wouldn’t allow IE to run (probably a bad Flash chip), and the trackpad in another one sent the cursor on a random walk. You get what you pay for.

These WinCE netbooks have finally been put out to pasture, hopefully the same one laser printers go to. It’s all for the best, though; [roger] made a much better alarm clock with Nixies.


2013-09-05-Hackaday-Fail-tips-tileFail of the Week is a Hackaday column which runs every now and again. Help keep the fun rolling by writing about your past failures and sending us a link to the story — or sending in links to fail write ups you find in your Internet travels.