Colorful Clock

A Colorful Clock For Toddlers

[Don] and his wife were looking for a way to teach their two-year old daughter how to tell time. She understood the difference between day and night, but she wasn’t old enough to really comprehend telling the actual time. [Don’s] solution was to simplify the problem by breaking time down into colored chunks representing different tasks or activities. For example, if the clock is yellow that might indicate that it’s time to play. If it’s purple, then it’s time to clean up your room.

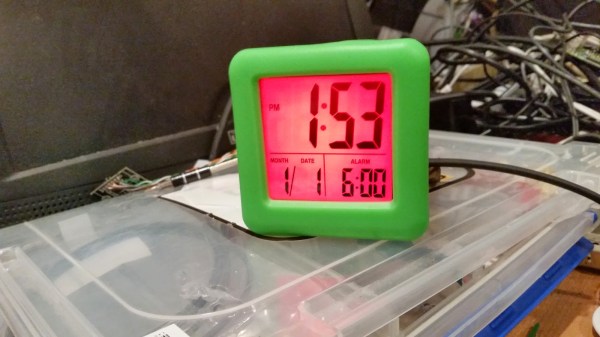
[Don] started with a small, battery operated $10 clock from a local retailer. The simple clock had a digital readout with some spare room inside the case for extra components. It was also heavy enough to stay put on the counter or on a shelf. Don opened up the clock and got to work with his Dremel to free up some extra space. He then added a ShiftBrite module as a back light. The ShiftBrite is a high-brightness LED module that is controllable via Serial. This allows [Don] to set the back light to any color he wants.

[Don] already had a Raspberry Pi running his DIY baby monitor, so he opted to just hijack the same device to control the ShiftBrite. [Don] started out using a Hive13 GitHub repo to control the LED, but he found that it wasn’t suitable for this project. He ended up forking the project and altering it. His alterations allow him to set specific colors and then exit the program by typing a single command into the command line.

The color of the ShiftBrite is changed according to a schedule defined in the system’s crontab. [Don] installed Minicron, which provides a nice web interface to make it more pleasant to alter the cron job’s on the system. Now [Don] can easily adjust his daughter’s schedule via web page as needed.

 

Piana – Musical Synthesis For The Raspberry Pi

For the last 15 years or so, software synths have slowly yet surely replaced those beatboxes, drum machines, and true synthesizers. It’s a loss for old hardware aficionados, but at least everyone with a MacBook is now a musician, amiright?

The Raspberry Pi and Pi2 already have more processing power than a desktop from ’99, so it’s no surprise that all of those classic synths, from a Moog. Yamaha DX, Casio CZ, Linn drum machine, Fairlight, and a mellotron, can all be stuffed into a Pi thanks to the work of [Phil Atkin] and his Raspberry Pi synthesizer.

[Phil]’s efforts to bring audio synthesis to the Pi fall under three techniques: subtractive synthesis, phase distortion synthesis, and sample-based synthesis, something that’s found in everything from Akai MPCs, MacBooks, and that one episode of The Cosby Show. [Phil] is combining all of these techniques into a piece of software that’s capable of running seamlessly on the Pi, giving anyone with a $35 computer a tool that would have been worth several thousand dollars in 1985.

The project is pretty far along, but the recent release of the Raspberry Pi 2 has thrown [Phil] for a loop. On one hand, the Pi 2 is much more capable than the original Pi in terms of hardware, and this lends itself to more sounds and a better GUI. On the other hand, there are millions of original Pi 1s out there that still make for exceptional synthesizers. Either way, [Phil]’s work is a great example of how far you can push the Pi with audio work.

Thanks [Wybren] for the tip. Videos below.

Continue reading “Piana – Musical Synthesis For The Raspberry Pi”

EddiePlus, The Edison Based Balancing Robot

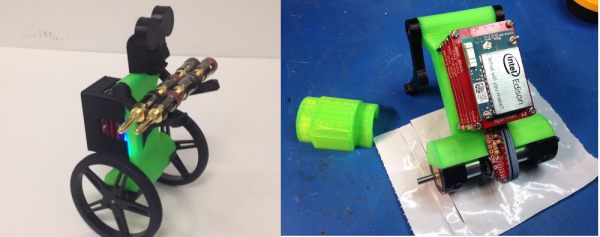
[Renee] dropped a tip to let us know about EddiePlus, her balancing robot creation. As its name might imply, EddiePlus is controlled by an Intel Edison processor. More specifically, [Renee] is using several of Sparkfun’s Edison Blocks to create Eddie’s brain. EddiePlus’ body is 3D printed, while his movement comes from two Pololu DC motors with wheels and encoders. The full build instructions are available as a PDF from [Renee’s] Google drive.

Eddie is able to balance and drive around on two wheels, much like a Segway. Sensor data for balance comes from Sparkfun’s LSM9DS0 based Inertial Measurement Unit (IMU) block. In this new “plus” version of Eddie, [Renee] has added encoders to the robot’s wheels. This makes it easier for him to adapt to changing loads – such as pumping iron (or banana plugs as the case may be). The encoders also help with varying terrain, as [Renee] demonstrates by tilting a board as Eddie drives on it. Eddie’s code is written in C, and available on Github.  Controlling Eddie is as easy as sending simple commands via UDP.

As you might imagine, the Intel Edison still has plenty of cycles left over after computing Eddie’s balance. [Renee] uses some of these with a webcam based teleoperation mode.

Click past the break to see Eddie in action!

Continue reading “EddiePlus, The Edison Based Balancing Robot”

OK Google, Open Sesame

There are a myriad of modern ways to lock and unlock doors. Keypads, Fingerprint scanners, smart card readers, to name just a few. Quite often, adding any of these methods to an old door may require replacing the existing locking mechanism. Donning his Bollé sunglasses allowed [Dheera] to come up with a slightly novel idea to unlock doors without having to change his door latch. Using simple, off the shelf hardware, a Smartwatch, some code crunching and a Google Now app, he was able to yell “OK Google, Open Sesame” at his Android Wear smartwatch to get his apartment  door to open up.

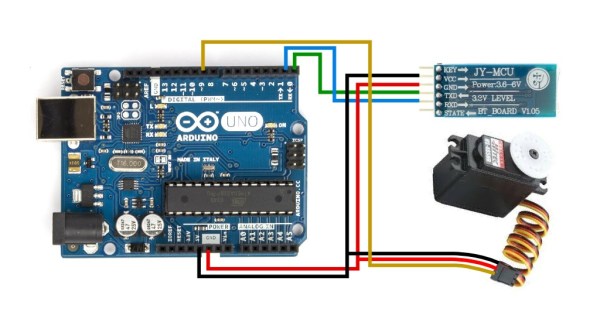
The hardware, in his own words, is trivial. An Arduino, an HC-05 bluetooth module and a servo. The servo is attached to his door latch using simple hardware that looks sourced from the closest hardware store. The code is split in to two parts. The HC-05 listens for a trigger signal, and informs the Arduino over serial. The Arduino in turn activates the servo to open the door. The other part is the Google Now app. Do note that the code, as he clearly points out, is “barebones”. If you really want to implement this technique, it would be wise to add in authentication to prevent all and sundry from opening up your apartment door and stealing your precious funky Sunglasses. Watch a video of how he put it all together after the break. And if you’re interested, here are a few other door lock hacks we’ve featured in the past.

Continue reading “OK Google, Open Sesame”

Retrotechtacular: Step Up And Get Your Transformer Training

Whether you’re just getting into electronics or could use a refresher on some component or phenomenon, it’s hard to beat the training films made by the U.S. military. This 1965 overview of transformers and their operations is another great example of clear and concise instruction, this time by the Air Force.

It opens to a sweeping orchestral piece reminiscent of the I Love Lucy theme. A lone instructor introduces the idea of transformers, their principles, and their applications in what seems to be a single take. We learn that transformers can increase or reduce voltage, stepping it up or down through electromagnetic induction. He moves on to describe transformer action, whereby voltages are increased or decreased depending on the ratio of turns in the primary winding to that of the secondary winding.

He explains that transformer action does not change the energy involved. Whether the turns ratio is 1:2 or 1:10, power remains the same from the primary to the secondary winding. After touching briefly on the coefficient of coupling, he discusses four types of transformers: power, audio, RF, and autotransformers.

Continue reading “Retrotechtacular: Step Up And Get Your Transformer Training”

Controlling Analog with SPI

We Assume Control: SPI And A Digital Potentiometer

In the last video I demonstrated a Universal Active Filter that I could adjust with a dual-gang potentiometer, here I replace the potentiometer with a processor controlled solid-state potentiometer. For those that are too young to remember, we used to say “solid-state” to differentiate between that and something that used vacuum tubes… mostly we meant you could drop it without it breakage.

The most common way to control the everyday peripheral chips available is through use of one of the common Serial Protocols such as I2C and SPI.  In the before-time back when we had only 8 bits and were lucky if 7 of them worked, we used to have to memory map a peripheral or Input/Output (I/O) controller which means we had to take many control and data lines from the microprocessor such as Data, Address, Read/Write, system clocks and several other signals just to write to a couple of control registers buried in a chip.

Nowadays there is a proliferation of microcontrollers that tend to have built-in serial interface capability it is pretty straightforward to control a full range of peripheral functions; digital and analog alike.  Rather than map each peripheral using said data and address lines,which is a very parallel approach,  the controller communicates with peripherals serially using but a handful of signal lines such as serial data and clock. A major task of old system design, mapping of I/O and peripherals, is no longer needed.

Continue reading “We Assume Control: SPI And A Digital Potentiometer”

Fail Of The Week: WinCE Is A Noun And A Verb

A few years ago, [localroger] found some incredible hardware on sale: a very tiny laptop with a seven-inch screen, full keyboard, trackpad, Ethernet, WiFi, USB (with support for a lot of HID devices), and a battery that would last hours. They were on sale for $30 USD, and [localroger] bought four of them. A great deal, you say? These machines ran Windows CE. No, owning a WinCE device is not the Fail of the Week.

Figuring he should do something with these machines, [roger] thought, ‘a clock will do’, and began to figure out how to program or write an app for these things. These tiny netbooks did come with a programming language, JavaScript, in the form of the built-in IE6 web browser. This was actually a really, really good solution – WinCE apps formatted for portrait displays just didn’t work with the ‘widescreen’ laptop, and a hand-coded HTML table is probably the best solution anyone could have hoped for.

These machines – [roger] used three of them over the years as alarm clocks – did their job well, even if NTP had been left out of the OS image. The real fail here comes from buying a $30 WinCE netbook, and using it for something as mission critical as an alarm clock. The displays burned in, the batteries began puffing up, one unit somehow wouldn’t allow IE to run (probably a bad Flash chip), and the trackpad in another one sent the cursor on a random walk. You get what you pay for.

These WinCE netbooks have finally been put out to pasture, hopefully the same one laser printers go to. It’s all for the best, though; [roger] made a much better alarm clock with Nixies.


2013-09-05-Hackaday-Fail-tips-tileFail of the Week is a Hackaday column which runs every now and again. Help keep the fun rolling by writing about your past failures and sending us a link to the story — or sending in links to fail write ups you find in your Internet travels.