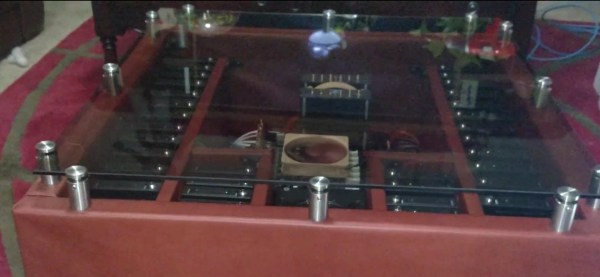
Automatic Laser Level Made From Hard Drive Components?

hard drive laser level

[Crispndry] found he needed a laser level, but didn’t want to spend a few hundred dollars on a tool he might only get a few uses out of… So he decided to build one himself.

If you’re not familiar, a laser level projects a laser beam, level to wherever you put it — it works by having a very precise gimbal assembly that keeps the laser perpendicular to the force of gravity. To build his, [Crispndry] needed a highly precise bearing assembly in order to build his gimbal — what better to use one out of a hard drive?

He used the main bearing from the platter for one axis, and the bearing from the read and write arm for the second axis. A square tube of aluminum filled with MDF is then mounted to the bearings, creating a weighted pendulum. The laser pointer is then attached to this with an adjustment screw for calibration.  Continue reading “Automatic Laser Level Made From Hard Drive Components?”

Cobalt RaQ Retrofit Help Geek Up Your Entertainment Center

cobalt-raq-jukebox

Even network engineers who toil away in hot server rooms (which aren’t actually all that hot because they’re well climate controlled) deserve nice things. That’s why Cobalt came out with these gorgeous front bezels for their rack mounted equipment… around twenty years ago. [Geekmansworld] is reviving the look, but he’s not hiding it away in a server rack. He scrapped the guts and used the front bezel and controls as part of his media server.

His first new addition to the case was a pair of hard drives which connect to an eSATA hub also stored in the enclosure. He buttoned it up and gave it a test run. Everything worked smoothly and he hopes that it will continue that way without overheating when the summer rolls around again.

Of course a dead front bezel is no fun so he cut off the portion of the original circuit board which hosts the buttons seen on the right. These buttons now connect to a U-HID board which turns the button presses into mouse or keyboard inputs using a USB connection. The original display was swapped out for a backlit character LCD. The LEDs to the left are a refit which turns the status indicators into a VU-Meter. See the entire thing at work after the break.

Continue reading “Cobalt RaQ Retrofit Help Geek Up Your Entertainment Center”

Bypassing Seagate ATA Security Lock

Here’s a common story when it comes to password retrieval: guy sets up a PC, and being very security-conscious, puts a password on his Seagate hard drive. Fast forward a few months, and the password is, of course, forgotten. Hard drive gets shuffled around between a few ‘computer experts’ in an attempt to solve the problem, and eventually winds up on [blacklotus89]’s workbench. Here’s how he solved this problem.

What followed is a walk down Hackaday posts from years ago. [blacklotus] originally found one of our posts regarding the ATA password lock on a hard drive. After downloading the required tool, he found it only worked on WD hard drives, and not the Seagate sitting lifeless on his desk. Another Hackaday post proved to be more promising. By accessing the hard drive controller’s serial port, [blacklotus] was able to see the first few lines of the memory and the buffer.

Two hours and two Python scripts later, [blacklotus] was able to dump the contents of his drive. He then took another Seagate drive, locked it, dumped it, and analyzed the data coming from this new locked drive. He found his old password and used the same method to look for the password on the old, previously impenetrable drive. It turns out the password for the old drive was set to ‘0000’, an apparently highly secure password.

In going through a few forums, [blacklotus] found a lot of people asking for help with the same problem, and a lot of replies saying. ‘we don’t know if this hard drive is yours so we can’t help you.’ It appears those code junkies didn’t know how to unlock a hard drive ether, so [blacklotus] put all his tools up on GitHub. Great work, and something that didn’t end up as a Hackaday Fail of the Week as [blacklotus] originally expected.

Build A File Server Inside An Old External Optical Drive Enclosure

This one nearly ended up in today’s Links post, but on second look we think it deserves a feature of its own. [Profezzorn] designed some mounting brackets to house a file server inside of an external drive enclosure. Click on the instructions tab to get a bit more of the story.

The enclosure that he’s using is meant for a 5.25″ optical drive. It comes with a USB to SATA converter which is how he connects the hard drive to the Raspberry Pi serving the files. His mounting system uses the original holes in the enclosure, the threaded holes of the drive, and the holes in the RPi PCB to mount everything with just ten screws. The enclosure included a Molex power connector. He sacrificed an old connector to make a custom cable for the Pi’s power.

Add a portable power supply, do a little work with the Linux configuration, and you could easily turn this into a pirate box.

[Sprite_TM] OHM2013 Talk: Hacking Hard Drive Controller Chips

Even if he hadn’t done any firmware hacking on this hard drive [Sprite_TM’s] digital exploration of the controller is fascinating. He gave a talk at this year’s Observe, Hack, Make (OHM2013) — a non-commercial community run event in the Netherlands and we can’t wait for the video. But all the information on how he hacked into the three-core controller chip is included in his write up.

[Sprite_TM] mentions that you’re not going to find datasheets for the controllers on these drives. He got his foot in the door after finding a JTAG pinout mentioned on a forum post. The image above shows his JTAG hardware which he’s controlling with OpenOCD. This led him to discover that there are three cores inside the controller, each used for a different purpose. The difference between [Sprite_TM’s] work and that of mere mortals is that he has a knack for drawing surprisingly accurate conclusions from meager clues. To see what we mean check out the memory map for the second core which he posted on page 3 of his article.

Using JTAG he was able to inject a jump into the code (along with a filler word to keep the checksum valid) and run his own code. To begin the firmware hacking portion of the project he pulled the flash ROM off of the board and installed it on that little board sticking out on the left. This made it easy for him to backup and reflash the chip. Eventually this let him pull off the same proof of concept as a firmware-only hack (no JTAG necessary). He goes onto detail how an attacker who has root access could flash hacked firmware which compromises data without any indication to they system admin or user. But we also like his suggestion that you should try this out on your broken hard drives to see if you can reuse the controllers for embedded projects. That idea is a ton a fun!

When we were poking around the OHM2013 website (linked above) we noticed that the tickets are sold out; good for them! But if you were still able to buy them they take Bitcoin as one payment option. Are there any other conferences that allow Bitcoin for registration?

Building A Hard Drive Scratch Controller

hard-disk-scratch-controller

If you’re reading this blog then chances are you have a dead hard drive hanging out somewhere in your house. Here’s a weekend project that will put it back into use. [Andreas] took on the popular project which combines a hard drive and optical mouse to build a scratch controller.

The gist of the build is that you use an optical mouse sensor to track the movement of the platter. But [Andreas] made things harder on himself by not using the USB capability of the mouse and mapping it in software for his needs. Instead he plucked the sensor from the mouse, reading it using an Arduino. After much trial and error with the best way to coat the underside of the platter to play nicely with the sensor he managed to get it up and running. The controller issues commands using the MIDI protocol, forming a strong foundation for future upgrades which could lead to a full-blown DJ console hack.

Continue reading “Building A Hard Drive Scratch Controller”

Anachronistic Hard Drive For The Apple II

applefile

Not wanting too many disks lying around his Apple II battlestation, [NeXT] started looking into hard drive solutions. There is the old-time solution – a ProFile hard drive initially designed for the Apple /// and Lisa, but those are rare as hen’s teeth, and just as expensive as newer Compact Flash adapters. [NeXT] had another option – SCSI, with an adapter card, but most of the SCSI devices of the era didn’t fit in with the cool ‘stackable’ aesthetic of AII peripherals.

With a bit of Bondo and some paint, [NeXT] modded an old dual disk drive into a retro-looking hard drive perfect for storing and running hundreds of old games.

[NeXT] began his build by taking an old Apple DuoDisk (the two-disk drive seen above) and Bondoing over the holes in the front. A drive activity light was added above the Apple logo, and the old drives saved for another day. Inside the new enclosure, an old 40MB hard drive, tested on a Macintosh SE/30, was installed along with a small power supply for the drive. With a few custom SCSI cables, the drive will be ready for it’s grand debut. We think it looks awesome just sitting there, and is sure to be the pride of [NeXT]’s collection.