Illustrated Kristina with an IBM Model M keyboard floating between her hands.

Keebin’ With Kristina: The One With The Cutting Board Keyboard

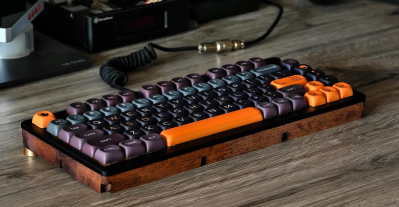
Doesn’t this look fantastic? Hard to believe it, but the base of this keyboard began life as a cutting board, and there’s a gallery to prove it. This is actually [androidbrick]’s second foray into this type of upcycling.

This time, [androidbrick] used a FiiO KB3 and replaced the bottom half of the plastic shell with a hand-routed kitchen cutting board. The battery has been disabled and it works only in wired mode, which is fine with me, because then you get to use a curly cord if you want.

A lovely keyboard built into a kitchen cutting board.
Image by [androidbrick] via reddit
The switches are mostly Gateron EF Currys, though [androidbrick] left some of the original Gateron G Pro 3.0 on the stabilized keys just for comparison. As you might imagine, the overall sound is much deeper with a wooden bottom. You can check out the sound test on YouTube if you’d like, though it’s pretty quiet, so turn it up.

Those keycaps look even nicer from top-down, which you’ll see in the sound test video linked above. Just search ‘JCM MOA GMK’ on Ali and you’ll find them in a bunch of colorways for around $20. Apparently, [androidbrick] was saving them for months, just waiting for this build.

Via reddit

Continue reading “Keebin’ With Kristina: The One With The Cutting Board Keyboard”

Illustrated Kristina with an IBM Model M keyboard floating between her hands.

Keebin’ With Kristina: The One With The Keyboard Configurator

Have you ever wished you could experiment with different layouts super easily, just by adding or removing a few switches here and there and printing a new case? Well, [heyisjambo] says that it’s more than possible with menura, the modular keyboard system.

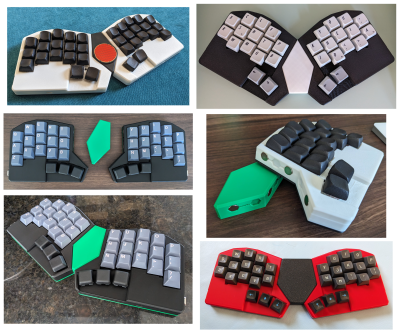
A collage of menura keyboards, which are modular via the VIK standard.
So many lovely options! Image by [heyisjambo] via GitHub
[heyisjambo] is happy with 36 keys, but is reduced-count-curious and wanted a way to explore without a lot of wasted time and PCBs.

At the same time, [heyisjambo] wanted to experiment with split vs. uni-body construction, and especially the different shapes that are possible when tweaking the angle and distance between them.

And as if that weren’t enough, there’s support for [Sadek Baroudi]’s VIK standard for interfacing data between PCBs, which calls for an FPC 12-pin, 0.5 mm pitch connector and allows for ultra-cool magnetic connectors. This way, you can easily add things like displays, trackpads, and trackballs in the between the halves.

Thanks for the tip, [calculus]!

Continue reading “Keebin’ With Kristina: The One With The Keyboard Configurator”

Illustrated Kristina with an IBM Model M keyboard floating between her hands.

Keebin’ With Kristina: The One With All The Espionage

[Ziddy Makes] describes this cute little guy as a biblically-accurate keyboard. For the unfamiliar, that’s a reference to biblically-accurate angels, which have wings (and sometimes eyes) all over the place. They’re usually pretty scary to behold. Don’t say I didn’t warn you.

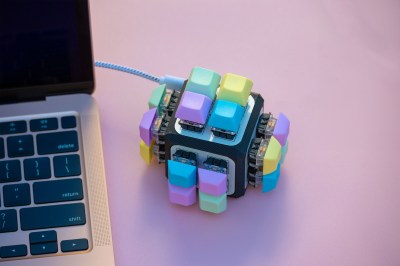
A cube keyboard with adorably vibrant pastel keycaps.
Image by [Ziddy Makes] via GitHub
But this? This is the opposite of scary. Sure, there are keys everywhere. But it’s just so darn adorable. You know what? It’s those keycaps.

This 16-key macro cube uses a Pro Micro and a system of PH2 5p ribbon cables to connect the four four-key sisterboards to the main board. A 3D-printed base holds all the boards in place. Out of all the switches in the world, [Ziddy] chose Otemu Blues. Clack!

Although it may take some getting used to, this seems like it would be a fun way to input macros. I can see the case for putting some rubber feet on the bottom, otherwise it might scoot around on the desk. That might be cute, but only the first couple of times, you know?

Continue reading “Keebin’ With Kristina: The One With All The Espionage”

Illustrated Kristina with an IBM Model M keyboard floating between her hands.

Keebin’ With Kristina: The One With The Music Typewriter

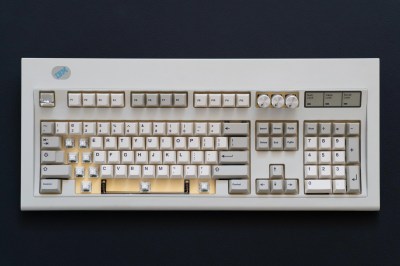
This edition’s community build comes from the Yes They Could, But Should They Have? file. Well, I ultimately say yes, this is intriguing. Redditor [dj_edit] looked at the venerable Model M and thought, this buckling-spring masterpiece can yet be improved upon. Yeah! Well, to each their own. I must say that it does sound great, especially with the solenoid feedback enabled via rotary encoder. Just check out the typing test.

To be clear, this is essentially a new keyboard that fits inside a Model M case, but that alone is quite a feat, especially if you consider the curvature of the backplate. Because of this hurdle, [dj_edit] went with 1 mm FR4 for the switch PCB, which is a nice compromise of sturdiness and flexibility.

Underneath those stunning reproduction keycaps are Kailh box white switches, which are pretty chonky-sounding on their own. But turn on that sweet solenoid action and you really get noisy.

Those box whites are sitting in hot-swap sockets, a design decision that kind of made things difficult because of the curvature. [dj_edit] ended up using an acrylic plate that gets bent to match the curvature by the switches themselves.

Continue reading “Keebin’ With Kristina: The One With The Music Typewriter”

Hackaday Podcast 052: Shorting Components, Printing Typewriter Balls, Taking Minimal Time Lapse, And Building A Makerspace Movie Prop

Hackaday editors Elliot Williams and Mike Szczys recap a great week in hardware hacking. There’s perfection in the air as clever 3D-printing turns a button and LED matrix into an aesthetically awesome home automation display. Take a crash course in RF modulation types to use on your next project. Did you know the DB-9 connector is actually a DE-9? Building your own underwater ROV tether isn’t as simple as it sounds. And Elliot found a treasure trove of zero-ohm jumpers in chip packages — what the heck are these things for?

Take a look at the links below if you want to follow along, and as always tell us what you think about this episode in the comments!

Take a look at the links below if you want to follow along, and as always, tell us what you think about this episode in the comments!

Direct download (60 MB or so.)

Continue reading “Hackaday Podcast 052: Shorting Components, Printing Typewriter Balls, Taking Minimal Time Lapse, And Building A Makerspace Movie Prop”

Can You Help 3D Print A Selectric Ball?

The IBM Selectric changed typewriters as we knew them. Their distinctive ball element replaced the clunky row of typebars and made most people faster typists. When [Steve Malikoff] thought about 3D printing a type ball — colloquially known as a golf ball — it seemed like a great idea.

The problem? It just doesn’t work very well. According to [Steve], it is likely because of the low resolution of the printer. However, it isn’t clear the latitudes of the characters are correct. and there are a few other issues. It is possible that a resin printer would do better and there’s a call for someone out there to try it and report back. We are guessing a finer nozzle and very low layer height might help on an FDM printer.

Judging from the images, it looks like some of the balls do pretty well, but don’t get a full strike at the tilt angle. So it could be something else. However, it does sound like cleaning up the print so it fits is a major problem.

The Selectric was notable for several reasons — you can see an ad for the machine in the video below. The type ball meant you couldn’t jam keys. Since you didn’t have to unjam keys and you had the ribbon in a cartridge, you would have to work really hard to get ink on your fingers, even if you used the cloth ribbon instead of the arguably better carbon film ribbon. The Selectric II could even use a special tape to lift the carbon ribbon off the paper for correcting mistakes. No white-out liquid or fussing with little strips of correction paper. The fact that the ball moves means you don’t have to clear space on the side of the machine for the platen to travel back and forth.

Can you help? If you have a Selectric I or II and a high-quality printer, this would be a fun project to try and report back your results to [Steve]. If you are familiar with the later issue typeballs, you might not have seen the wire clip that [Steve] uses to hold the ball in place. However, you can see them in the video ad below. More modern balls use a plastic lever that acts as a handle so even with cloth ribbons you have less chance of getting ink on your hands.

Although there were Selectrics meant to interface with a computer, you can refit any of them to do it with some work. The Selectric also has a role in one of the great techno spy stories of all time: The GUNMAN project.

Continue reading “Can You Help 3D Print A Selectric Ball?”

Retrotechtacular: Cold War-Era Hardware Keyloggers

As Cold War tensions increased throughout the 1970s, the Soviets pulled out all the stops when it came to digging up information from US diplomats. This NSA memo from 2012 explains how several IBM Selectric typewriters used in the Moscow and Leningrad offices were successfully bugged with electromechanical devices that could possibly have been the world’s first keyloggers.

The Selectric prints with a ball that is spun and tilted to select the desired character. Two mechanical arms control the ball’s spin and tilt, and the keylogger read out the position of those arms. Thus, each character on the Selectric’s type element ball has its own signature. The sensing part of the keylogging mechanism was buried in part of the typewriter chassis, a metal bar that spans the width of the machine, and were so well hidden that they could only have been detected by complete dissassembly or x-ray.

Continue reading “Retrotechtacular: Cold War-Era Hardware Keyloggers”