The CC3200 dev board with Energia

Energia On The CC3200

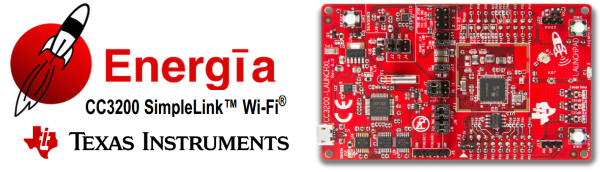
If you’re looking to connect things to the internet, with the goal of building some sort of “Internet of Things,” the new CC3200 chip from TI is an interesting option. Now you can get started quickly with the Energia development environment for the CC3200.

We discussed the CC3200 previously on Hackaday. The chip gives you an ARM Cortex M4 processor with a built-in WiFi stack and radio. It supports things like web servers and SSL out of the box.

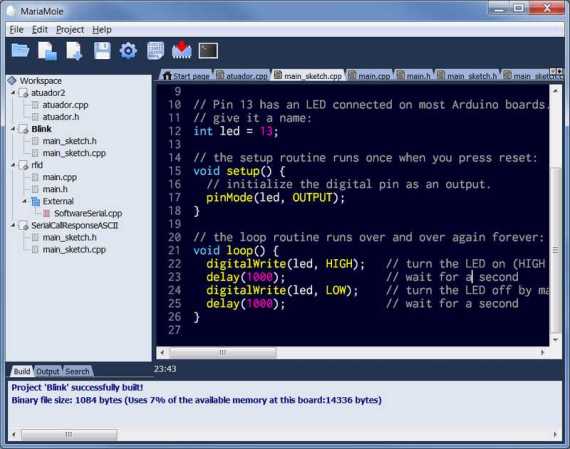
Energia is an Arduino-like development environment for TI chips. It makes writing firmware for these devices easier, since a lot of the work is already done. The collection of libraries aids in getting prototypes running quickly. You can even debug Energia sketches using TI’s fully featured IDE.

With this new release of Energia, the existing Energia WiFi library supports the built-in WiFi radio on the CC3200. This should make prototyping of WiFi devices easier, and cheaper since the CC3200 Launchpad retails for $30.

THP Entry: A Wireless Bootloaders And Linux Build Systems

radioWith The Hackaday Prize, you’re not just limited to one entry. Of course it would be better to devote your time and efforts to only one project if you’re competing for a trip to space, but if you’re [Necromant], you might be working on two highly related project that are both good enough for The Hackaday Prize

[Necromant]’s first project is rf24boot, an over-the-air bootloader using the very cheap and very popular NRF24L01 2.4GHz wireless module. There have been many, many projects that add wireless bootloading to microcontrollers using XBees and the NRF24, but [Necromant] is doing something different with this project: he’s building in support for a wide variety of microcontrollers, that include the STM32, MSP430, PIC32, 8051, and of course AVR chips for that ever so popular Arduino compatibility.

The support of multiple microcontroller platforms is a result of [Necromant]’s other entry to The Hackaday Prize, Antares, the Linux kernel-like build system for microcontrollers. The idea behind Antares is to separate the writing of code from microcontrollers away from compiling and burning. Think of it as a giant makefile on steroids that works with everything, that also includes a few libraries for common projects.

Supported platforms for Antares include the popular aforementioned targets, and allow you to use any IDE you could possibly desire. emacs? Sure. Eclipse? Right on. Arduino? You’re a masochist. For a really great overview of Antares you can check out the Readme, or the post we did a year or so ago.

It’s all very cool stuff, and very easy to see the potential of what [Necromant]’s working on. Combining the two together, it’s almost a complete system for developing that Internet of Things we’ve been hearing about – uploading code to simple AVRs for simple sensors, and deploying significantly more complex code for your ARM-powered dishwasher or microwave.

Video: Getting Your Feet Wet With Programmable System On Chip

Ever since I received my PSOC 4 Pioneer kit from Cypress I have wanted to play with this little mixed-signal Programmable System-on-Chip (PSOC) developer board. I love developer boards, providing that they are priced in a way to entice me to not only open my wallet but also make time in a busy schedule. I think my kit was free after winning a swag bag from Adafruit that they themselves obtained at the Open Hardware Summit and gave away on their weekly streamcast. Ultimately it was the invitation to beta test datasheet.net which also was included in that pile of swag that led to my getting involved with Hackaday.

What is Programmable System On Chip?

So what is a PSOC 4? A quick summary is that it’s based on an ARM Cortex reduced instruction set processor (RISC) and is somewhat capable of supporting shields based on the Arduino footprint, and it also uses a bright red PCB that I have come to associate with a Sparkfun PCB. What doesn’t show is the fact that this programmable system on chip has programmable analog function blocks in addition to programmable digital logic blocks. There is also some supporting input/output circuitry such as a multicolored LED and a capacitive touch sensor directly on the PCB.

Pioneer 4 Development Kit
PSCO4 Development Board on Hackaday

This is an intriguing amount of programmability, so much so that Newark/Element 14 highlighted a “100 projects in 100 days” event on it.

Enter the IDE

Over the years I have had to create or install many Integrated Development Environments (IDE) that linked hardware to software. Knowing that you had to, and how to, implement an IDE was part of being an engineer. Nowadays with the Arduino type environment the user has an IDE pretty much as soon as they click on the executable which I find to be one of the best aspects of the genre. It was so quick in fact that I was able to get my teenaged son into writing his first program even before he remembered to do massive eye-rolls and make sounds of utter disdain. He did give up however, just shy of learning how to have the Arduino make sounds of disdain on his behalf.

PSCo4 Cypress Development Kit on Hackaday
Closeup of a Programmable System on Chip Development System

Continue reading “Video: Getting Your Feet Wet With Programmable System On Chip”

Sublime Text As An Arduino IDE

If you’ve played with an Arduino, you’ve probably been frustrated by the IDE. It works, but it’s not the best editor. It’s especially painful for bigger files and larger projects. The Stino plugin for Sublime Text aims to solve this issue by bringing the full functionality of the Arduino IDE to the Sublime Text editor.

Sublime Text is a powerful text editor with support for most programming languages. What it’s missing is support for compiling and uploading code to an Arduino. Stino bridges that gap. Sublime is a commercial product, and retails for $70 USD. However Sublime does have an indefinite trial period, so Stino can be evaluated for free. Stino itself is an open source plugin written in Python, and you can contribute to the project on Github.

After installing Sublime and Stino, you point the plugin at an Arduino install folder. It then allows you to build and flash directly from the editor. For anyone who’s been frustrated with the Arduino IDE, this looks like a slick solution.

[Thanks to Matt for the tip!]

How To Configure Eclipse For The Stellaris Launchpad

eclipse-for-stellaris-launchpad

We’re partial to using gedit and a makefile for our AVR projects. But for the most part we don’t a debugger with those smaller chips. Now that we’re getting going with ARM processors we use debugging all the time and Eclipse is a great way to combine code writing, compiling, and debugging in one place. Sure, we could use one of TI’s provided IDEs (some of them are based on Eclipse), but we’d rather build our tools up ourselves. [Doragasu] is making this a snap with his Eclipse for Stellaris Launchpad tutorial.

He illustrates every step with a screenshot like the one seen above. Here he is including the driverlib from StellarisWare in the linking step. After all of the compiler and linker settings are just right all you need to do is make a copy of the template to start a new project. The final part of the setup configures lm4flash to write binaries to the chip, and configures OpenOCD for use when debugging.

[via Comments]

MariaMole – An Alternate Arduino IDE Aimed At Advanced Users

[Alex] has been working with Arduino for some time now, but always thought it lacked some features which advanced users would really find useful. He decided to devote some free time to fixing the problem and ended up coding an Arduino IDE for more advanced users. A screenshot of his work — called MariaMole — can be seen above. It is obviously different from the standard IDE, bot not so much as to scare off new users.

This is meant to complement the original IDE, so it actually uses those configuration settings as dependencies. Once running, the program allows you to have multiple projects open at once. These are managed with the tree in the left hand column and a series of tabs along the top of the code window. When it comes time to compile and load the sketch you can click one button like normal, or use the program to fine tune your compiler flags, libraries includes, and the like. It also allows for interaction through one or more serial terminal windows. We haven’t tried it ourselves, so please leave a comment with your thoughts after having given it a go.

thanks for the tip [Rodrigo].

Web IDE For The Raspi

For this month’s release of Adafruit’s Raspberry Pi Linux distribution, [Limor], et al. decided to build a web-based IDE for the Raspberry Pi.

The Raspberry Pi WebIDE is a web server that runs on the Raspi. By connecting to your raspi in a web browser, you’re able to create your own Python programs that are able to interact with the GPIO pins. All the code is stored in the cloud with the help of bitbucket.

The WebIDE is in its early Alpha stage right now; there are a few bugs and minor issues, but in the video after the break, [Limor] shows us it’s possible to push code to a Raspi through the Internet and view the result in a web-based serial terminal.

For fear of editorializing, we have to point out that Adafruit’s web IDE – along with other Arduino web IDEs such as Codebender and the Wifino – work on the cloud. If you’re planning a long-term project that relies on a web-based IDE, you might be in for a world of hurt if only because you can’t host a cloud on a personal server. We’d love to see a package that allows us to have the same functionality as bitbucket on a personal server. If you can find a project that does something similar, or have written your own, send it in and we’ll spread the word.

Continue reading “Web IDE For The Raspi”