Smart Watch Hack Lets You Use Your 3.5mm Headphones With An IPhone 7

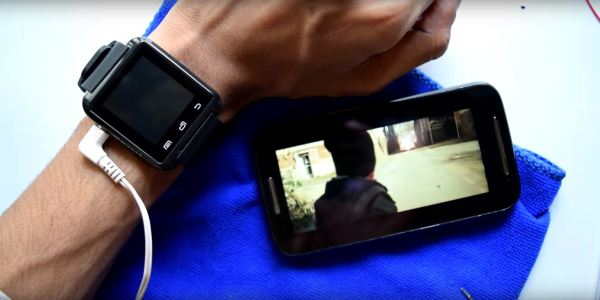
As you may have heard, the iPhone 7 is ditching the 3.5 mm headphone jack in the name of progress and courage. Whatever your take on that, it leaves the end user out in the cold if — for instance — their preferred headphones still use the old format. Here to save you from an untimely upgrade is YouTuber [Kedar Nimbalkar], who has modified a Bluetooth Smartwatch to incorporate a 3.5 mm jack to allow continued use your current headphones.

After opening up the smartwatch [Nimbalkar] removes the speaker, solders in a 3.5 mm headphone jack and clips out an opening in the watch’s case that maintains the watch’s sleek exterior.

Continue reading “Smart Watch Hack Lets You Use Your 3.5mm Headphones With An IPhone 7”

Ask Hackaday: Does Apple Know Jack About Headphones?

If you’ve watched the tech news these last few months, you probably have noticed the rumors that Apple is expected to dump the headphone jack on the upcoming iPhone 7. They’re not alone either. On the Android side, Motorola has announced the Moto Z will not have a jack. Chinese manufacturer LeEco has introduced several new phones sans phone jack. So what does this mean for all of us?

This isn’t the first time a cell phone company has tried to design out the headphone jack. Anyone remember HTC’s extUSB, which was used on the Android G1? Nokia tried it with their POP Port. Sony Ericsson’s attempt was the FastPort. Samsung tried a dizzying array of multi-pin connectors. HP/Palm used a magnetic adapter on their Veer. Apple themselves tried to reinvent the headphone jack by recessing it in the original iPhone, breaking compatibility with most of the offerings on the market. All of these manufacturers eventually went with the tried and true ⅛” headphone jack. Many of these connectors were switched over during an odd time in history where Bluetooth was overtaking wired “hands-free kits”, and phones were gaining the ability to play mp3 files.

Continue reading “Ask Hackaday: Does Apple Know Jack About Headphones?”

Developed On Hackaday : HaDge Update – It’s A HACK

Work on HaDge – the Hackaday con badge, continues in bits and spurts, and we’ve had some good progress in recent weeks. HaDge will be one conference badge to use at all conferences, capable of communicating between badges.

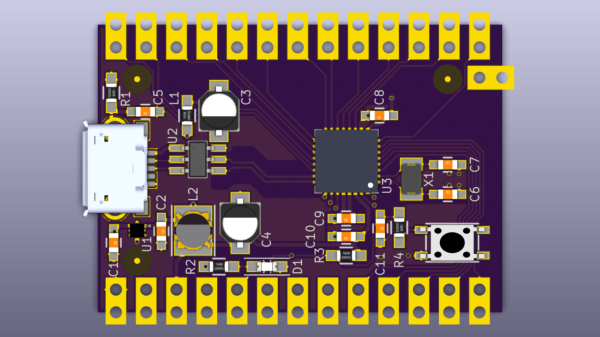
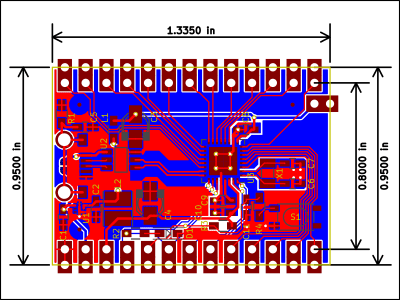
Picking up from where we left off last time, we had agreed to base it around the Atmel D21, a 32-bit ARM Cortex M0+ processor. To get some prototype boards built to help with software development, we decided to finish designing the HACK before tackling HaDge. HACK is a project that [Michele Perla] started that we have sort of assimilated to act as the prototyping platform for HaDge. We wanted a compact micro-controller board and hence opted for the SAM D21E – a 32 pin package with 26 IO’s.

[Michele Perla] had earlier designed HACK based on the larger 32 pin SAM D21G and used Eagle to hack-brddraw the schematic and layout. Using the Eagle to KiCad script, he quickly converted the project and got on to making the board layout. I took up the rear guard, and worked on making his schematic (pdf) “pretty” and building up a schematic library of symbols. While [Michele] finished off the board layout, I worked on collecting STEP models for the various footprints we would be using, most of which I could get via 3dcontentcentral.com. The few I couldn’t were built from scratch using FreeCAD. The STEP models were converted to VRML using FreeCAD. Using [Maurice]’s KiCad Stepup script, we were able to obtain a complete STEP model of the HACK board.

HACK is now ready to go for board fabrication and assembly. We plan to get about 20 boards made and hand them out to developers for working on the software. The GitHub repository has all the current files for those who’d like to take a look – it includes the KiCad source files, PDFs, gerbers, data sheets and images. The board will be breadboard compatible and also have castellated pads to allow it to be soldered directly as a module. Let us know via group messaging on the HACK project page if you’d like to get involved with either the software or hardware development of HaDge.

In a forthcoming post, we’ll put out ideas on how we plan to take forward HaDge now that HACK is complete. Stay tuned.

Developed On Hackaday – HaDge Is Back To The Drawing Board

A couple of days back, we wrote about the HACK – a prototyping platform designed by [Michele Perla] based on the Atmel SAM R21 MCU. It’s one of the new breed of devices consisting of an ARM Cortex-M0 MCU + IEEE 802.15.4 Wireless radio bundled together. This was exciting since we could pack a lot of punch in the HaDge hardware. We planned to use the same design later to power the HaDge. Building HACK would have allowed us to get it in the hands of the software team, while the hardware folks worked on the real HaDge layout.

The HACK design was ready for review and we asked around to verify the antenna layout, which was the part we were not too sure about.  We asked Atmel for help with verifying the layout. That’s when we had the facepalm moment. They asked us – “What about FCC certification?” Since we plan to build the badges in quantities of a few hundred at the very least, it’s obvious we cannot escape from FCC certification. A design based around the R21 is ruled out – the cost of obtaining approval is pretty high. This means we need to punt the R21 and instead use an off-the-shelf radio module which is already FCC certified. Sigh.

Now the good news. This is a setback in terms of time, and effort put in by [Michele]. But beyond that, we’re good to go back to the drawing board and start afresh. First off, we decided to revert back to the Atmel D21 as the main controller. It’s a fairly decent MCU, and there’s a fairly robust tool chain available that a lot of people are familiar with. For the Radio, we are looking at some of these available options :

The last one from Microchip looks quite promising. But we’re open for better and cheaper suggestions, so please chime in with your comments.

Developed On Hackaday – It’s A Badge. No, It’s The HaDge

Sometime back, we announced start of a new project under the “Developed on Hackaday” series – a Badge for the Hackaday community. At its core, this badge is a single node in an Internet of Badges. At every event this badge is deployed at, a Hackaday Sub-Etha mesh network will be created, and each badge will be able to transmit and receive messages from other badge wearers. There are plans for an Sub-Etha to Internet gateway, so even if badge wearers are on the other side of the world, they’re still connected through the HaDge network.

Things have been moving along quickly, so I thought of doing a quick round-up and share progress with the community. First off, it has a name. HaDge, as in HackaDay Badge. Our objectives up until now were to set up a team, name the project, set up repositories and lock down on a working bill of materials. Within a few weeks, we’ve got all of that tied down. The HaDge group chat channel has been super active, and everyone’s been pitching in with ideas and suggestions. A spreadsheet seemed like a good idea – it let everyone add in their suggestions regarding candidate parts, create a feature list and then talk about it on the channel.

We realized early on that building the hardware is going to take some time. So in the interim, we need a dev kit platform to get in to the hands of the software developers so they can start working on the smarts that will power the HaDge. [Michele Perla] had already built JACK (Just another Cortex kit) – a development kit powered by the Atmel SAM D21. It’s pretty bare bone with just the bare minimum of parts to make it work while keeping an eye on reliability. The microcontroller+radio on the HaDge is the Atmel SAM R21 – a close relative of the D21, so it made sense to respin the JACK and create HACK (Hackaday Cortex kit) – a development kit powered by the Atmel SAM R21 that is going to be used as the core of the HaDge. [Michele] has worked hard single-handedly to complete the design and it is now ready to go for PCB fabrication soon. We are just awaiting some feedback and review of the Antenna part of the design. None of us on the hardware team have a strong RF-fu so we don’t want to make an avoidable mistake. If you’d like to review and help vet the HACK design, grab the design files from the github repo and let us know.

Once HACK board layout is cleared for fabrication, we’ll work on building kits that can be sent out to the software folks. We will also be working on porting the HACK design in to KiCad and this is something I have already stared work on. I started by using the neat Eagle2KiCad conversion tool by [LachlanA]. It’s not perfect, but it does reduce the work involved in porting over from Eagle to Kicad. Once that is done, hardware development for the actual HaDge will see some progress – keep a watch on the project page.

Off Road Jack

Lift Kits For Car Jacks Do Exist

When needing to change a tire or work under our vehicles we humans reach for a trusty jack. The standard jack in your trunk or mounted behind the seat of your truck works fine 99% of the time. But what happens when the vehicle in need of repair has a lifted suspension, raising the frame in relation to the ground and making the stock jack now too short?

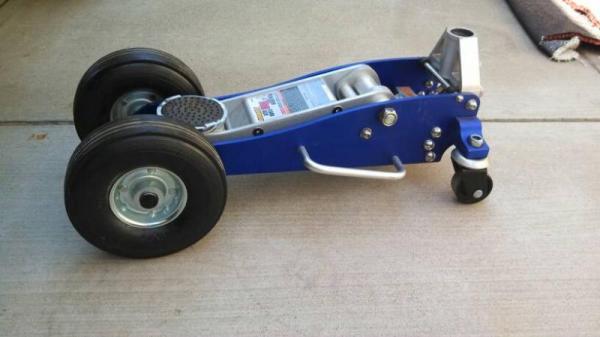
Off-Road enthusiast [am4x4] had that problem and came up with a neat solution. He made a lift kit for a roll-around mechanics jack! He started with a 1.5 ton jack from Harbor Freight. This jack had 2 small casters in the rear and one wide roller in the front. This combination works great on concrete but [am4x4] needed this to work out in the dirt so a few mods were in order.

First the front roller was scrapped and replaced by two large 8 inch diameter tires. To get these to fit the bolt holes for the roller were enlarged to the same diameter as the wheel bearings. A new solid axle was then made from 5/8 inch solid rod. Those may look like pneumatic tires but they are actually solid rubber and only cost $6 each, also from Harbor Freight. These tires not only raise the jack up several inches but also increase the surface area contacting the ground. This better distributes the weight of the vehicle and prevents the jack from pushing itself into the ground.

In the back, the small stock casters were removed and replaced with larger, heavier duty ones. Even with the larger casters, the jack leans rearward. [am4x4] plans on making an extension to level the jack out but for now, it works well and is definitely a conversation piece at the off-road get togethers.

Hacked Auxiliary Port For A Car Stereo

hacked-auxiliary-port-car-stereo
We’re not sure if [Apachem25] is just lucky, or if installing Auxiliary ports on most car stereos is this easy. The dealership wanted $95 to put one in, but he managed to add a 3.5mm audio-in port to his car stereo for just a couple of bucks.

The connector on the back of his head unit is a 2×4 set of pins recessed in a protective plastic ring. It turns out that the audio connector cable for a PC CD-ROM drive has a 1×4 socket that is perfect for this. [Apachem25] simply clipped one of those cables in half and used both ends to interface with the Aux port. He found the pin-out for his particular model on the Internet. He needed a specific resistance value between two of the pins to get the deck to let him use the input. All that he needed was a quick bit of soldering. The left, right, and ground are brought around the side and soldered to an audio jack he added in the face plate of the unit.

If you’re still rockin’ the cassette deck our favorite automotive Bluetooth solution is still this one for a classic Beetle.

[via Reddit]