Repairing Flex Circuits By Accident

A while ago, [drygol] was asked to repair a few old Amiga keyboards. The key switches worked fine, but in the past decade or two, the flexible PCB ribbon connector has been mistreated, and was in an unworkable, nonfunctional state. The fragile traces underneath the green epoxy coating were giving way, but [drygol] found a few cool ways to repair these flex cables.

The end of this keyboard cable was beyond repair, but the Commodore engineers were gracious enough to leave a bit of slack in this keyboard connector. After cutting off the most damaged section, [drygol] had a strip of plastic, a few copper traces, and a green coating that had to be removed. The first attempt to remove this green covering used methanol, but that didn’t work. The next chemical attempt was with an epoxy solvent that contained nasty chemicals. This was applied to the end of the flex cable, with the remainder of the cable masked off by Kapton. It worked remarkably well.

In removing the Kapton masking tape, [drygol] discovered this green film sticks better to Kapton than it does to copper and plastic. A mechanical solution was found, allowing these keyboard cables to be easily repaired.

Of course, this was only half of the problems with these flexible circuits. Over the years, a few cracks appeared in the traces. To repair these broken traces, [drygol] turned to silver glue and a few laminations of Kapton to make this keyboard cable whole again. It worked, and the ancient keyboard was returned to service. Great work, and a fantastic observation for anyone with one of these keyboards sitting around: just grab a roll of Kapton to repair these circuits. It can’t get any easier than that.

One-Off Kapton Solder Masks

soldermask

With the proliferation of desktop routers, and a number of easy methods to create PCBs at home, there’s no reason anyone should ever have to buy a pre-made breakout board ever again. The traditional techniques only give you a copper layer, however, and if you want a somewhat more durable PCB, you’ll have figure out some way to create a solder mask on your homebrew PCBs. [Chris] figured Kapton tape would make a reasonable soldermask, and documented the process of creating one with a laser cutter over on the Projects site.

The solder mask itself is cut from a piece of Kapton tape, something that should be found in any reasonably well-stocked tinkerer’s toolbox. The software for [Chris]’ laser cutter, a Universal Laser Systems model, already has a setting for mylar film that came in handy for the Kapton tape,

Of course, getting the correct shapes and dimensions for the laser to cut required a bit of fooling around in Eagle and Corel Draw. The area the laser should cut was taken from the tCream and tStop layers in Eagle with a 1 mil pullback from the edges of the pads. This was exported to an .EPS file, opened in Corel Draw, and turned into a line art drawing for the laser cutter.

The result is a fast and easy solder mask that should be very durable. While it’s probably not as durable as the UV curing paints used in real PCBs, Kapton will be more than sufficient for a few prototypes before spinning a real board.

Making PLA Stick To A 3D Printer Build Platform By Using Hairspray Or An Acetone ABS Slurry

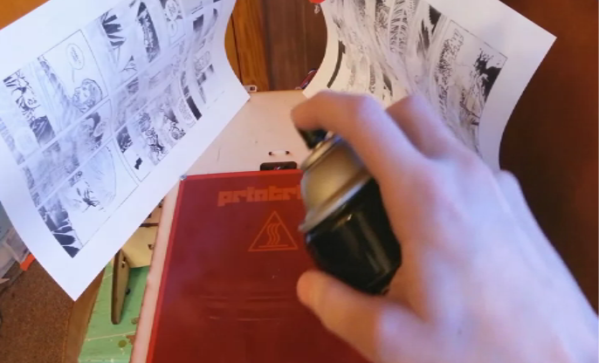
[Chris] has been having some real problems getting PLA to stick to the build platform of his Printrbot. This is of course not limited to this brand of printers, and affects all extruder-based hardware using the PLA as a source material. He came up with a couple of ways to fix the problem.

The first is something we’re quite familiar with. The image above shows [Chris] applying a thin layer of hairspray to the platform. This is a technique the we use with our own 3D printer. The sheets of paper are used as a mask to help keep the sticky stuff off of the threaded rod. For more info on the hairspray trick [Chris] recommends that you read this article.

The second technique uses a slurry made from saturating a bottle of acetone with ABS leftovers. In the clip after the break he shows off a glass jar of the solvent with scraps from past print jobs hanging out inside. After a couple of days like that it’s ready to use. He takes a paper towel, wets it with the solution, and wipes on a very small amount. He does mention that this will eventually eat through the Kapton tape so apply it rarely and sparingly.

Continue reading “Making PLA Stick To A 3D Printer Build Platform By Using Hairspray Or An Acetone ABS Slurry”

How To Populate A Surface Mount PCB

Reflow_08

Let’s face it friends, everything is moving toward surface mount components. We’ve seen quite a few features here that cover using stencils to populate boards and using ovens to reflow. [Oleg] has put together a tutorial on the process he uses to populate and reflow his own boards.

[Oleg] is the creator of the USB Isolator and therefore has a need to frequently populate the same board. He’s using an acrylic frame that fits the PCB perfectly to hold it in place so that paste and be applied right up to the edges of the board. He ordered a laser cut Kapton stencil for applying the solder. The paste is squeegeed into the stencil holes, the stencil is removed, and parts are placed with tweezers and a steady hand. For the final step, the boards go into an old toaster oven for reflow.

[Oleg] uses temperature marker on his boards to monitor the progress of the reflow. This marker is basically a crayon that begins to melt at a specific temperature. When the board has cooled, the melted mark can be scraped away or removed with alcohol.

Of course this is only really useful if you have a bunch of high-quality boards to populate. But with the relatively low cost of getting professionally made boards we think the need for this type of assembly process is on the rise.