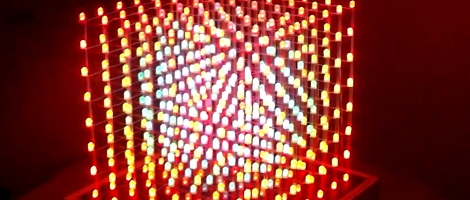
Flowerboard LED Cube

Here’s a neat 4x4x4 LED cube made with an ElecFreaks Flower Protoboard.

A few days ago, we posted a neat new prototyping board made specifically for SMD work. Instead of the usual ‘holes-with-circles’ protoboard layout, the ElecFreaks team decided to go with a flower-shaped pad. This makes it especially easy to deal with SMD components when building whatever. To demonstrate their new protoboard, ElecFreaks built an awesome-looking 4^3 LED cube. Just look at those solder traces.

The LED cube itself is nothing we haven’t seen before, but the construction of this thing is amazing. The entire build is on the Arduino Mega Flower shield, meaning there are no wires at all. Everything, from the resistors to the transistors, is an SMD component. The only problem now is bending and soldering all those LED leads.

This Flower Protoboard is starting to look more and more interesting; check it out in action after the break.

Continue reading “Flowerboard LED Cube”

Voxel Shield Makes Driving LED Cubes Easy

voxel_shield_led_cube

An Arduino can handle running a small LED cube on its own, but if you’re planning on building something big, eventually you are going to run out of pins. For something like an 8x8x8 cube, odds are you will have to turn to shift registers to get the job done. While you could design a breakout board full of shift registers on your own, [Connor] has done the work for you and produced an easy to use Arduino LED cube shield.

He calls his creation the Voxel Shield, and it incorporates 9 SN74LS595N shift registers and an external power plug for all of your LED cube needs. The shield can handle addressing up to 512 LEDs, making it an easy way to drive an 8x8x8 cube or even a 64×8 LED matrix.

It’s a nice clean and compact way to drive a large number of LEDs, so if you have the need, be sure to swing by his site – he has made his schematics and board layout files available to all comers.

[Thanks, Thomas]

ATtiny Hacks: ATtiny-controlled 4x4x4 LED Cube Has A Unique Design

ATtiny Hacks Theme Banner

simple_attiny_led_cube_charlieplexing

[Tom] recently started experimenting with Charlieplexing, and wrote in to share the 4x4x4 cube he built with an ATtiny24. Similar to this minimalist 4x4x4 LED cube we featured the other day, [Tom’s] version attempts to use the least pins possible to drive the LEDs, but in a different manner.

[Tom] didn’t want to sacrifice brightness, so he decided that the LEDs would have a 1/8 duty cycle. The problem is that the ATtiny’s I/O ports can’t support that kind of current so he needed a different means of driving the LEDs. Rather than employ any sort of shift register to control the LEDs, he opted to exclusively use transistors as he had done in previous projects.

For his Charlieplexed cube to use a total of 9 I/O pins he had to get creative with his design. He broke each level of the structure into two non-connected groups of LEDs, utilizing diagonal interconnects to get everything wired up properly.

It seems to work quite nicely as you can see in the video below. While it uses two more I/O lines than the other ATtiny cube we featured recently, we love the simple, shift register-less design.

Continue reading “ATtiny Hacks: ATtiny-controlled 4x4x4 LED Cube Has A Unique Design”

ATtiny Hacks: 2313 Driving A 4x4x4 LED Cube

ATtiny Hacks Theme Banner

[Kirill] wrote in to share his ATtiny hack, a 4x4x LED cube. The 64 LED display is a great choice to fully utilize the hardware he chose. It’s multiplexed by level. Each of the four levels are wired with common cathodes, switched by a 2N3904 transistor. The anodes are driven by two 595 shift registers, providing a total of 16 addressable pins which matches the 4×4 grid perfectly. All said and done it only takes seven of the ATtiny2313’s pins to drive the display. This is one pin more than the chip’s smaller cousins like the ATtiny85 can provide. But, this chip does include a UART which means the project could potentially be modified to receive animation instructions from a computer or other device.

You may have noticed the USB port in the image above. This is serving as a source for regulated power in lieu of having its own voltage regulation hardware and is not used for data at all. Check out the animations that [Kirill] uses on the display by watching the video after the break. You’ll find a link to the source code there as well.

Continue reading “ATtiny Hacks: 2313 Driving A 4x4x4 LED Cube”

Largest LED Cube We’ve Ever Seen Is Still Only Half Complete

[Brendan Vercoelen] is a university student in New Zealand studying engineering. He says his recent gigantic LED cube build, “isn’t very serious” compared to other student projects, but that doesn’t mean it’s not impressive. The original plan for the build was a 16x16x16 tri-color LED cube. After realizing how much soldering that really was, [Brendan] scaled back his design a little to a 16x16x8 cubeoid, but the other half can be attached when the project is complete.

From the cost breakdown, [Brendan] only spent about $550 USD – far less expensive than we expected. The most expensive item was the 4,000+ Red-Green-Orange tri-color LEDs. The largest LED cubes (1, 2, 3) we’ve covered have maxed out at 8x8x8, or 512 total LEDS. Even though [Brendan]’s build is only half done, it’s still four times larger in volume than the largest LED cube we’ve seen.

The gauntlet has been thrown down. This is the one to beat, folks. Check out a video of the cube after the break.

Continue reading “Largest LED Cube We’ve Ever Seen Is Still Only Half Complete”

Using An LED Cube As An Audio Visualizer

[Isaac] sent in his mashup build of a LED cube combined with a graphic EQ meter. The build is fairly simple and from the video we can tell that his build would be a great installation in a dubstep venue. While it’s not the 9x9x9 cube possible with some judicious coding we think it’s a very fitting display for the intended purpose.

Continue reading “Using An LED Cube As An Audio Visualizer”