Make Your Own Custom Hot Glue Sticks

Hot glue guns can be very handy tools for bonding all sorts of surfaces, while getting you accustomed to plastic burns. The one thing they lack though is color, and while yes, you can on occasion find colored glue sticks, there is usually only a limited selection and they cost way more than the normal amber or clear sticks.

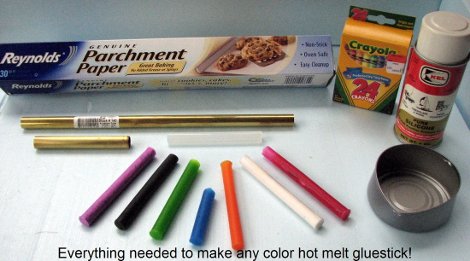
[Ken] solves the blandness problem of hot glue sticks in his kitchen, as shown in this cool slideshow. In a melt and recast process, glue sticks and crayons in a 3:1 ratio are slowly heated on an electric stove in a old can. Metal tubing is lined with silicone parchment paper to act as a release agent. The now vivid and scalding hot glue is poured into the tube and left to cool.

You might be wondering how mixing colored wax into ethylene-vinyl acetate effects the glue’s strength . According to the author if you need  decrease the mix viscosity, you can add up to 10% paraffin wax by weight without effecting the bond strength. Color and viscosity control? Hot glue just keeps getting better!

Largest LED Cube We’ve Ever Seen Is Still Only Half Complete

[Brendan Vercoelen] is a university student in New Zealand studying engineering. He says his recent gigantic LED cube build, “isn’t very serious” compared to other student projects, but that doesn’t mean it’s not impressive. The original plan for the build was a 16x16x16 tri-color LED cube. After realizing how much soldering that really was, [Brendan] scaled back his design a little to a 16x16x8 cubeoid, but the other half can be attached when the project is complete.

From the cost breakdown, [Brendan] only spent about $550 USD – far less expensive than we expected. The most expensive item was the 4,000+ Red-Green-Orange tri-color LEDs. The largest LED cubes (1, 2, 3) we’ve covered have maxed out at 8x8x8, or 512 total LEDS. Even though [Brendan]’s build is only half done, it’s still four times larger in volume than the largest LED cube we’ve seen.

The gauntlet has been thrown down. This is the one to beat, folks. Check out a video of the cube after the break.

Continue reading “Largest LED Cube We’ve Ever Seen Is Still Only Half Complete”

Automated Aquarium Chemical Dispenser Is Extremely Precise

precision_doser_nano_doser_espresso_pump

[Robovergne] prides himself on the beautiful reef aquarium that he has set up in his home. These sorts of water displays require constant maintenance due to the mineral requirements of living coral. Rather than add mineral solutions manually, he decided to build a nano-doser using espresso machine pumps (Google Translation).

These vibration pumps run on mains voltage, so he had several options as far as how to control them. Using relays would likely make things pretty noisy, so he chose to use a zero crossing detection circuit to precisely control the pumps’ duty cycles and output.

His setup uses a PIC to control everything from the zero crossing circuit to the display LCD. An amount of product and the distribution time frame are entered using a handful of buttons mounted on the front of his control box, leaving the PIC to do the heavy lifting. It will calculate the proper length of time to run the pump based on several factors, including fluid viscosity and height of release.

It really is an impressive system, and while his needs are very precise, we imagine this sort of setup would be quite useful in building less complicated dispensers, such as those found in an automated bar.

Continue reading to see a few videos of his Nano-doser in action.

Continue reading “Automated Aquarium Chemical Dispenser Is Extremely Precise”

Eye See You.

So you want to add animated eyes to your next robot? Now you can.. Using ping-pong balls, some scrap plastic and 6 servo motors [Chris] has created these animatronic eyes along with some nifty animated eyebrows. To get motion emulating realism [Chris] created a 2 axis gimbal using plastic rings and some nuts and bolts. The eyes (ping-pong balls) are held in the gimbal and actuated using two servos each. The eyebrows use another pair of servos and some tubing covered in electrical tape as the actual eyebrow.

[Chris] Kindly goes through the entire build process including information for beginners such as servo motor control. The whole thing is controlled using a PIC 18F452 and circuit diagrams and code are all available on the site. Check out the video after the break to see the eyes in action, you will also find more videos describing the build process if you follow through the tutorial.

Continue reading “Eye See You.”

Build Your Own Class AB Audio Amplifier

[Dino Segovis] wrote in to tell us about his “hack”, making an AB Audio Amplifier. The advantage of this particular amp is that the transistors never turn off, which would cause distortion. A full schematic is given in the article as well as a parts list. A complete “bill of materials” makes any circuit building project easier, especially for the beginner.

Although this is by no means a new circuit design, (a similar setup is used in car audio equipment) [Dino] does a great job of explaining how things work in the article itself and in the video after the break. He also gives some great tips about transferring your drawn circuit to a breadboard in a neat and organized way at around 5:00 in the video. Continue reading “Build Your Own Class AB Audio Amplifier”

Playing SNES With An R/C Controller

Normally when we see an R/C transmitter used in a build we’re prepared for robots, quadcopters, or UAVs. [Alex] found a new use for his Futaba radio – hooking it up to his Super Nintendo.

We’ve seen a lot of builds using game controllers as interfaces to other hardware. The N64 media remote comes to mind, as does the NES iPod dock. Outside of a few builds to automatically win in-game currency for you, we haven’t seen much of anything to control a video game with additional electronics. [Alex]’s build happily bucks that trend, and technically gives the SNES an analog controller.

The build uses an mBed microcontroller to capture the radio’s button and stick positions. This is sent through a two shift registers to produce the 16-bit packet required of the SNES controller protocol. [Alex] posted all the software for his build, and from the looks of it the code seems pretty portable. [Alex] says he’s working on getting his Sega Saturn running with his Futaba, so we can’t wait to see some Panzer Dragoon action. Check out [Alex] demoing his controller with Gradius III after the break.

Continue reading “Playing SNES With An R/C Controller”