Thorough Macbook Charger Teardown Reveals Some Complex Circuitry

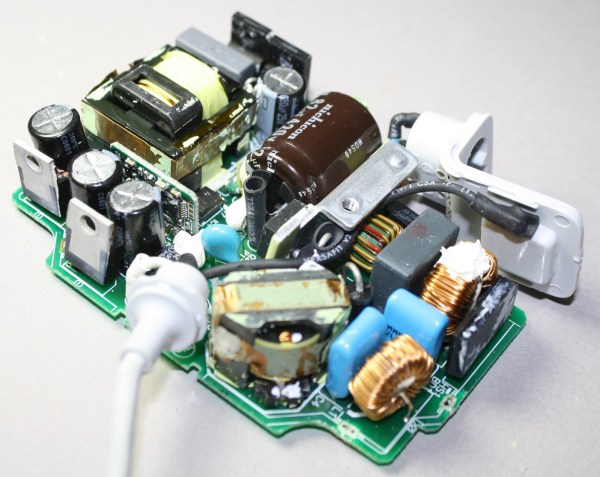
Apple has a reputation in the tech world as being overpriced, and nowhere is that perception more common than in the Hackaday comments. The standard argument, of course, is that for a device with equivalent specs, Apple charges a lot more than its competitors. That argument is not without its flaws, especially when you consider factors other than simple specs like RAM and processor speed, and take into account materials used and build quality. But, as this teardown by [Ken Shirriff] shows, Apple’s attention to detail extends beyond simply machining Macbook bodies out of aluminum.

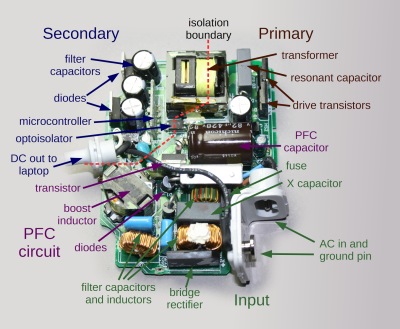
In his teardown, [Ken Shirriff] thoroughly investigates and describes all of the components and circuitry that go into the ubiquitous Macbook charger. Why does it cost $79? Other than the MagSafe connector, what makes it any better than the charger that came with your Toshiba Satellite in the ’90s? Isn’t it just a transformer to convert AC power to DC?

components1

[Ken Shirriff] answers all of this and more, and you may be surprised by what he found. As it turns out, the Macbook charger isn’t just a transformer in a plastic case with a fancy magnetic connector. There is a lot of high-quality circuitry involved to make the power output as clean and stable as possible, and to avoid potential damage to your Macbook that could be caused by dirty power or voltage spikes. Does it justify the costs, even with so many reported failures? That’s for you to decide, but there is no questioning that Apple put more thought into their chargers than simply converting AC to DC.

diydockplug

Computer Docking Plug Alleviates Docking Station Woes

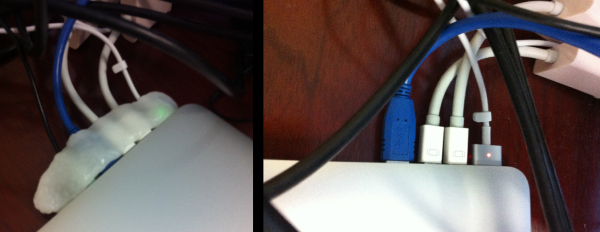
If you’ve ever owned a laptop with a docking station you can certainly attest to how something so simple can make your life easier. Just pop in the laptop and your external monitor(s), mouse, keyboard, and whatever are all ready to go. When it’s time to leave, just pop the laptop out and be on your way. [Chris] uses a Macbook for work and has to plug and unplug 4 connectors several times a day. This is just plain annoying and even more annoying when he accidentally plugs his two external monitors into the wrong ports. Commercially available docking stations are very expensive so [Chris] scratched his head and came up with a neat DIY docking station alternative.

All of the cords that regularly need connecting and disconnecting are conveniently located next to each other. He took some moldable plastic and surrounded all of his cord connectors while they were plugged into his laptop. Once the plastic hardened, all 4 cables can be plugged/unplugged at once. The plastic holds the connectors at the right orientation and spacing so [Chris’s] monitors will never again be plugged into the wrong ports. This is a great idea and we’d love to see a 3D printed version made for the docking-station-less computer users.

via [LifeHacker]

Reading Analog Values With A MagSafe Port

The MagSafe adapter in MacBooks and MacBook Pros is probably the greatest single advancement in laptop technology in the last 10 years. Interestingly, the MagSafe port is also a an analog volt meter that can be read by the OS, and it’s not just limited to monitoring battery voltage; with the right software, you can turn a MagSafe port into a terrible and expensive analog sensor, letting scripts on the computer run based on analog values.

[Peter] created a voltmeter application for his mac after realizing the System Management Controller – the chip responsible for charging the battery – was accessible through low-level kernel calls. If you care enough to chop an Apple power adapter in half, the MagSafe port can read other analog inputs.

The SMC Voltmeter app [Peter] wrote samples the voltage every second and displays values on a graph. This app also allows you to run scripts. While you won’t be able to do much with an extremely expensive, very slow, one-channel data logger (the battery is going to run down eventually), we’re sure we’ll see something that’s held together with duct tape and prayer that uses this weird tool.

Customized IPad LCD Screen Clips Onto Macbook As A Slick Second Screen

Macbook with iPad second screen

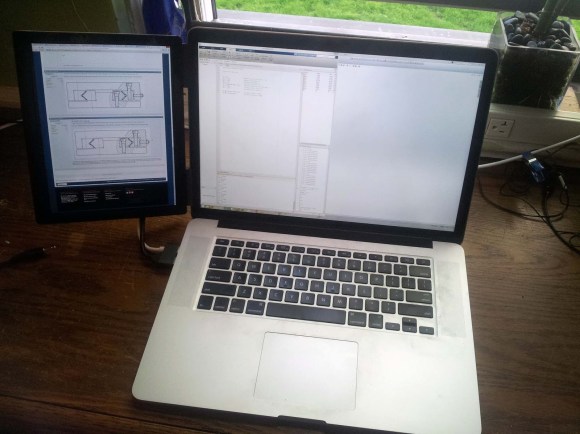
Last year, [Ben] found a good deal on iPad 3 LCD screens. He couldn’t resist buying a couple to play around with. It didn’t take him long to figure out that it’s actually quite simple to use these LCD screens with any computer. This is because the LCD panels have built-in Apple Display port interfaces. This means that you can add your own Display Port connector to the end of the LCD’s ribbon connector and just plug it into a computer. You’ll also need to hook up a back light driver, which [Ben] was able to find pre-made for around $35.

The hack doesn’t stop there, though. [Ben] wanted to have a nice, finished product. He laser cut an acrylic bezel for the LCD screen that was a perfect fit. He then milled out a space for the LCD to fit into. The acrylic was thick enough to accommodate the screen and all of the cables. To cover up the back, [Ben] chose to use the side panel of a PowerMac G5 computer case. He chose this mainly for aesthetics. He just couldn’t resist the nice brushed aluminum look with the giant Apple logo. It would be a perfect match to his Macbook.

Once the LCD panel was looking nice, [Ben] still needed a way to securely fasten it in the right place. He knew he’d want it next to his Macbook, so why not attach it directly to the Macbook? [Ben] got to work with his 3D printer and printed up some small plastic clips. The clips are glued to the iPad screen’s acrylic bezel and can be easily clipped on and off of the Macbook screen in seconds. This way his laptop is still portable, but he has the extra screen real estate when he needs it. [Ben] also printed up a plastic clip that turns the iPad’s USB power connector and the Display Port connector into one single connector. While this is obviously not required, it does effectively turn two separate plugs into one and makes the whole project that much more slick.

A Macbook Air And A Thunderbolt GPU

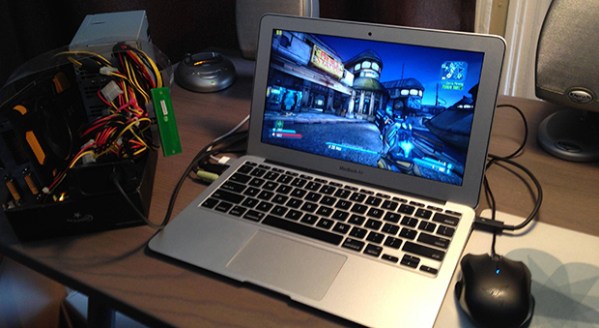
When Intel and Apple released Thunderbolt, hallelujahs from the Apple choir were heard. Since very little in any of Apple’s hardware lineup is upgradeable, an external video card is the best of all possible world. Unfortunately, Intel doesn’t seem to be taking kindly to the idea of external GPUs. That hasn’t stopped a few creative people like [Larry Gadea] from figuring it out on their own. Right now he’s running a GTX 570 through the Thunderbolt port of his MacBook Air, and displaying everything on the internal LCD. A dream come true.

[Larry] is doing this with a few fairly specialized bits of hardware. The first is a Thunderbolt to ExpressCard/34 adapter, after that an ExpressCard to PCI-E adapter. Couple that with a power supply, GPU, and a whole lot of software configuration, and [Larry] had a real Thunderbolt GPU on his hands.

There are, of course, a few downsides to running a GPU through a Thunderbolt port. The current Thunderbolt spec is equivalent to a PCI-E 4X slot, a quarter of what is needed to get all the horsepower out of high-end GPUs. That being said, it is an elegant-yet-kludgy way for better graphics performance on the MBA,

Demo video below.

Continue reading “A Macbook Air And A Thunderbolt GPU”

The Trials Of Repairing A MacBook

mac

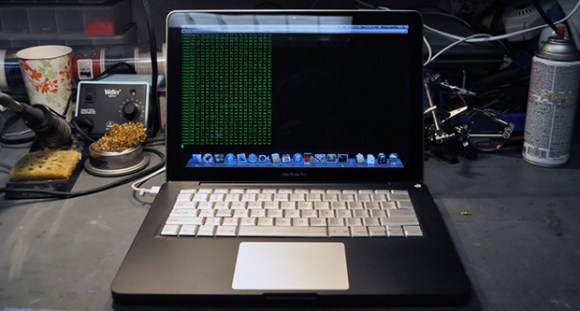
As a favor to a friend, [Phil] traded a unibody MacBook logic board for one with a broken headphone jack, a busted keyboard controller, and a nonfunctional fan. Not one to let bad hardware go to waste, he set off to repair this now-broken laptop by scavenging parts wherever he could. The whole thing ended up working, and became a very impressive display of soldering skill in the process.

The first step for the keyboard transplant was to cut a properly sized hole in the newer unibody MacBook for an older, pre-unibody MacBook Pro 17″ keyboard. This was done by cutting out the keyboard pan of the pre-unibody case and very carefully epoxying it into the unibody chassis. The MBP had a separate keyboard and trackpad controller, so of course [Paul] needed to find some space inside the chassis for these new electronics. This space was found next to the internal hard drive, and a liberal application of hot glue held everything together.

In the future, [Phil] plans on adding more LEDs, a 3.5 mm jack, and a USB to TTL converter – a necessity for any true ‘hacker’ laptop. It’s still a wonderful piece of work, and an incredible amount of effort and skill to get it where it is today.

Hackaday Links: Sunday, May 5th, 2013

hackaday-links-chain

Let’s start off this weekend’s links post with some advertising. We like targeted ads (mostly because we don’t have pooping problems and are tired of hearing about Activia). So we applaud IBM for finding our number with this commercial which produces a stop-motion animation using single atoms as pixels. Wow! [via Reddit and Internet Evolution]

Speaking of commercials, here’s some snake-oil which lets you touch a boob without being in the same room with the person [Thanks Michael].

Moving right along we’ve got a trio of trackpad hacks. There’s one that lets you use the keyboard and trackpad of a MacBook as a standalone USB input device [via Reddit]. Or you could take a Toshiba laptop to the tablesaw to turn it into a USB trackpad. But maybe your Acer C7 Trackpad doesn’t work very well and you just need better grounding.

[Nick McGill] is a member of the team developing an upper body exoskeleton as an assistive technology. This made the rounds on tech websites but the lack of in-depth build info on the project site kept it from getting its own feature here.

If you have a router capable of running DD-WRT here’s a method of setting up a PPTP VPN for free.

And finally, you may remember hearing about the original Prince of Persia source code being discovered and released about a year ago. Well [Adam Green] figured out how to compile it into the original Apple II floppy disks. [Thanks Arthur]