Virtual Reality is finally coming of age. Hackers, Makers and Engineers have dreamed of creating immersive interfaces for years. From the first flight simulators to today’s cellphone powered head mounted displays, VR has always been an exciting field. Many of the advances today are being created by hackers who were inspired by systems like Virtuality from the early 1990’s. Now 25 years on, we’re seeing amazing advances – not only in commercial systems, but in open source VR projects. This week’s Hacklet is all about the best VR projects on Hackaday.io!
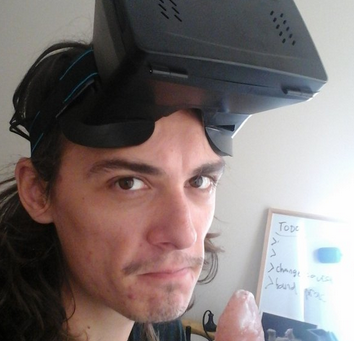 We start with [j0nno] and D.I.Y Virtual Reality. [J0nno] has become interested in VR, and decided to build his own head mounted display. His goal is to create a setup with full head tracking and an open source software stack. He’s hoping to do this within a budget of just $200 AUD. [J0nno] started with the Ritech3d-V2 VR Goggles, which are a plastic implementation of Google’s project cardboard. For display he’s using a 5.6 inch 1280 x 800 TFT LCD. Tracking is optical, using IR LEDs and a PS3 Eye camera. [J0nno’s] background is in software, so he’s doing great setting up OpenVR and Perception. The hardware side is a bit new to him. This isn’t stopping [J0nno] though! In true hacker spirit, he’s learning all about resistors and driving LEDs as he works on D.I.Y Virtual Reality.
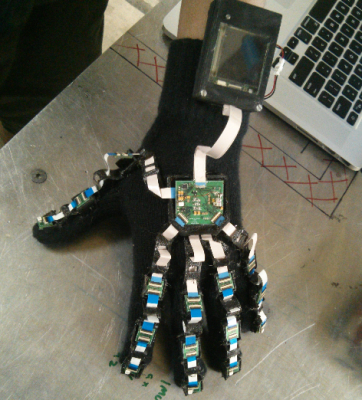 Next up is [Josh Lindsay] with Digitabulum: The last motion-capture glove. Digitabulum is a motion capture glove designed to be able to emulate most other motion capture systems. It is also designed to be relatively low-cost. At $400 per hand, it is less expensive than most other offerings, though we’d still love to see something even cheaper. [Josh] is going with inertial sensors, and a lot of them. Specifically he’s using no less than 17 LSM9DS1 Inertial Measurement Unit (IMU) sensors from ST Microelectronics. IMU sensors like this combine multiple rate gyros, accelerometers, and magnetometers into a single unit. Essentially every segment of every finger has its own sensor suite. As you might imagine, that is quite a bit of data to crunch. An Altera Max II CPLD and an ST Arm processor help boil down the data to something which a VR engine can process. [Josh] has been working on this project for over a year now, and he’s making great progress. The prototype glove looks terrific!
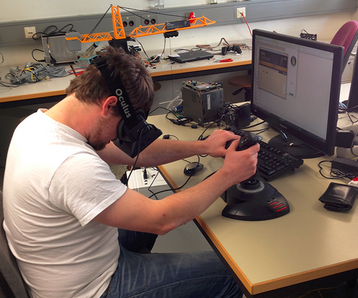 [Thomas] brings augmented reality to the table with Oculus Rift featured Crane control. What started as a hobby experiment became [Thomas’] major project at university. He’s connected an Oculus Rift to a toy crane. A stereo camera on the crane sends a video image to the operator. The camera is mounted on a pan/tilt mechanism driven by the Rift’s head tracking unit. Simple joystick controls allow [Thomas] to move the boom and lower the line. On-screen displays show the current status of the crane. The use of the Rift makes this an immersive demonstration. One could easily see how moving this system into the real world would make crane operations safer for crane operators.
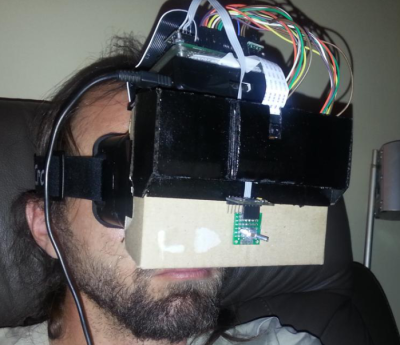 Finally we have [Arcadia Labs] with DIY Augmented Reality Device. This project, which is the [Arcadia Labs] entry in the 2015 Hackaday Prize, uses two 320 x 240 screens to create an augmented reality head mounted display. While the resolution can’t match that of the Oculus Rift or HTC Vive, [Arcadia Labs] is ok with that. They’re going for a lower cost open source alternative for augmented reality. Tracking is achieved with an IMU, while a PS3 Eye camera provides the video. A Raspberry Pi controls the show. [Arcadia Labs] was able to get 50 frames per second on the displays just using the Pi’s SPI interface, however the USB PS3 Eye camera limits things to around 10 FPS. This project is under heavy development right now, so follow along with us to see where [Arcadia Labs] ends up!
If you want VR goodness, check out our new virtual reality projects list! Did I miss your project? Don’t be shy, just drop me a message on Hackaday.io. If you’re on the left coast of the USA, check out SOCAL Virtual Reality Conference and Expo. Hackaday is a sponsor. The event happens on July 12 at the University of California Irvine.
That’s it for this week’s Hacklet, As always, see you next week. Same hack time, same hack channel, bringing you the best of Hackaday.io!