Microcontrollers And Node.js, Naturally

We see a surprising amount of projects using Node.js, but despite this we haven’t seen much JavaScript running microcontrollers, even the ARM powered Raspi or BeagleBone. The folks at Technical Machine want to change that with a very cool dev board designed to be an Internet-connected JavaScript running prototyping device from the very beginning. It’s called Tessel, and brings some very cool tools to any maker’s workbench.

On board this little… board is an ARM Cortex-M3 running at 180 MHz, 32 Megs of Flash, 32 Megs of SDRAM, and a TI CC3000 WiFi module that we’ve heard so much about. The 16-pin GPIO can connect to other Tessel modules that allow for servos, accelerometers, micro SD cards, and a whole bunch of other sensors for just about any project imaginable.

Aside from having WiFi built in from the get-go, Tessel also has some Arduino compatibility, allowing it to work with existing shields and code. It seems pretty cool, and we can’t wait to get our hands on one when it launches in September.

Animating A Lamp With The Leap Motion

leap

The Leap Motion is a very cool device, but so far we haven’t seen many applications of interacting with physical devices. [Xavier] wanted to control a cute servo animated desk lamp with his hands, and with the help of a Leap and an Arduino he was able to do just that.

The Leap Motion API has a handy feature that will output all its data over a websocket. It’s a very easy way to transfer hand positions with a minimum amount of overhead, and with just a little bit of Node.js, it’s only two lines of code to connect the Leap to a websocket server.

With the Leap data on a web server, the only thing left to do is pulling it down to an Arduino. Again, [Xavier] used Node.js, this time in the form of johnny five, a Javascript-based Arduino framework. After that, it was a simple matter of mapping the data from the Leap to servo movements in [Xavier]’s Pixar-inspired lamp.

Video of the build below.

Continue reading “Animating A Lamp With The Leap Motion”

Raspberry Pi Used To Build A Smart Television

In the title of his post [Donald Derek] calls this a Google TV you can build yourself. That’s certainly an over-reach. But the project is still a very impressive smart television built using a Raspberry Pi.

The open source project starts with the Rasbian OS, an RPi version of Debian Linux. Functionality is built up by installing Chromium to display webpages, a script to download YouTube videos, and OMXPlayer to play videos including 1080P HD content. The image above shows the smart phone controller for the system. This is provided by a Node.js configuration that manages communication between the remote and the RPi board.

On the one hand we love that this is open source. On the other, it’s not going to be able to tap into a lot of the content which makes a Google TV so valuable. For instance, you won’t be able to watch Netflix because that service doesn’t work on Linux systems. But you should be able to watch browser-based content like Hulu.

Robot Can Barely Move With So Much Hardware Strapped To It

web-server-robot

We think that [Andrej Škraba] needs to start looking for a beefier motor platform. This little robot has so much hardware strapped to it the motors can barely keep up. But with a little help it can make its way around the house, and it takes a whole lot of connectivity and computing power along for the ride.

The white stick on the top is a single-board computer. The MK802 Mini sports an A10 processor and up to a gig of ram. Just below that is a USB hub which is sitting on top of a USB battery pack. This powers the computer and gives him the ability to plug in more than one USB device. The robot chassis is from Pololu. It uses an Arduino and a motor shield for locomotion, with commands pushed to it via USB.

This setup makes programming very easy. Here [Andrej] has a keyboard and HDMI monitor plugged in to do a little work. When not coding it can be disconnected and driven over the network. He makes this happen using an Apache server on the MK802 and node.js. See a demo of the system in the clip after the break.

Continue reading “Robot Can Barely Move With So Much Hardware Strapped To It”

Hackaday Links: Christmas Eve, 2012

It’s Christmas Eve, the perfect time to interact with your extended familial units, eat cookies, nog things up a little, and watch Die Hard. Christmas Eve also means it’s a low-effort day here at Hackaday, so here’s a few cool things we’ve run across in the past few weeks.

A Round OLED Display

1_13inch_Round_OLED

That right there is a circular OLED display. [ArtistEngineer] over on reddit found this display on AliBaba. It’s a 1.13 inch diameter display with a resolution of 128×128 (yeah, we don’t know either). This looks like a great display for a DIY wrist watch, digital gauge, or loads of other devices where a square display doesn’t make much sense.

There seems to be a few circular OLED display manufacturers – including Truly Semiconductors who happened to put up a datasheet for their round display – but sourcing these in reasonable quantities is a pain. Anyone up for a group buy? Think of the fun you’ll have coding a polar coordinate display!

Computing with transistors

gate

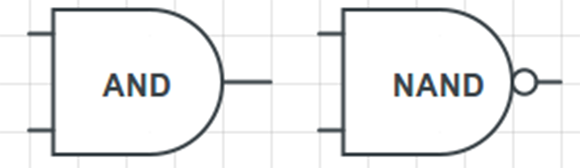
So you know computers are made up of simple logic gates, latches, buffers, and other miscellaneous digital cruft,  but how do we turn these digital circuits into a computer? Over the last few months, [Andrew] has been putting up a bunch of blog posts on the application of digital logic. Start out on the ‘Computing with Transistors’ post before moving on to The Digital State and Circuits and Arithmetic. There’s some good readin’ there.

 Embedding 3D objects in a web page

Go ahead. Click it. It’s Sketchfab that allows anyone to publish interactive 3D designs without a browser plugin. If anyone out there is trying to build a Thingiverse clone that isn’t tied to Makerbot, consider using this for the preview page for each object.

Surprisingly, Twinkies were the one thing that didn’t survive the Apocalypse.

twinkie

While there’s no use in mourning the death of the Twinkie – Little Debbie also makes small cream-filled cakes – you might as well include some Twinkies, Snowballs, Ding Dongs, and Ho-Hos in your Christmas baking. [scoochmaroo] on Instructables put together a list of homebrew recipes for the now defunct Hostess snack cakes.

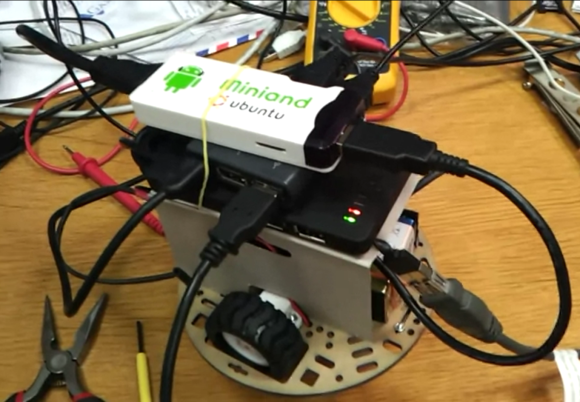
Perfect for autonomous robots

code

[maxogden] over on the gits put together a script for automatically joining wireless networks on Linux. This was tested on a Raspberry Pi, and we’re thinking it would be perfect for whatever autonomous creation you’ll be building in your workshop next year.

Adding Node.js Based Sensors To The Parrot AR Drone

[Max Ogden] wanted the option to add sensors to his Parrot AR Drone. This a commercially available quadcopter which runs Linux. This makes it rather easy for him to use Node.js to read the sensors from an Arduino board. The use of the Arduino is merely for easy prototyping. It is only needed to bridge the drone’s serial port with a sensor’s delivery method, so just about any microcontroller could be substituted for it.

There are some hardware considerations to take into account. The manufacturer was nice enough to populate a 0.1″ pitch pin socket on the serial port (if only this kind of invitation to mess with hardware was an industry standard). But the device expects 3.3V levels so pick your hardware accordingly. There is one commenter who tried the project for themselves and found that the drone wouldn’t boot up with the Arduino already connect — he had to boot and then complete connections. Troubles aside this makes adding your own sensor payload very simple and you don’t have to wait until landing to get at the data.

Maybe we’ll have to add some shock voltage data reporting to our shockerDrone.

Add An Arduino To A Google+ Hangout

Google+ Hangouts provide a group video chat with the ability to add apps. [RobotGrrl] created a Node.js web app to control an Arduino that can be added to a Hangout.

There’s a Javascript client that runs inside of the Hangout and communicates with the Node.js server running on an EC2 server over WebSockets. The server receives this client data and sends commands to Processing using TCP sockets. Processing deals with communicating with the Arduino, allowing you to control many things from the Hangout.

In this simple example, [RobotGrrl] demonstrates how to toggle an LED from the Hangout. This includes a tutorial on setting up your EC2 instance, full source for the server and client apps, the processing sketch to control an Arduino, and the code to allow the app to be added to a Hangout.

This example shows the basics, but there’s a whole slew of things that could be controlled with this system. [RobotGrrl] even demonstrates some robots that are controlled from a Hangout interface.

Check out an overview video after the break.

Continue reading “Add An Arduino To A Google+ Hangout”