State Of The Art Big Mouth Alexa Bass

Hackers seem intent on making sure the world doesn’t forget that, for a brief shining moment, everyone thought Big Mouth Billy Bass was a pretty neat idea. Every so often we see a project that takes this classic piece of home decor and manages to shoehorn in some new features or capabilities, and with the rise of voice controlled home automation products from the likes of Amazon and Google, they’ve found a new ingredient du jour when preparing stuffed bass.

[Ben Eagan] has recently completed his entry into the Pantheon of animatronic fish projects, and while we’ll stop short of saying the world needed another Alexa-enabled fish on the wall, we’ve got to admit that he’s done a slick job of it. Rather than trying to convince Billy’s original electronics to play nice with others, he decided to just rip it all out and start from scratch. The end result is arguably one of the most capable Billy Bass updates we’ve come across, if you’re willing to consider flapping around on the wall an actual capability in the first place.

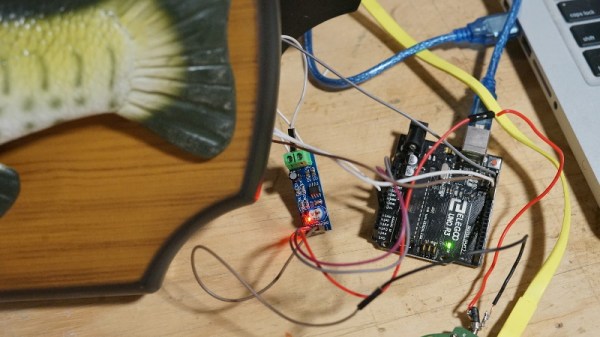
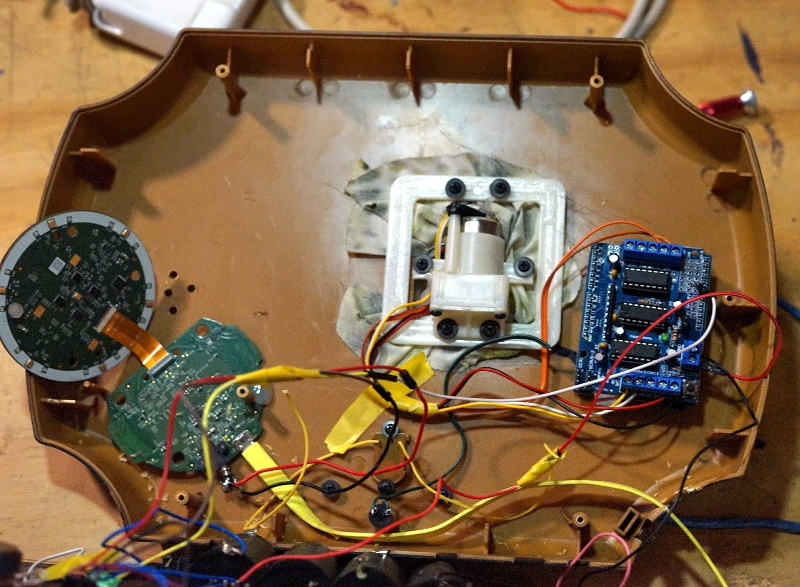
The build process is well detailed in the write-up, and [Ben] provides many pictures so the reader can easily follow along with the modification. The short version of the story is that he cuts out the original control board and wires the three motors up to an Arduino Motor Driver Shield, and when combined with the appropriate code, this gives him full control over Billy’s mouth and body movements. This saved him the trouble of figuring out how to interface with the original electronics, which is probably for the better since they looked rather crusty anyway.

From there, he just needed to give the fish something to get excited about. [Ben] decided to connect the 3.5 mm audio jack of an second generation Echo Dot to one of the analog pins of the Arduino, and wrote some code that can tell him if Amazon’s illuminated hockey puck is currently yammering on about something or not. He even added a LM386 audio amplifier module in there to help drive Billy’s original speaker, since that will now be the audio output of the Dot.

A decade ago we saw Billy reading out Tweets, and last year we presented a different take on adding an Alexa “brain” to everyone’s favorite battery powered fish. What will Billy be up to in 2029? We’re almost too scared to think about it. Continue reading “State Of The Art Big Mouth Alexa Bass”

University Peristaltic Pump Has Hacker Heritage

A team at [Vanderbilt University] have been hacking together their own peristaltic pumps. Peristaltic pumps are used to deliver precise volumes of fluid for research, medical and industrial applications. They’re even occasionally used to dose fish tanks.

pumpThey work by squeezing the fluid in a flexible tube with a series of rollers (check out the awesome gif from Wikipedia to the right). We’ve seen 3D printed peristaltic pumps before, and cheap pumps have been appearing on eBay. But this build is designed to be lab grade, and while the cheap eBay devices can deliver ~20ml/min this one can deliver flow rates in the microliter/min range. It also has a significant cost advantage over commercial research grade pumps which typically cost thousands of dollars, each of these pumps costs only fifty bucks.

The pump has a clear hacker heritage, using an Arduino Uno, Adafruit Motor shield, and 3D printed mechanical parts. So it’s particularly awesome that they’ve also made their design files and Arduino code freely available!

Continue reading “University Peristaltic Pump Has Hacker Heritage”

Forbidden Fruit Machine

Here’s another example of how today’s rapid-prototyping technologies are allowing Artists and Craftsmen to create interactive works of art rapidly and easily. [Kati Hyypa] and [Niklas Roy] teamed up to transform a classic painting in to an interactive exhibit. It’s a painting of Adam, Eve and the apple with a joystick attached. Spectators can control the destiny of the apple with the joystick and thus explore the painting.

The “Forbidden Fruit Machine” is based on a painting called “The Fall of Man” created by [Cornelis Cornelisz van Haarlem] in 1592. The painting depicts Eve and Adam in the Garden of Eden, being tempted by the serpent to eat the forbidden fruit. A public domain, high-resolution scan of the painting is available for download from the Rijksmuseum Amsterdam. Starting with that, the arms were edited out, and replaced with articulated versions (mounted on acrylic) driven by servos. The apple was mounted on a X-Y gantry driven by two stepper motors. These are driven by a motor shield, which is controlled by an Arduino Uno. The Uno also controls a Music Maker shield to play the various audio tracks and sound effects. Finally, an additional Arduino Pro-Mini is used to control the LED lighting effects via a Darlington driver and also connect to the end stops for the X-Y gantry. The joystick is connected to the analog ports of the Uno.

The LED’s give clues on where to move the apple using the joystick, and pressing the red button plays an appropriate audio or sound effect. For example, pressing the button over the cat at Eve and Adam’s feet elicits a heart-breaking meow, while letting Eve eat the apple results in an even more dramatic effect including a thunder storm.

The machine is open source with code posted on Github and 3d files on Youmagine. Watch a video after the break. The artist’s names may be familiar to some some readers – that’s because both have had their earlier work featured on our blog, for example this awesome ball sucking machine and another one too.

Continue reading “Forbidden Fruit Machine”

Building A Rather Rudimentary Arduino Tank Bot

building-an-arduino-tankbot

The tank robot builds that we see are often quite complex. This lets them do great things, but makes the platform scary for beginners. Here’s a tank build that would be a great first project, especially if you’re more interested in the programming side of robotics than you are in the hardware itself. [Paul Bleisch] combined several different commercially available products to fabricate this Arduino-powered tank robot base.

Locomotion is provided by a double geared-motor module. This unit, the plastic wheels and treads, as well as the wooden mounting platform are all made by Tamiya. They cost very little and are already designed to work with one another. To this base he adds the Arduino and a motor shield which makes the connections dead simple. The black case on one end of the chassis holds four AA batteries which provide power for everything.

These components are all that’s really needed to start, but they provide no interactivity. So [Paul] picked up a used wireless PlayStation 2 controller. There’s a library (written by regular reader [Bill Porter]) that allows him to connect the receiver to the Arduino in order to pick up commands from the controller. He also plans to add an ultrasonic range finder to the build sometime in the future.

If you’re don’t need to do things the easy way you should consider fabricating your own tank treads.

Robot Can Barely Move With So Much Hardware Strapped To It

web-server-robot

We think that [Andrej Škraba] needs to start looking for a beefier motor platform. This little robot has so much hardware strapped to it the motors can barely keep up. But with a little help it can make its way around the house, and it takes a whole lot of connectivity and computing power along for the ride.

The white stick on the top is a single-board computer. The MK802 Mini sports an A10 processor and up to a gig of ram. Just below that is a USB hub which is sitting on top of a USB battery pack. This powers the computer and gives him the ability to plug in more than one USB device. The robot chassis is from Pololu. It uses an Arduino and a motor shield for locomotion, with commands pushed to it via USB.

This setup makes programming very easy. Here [Andrej] has a keyboard and HDMI monitor plugged in to do a little work. When not coding it can be disconnected and driven over the network. He makes this happen using an Apache server on the MK802 and node.js. See a demo of the system in the clip after the break.

Continue reading “Robot Can Barely Move With So Much Hardware Strapped To It”

I’ll See Your Launchpad Controlled Arm And Raise You Arduino Controlled Autonomy

This OWI robot arm has been hacked to add position sensors and Arduino control. [Chris Anderson] took one look at the Launchpad controlled OWI from earlier today and said “wait a minute, I’ve already posted my own version of that project”. Well, that will teach him not to tip us off about his hacks!

The position control is a really nice addition. Potentiometers added to each of the joints (shoulder, elbow, and wrist) can be read by the ADC pins on the Arduino. Just a bit of calibration will let the microcontroller board know the position of the arm at any given time. The control technique is the same as the Launchpad hack, with one glaring drawback. [Chris] is using the Adafruit motor driver shield. It uses L293D H-bridge chips, but it only has four channels. There are five motors on this arm, so the video after the break shows it moving around without any outside instruction, but you won’t see it grab onto anything since the Arduino can’t move the gripper!

Still, the position feedback makes the case for this version. Just remember to order an extra chip if you want full control.

Continue reading “I’ll See Your Launchpad Controlled Arm And Raise You Arduino Controlled Autonomy”

Arduino Powered CD Changing Robot

arduino cd robot

[ross], a reader is working on a CD changing and ripping robot. The arm picks up a CD and the platform then rotates, stopping in front of the tray to drop the CD. A JB welded tire pump provides the vacuum pick up, while a brake light acts as a resistor to trick a PC power supply into operation. A Motor Shield beefs up an Arduino in order to drive the servos.