Engineering Overkill Motorizes The Daily Grind

You don’t tug on Superman’s cape, and you don’t come between an engineer and his coffee. And really, if all your office has for coffee is a big old BUNN that makes caffeinated trash, you don’t discourage your coworkers from the pursuit of a better brew.

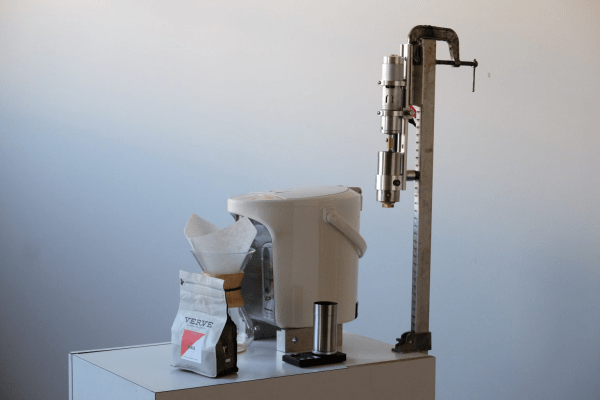
[George] is over at his desk each day treating coffee like the science experiment it is: with a kettle, a Chemex, and a manual coffee grinder. Trouble is, the setup is attracting more and more attention, and [George]’s unpaid side gig as the office barista is starting to wear out his arm. He considered buying an electric grinder just long enough to laugh at the idea, and then went out to the workshop and built this beautifully over-engineered motorized mount for his manual grinder.

The only trouble with motorizing these hand grinders or even driving them with a drill is that many of them have a pentagonal shaft. But that problem was no match for [George] and his file. He soon had his linkage between the 100RPM motor and the grinder shaft and set about building the overly adequate frame.

The whole thing is gorgeous, but we particularly like the gas spring that holds the motor up out of the way while he pours in the beans. [George] probably ought to start a bean fund, if he hasn’t already. That kind of noise followed by the smell of coffee is bound to bring a few more fresh-ground converts into the fold. Grab a fresh cup and grind past the break to see this baby pulverize some beanage.

Not everyone goes for pour over coffee, but there are hacks to be done at all points on the coffee spectrum. Check out [Maya Posch]’s adventures in totally tweaking an espresso machine.

Continue reading “Engineering Overkill Motorizes The Daily Grind”

Bearing-in-Bearing Fidget Spinner Taken To The Max

People who know about bearings go through a phase of bemusement with regards to fidget spinners. We say something like, “man, I got a whole box of bearings in the basement.” Then we go through a “OK, I’ll make one” phase and print one out of PLA.

[fishpepper] took that sentiment a step further. After being forced to print spinners for his kids, he got jealous and decided to make his own—but his spinner would be a version for engineers. [fishpepper]’s ginormous spinner consists of five bearings superglued inside each other, with the grease cleaned out of the insides to make them spin faster. The inner two sets are doubled up bearings, 6 mm x 17 mm x 6 mm and 17 mm x 30 mm x 7 mm. The middle bearing measures 30 mm x 55 mm x 13 mm, and the fourth bearing 55 mm x 90 mm x 18 mm.

If you want to stop here, it’s a good size, around two inches across. However, [fishpepper] took it a step further, adding a fifth bearing, a 90 mm x 140 mm x 24 mm monster weighing in at 1 kg by itself. The total weight comes to 1.588 kg with the 3D-printed hub included. If you want to make one yourself, check out [fishpepper’s] bearing-in-bearing spinner tutorial which guides you through the various steps.

Hackaday likes fidget spinners so much you’d think we were in 6th grade: we’ve published posts on the three-magnet spinner hack, a fidget-spinning robot, and teaching STEAM with fidget spinners.

Continue reading “Bearing-in-Bearing Fidget Spinner Taken To The Max”

The Internet Of Rice Cookers

You’d be forgiven for thinking this was going to be an anti-IoT rant: who the heck needs an IoT rice cooker anyway? [Microentropie], that’s who. His rice cooker, like many of the cheapo models, terminates heating by detecting a temperature around 104° C, when all the water has boiled off. But that means the bottom of the rice is already dried out and starting to get crispy. (We love the crust! But this hack is not for us. This hack is for [Microentropie].)

So [Microentropie] added some relays, a temperature sensor, and an ESP8266 to his rice cooker, creating the Rice Cooker 2.0, or something. He tried a few complicated schemes but was unwilling to modify any of the essential safety features of the cooker. In the end [Microentropie] went with a simple time-controlled cooking cycle, combined with a keep-warm mode and of course, notification of all of this through WiFi.

There’s a lot of code making this simple device work. For instance, [Microentropie] often forgets to press the safety reset button, so the ESP polls for it, and the web interface has a big red field to notify him of this. [Microentropie] added a password-protected login to the rice cooker as well. Still, it probably shouldn’t be put on the big wide Internet. The cooker also randomizes URLs for firmware updates, presumably to prevent guests in his house from flashing new firmware to his rice cooker. There are even custom time and date classes, because you know you don’t want your rice cooker using inferior code infrastructure.

In short, this is an exercise in scratching a ton of personal itches, and we applaud that. Next up is replacing the relays with SSRs so that the power can be controlled with more finesse, adding a water pump for further automation, and onboard data logging. Overkill, you say? What part of “WiFi-enabled rice cooker” did you not understand?

Neural Network Targets Cats With A Sprinkler System

It’s overkill, but it’s really cool. [Bob Bond] took an NVIDIA Jetson TX1 single-board computer and a webcam and wirelessly combined them with his lawn sprinklers. Now, when his neighbors’ cats come to poop in his yard, a carefully trained neural network detects them and gets them wet.

It is absolutely the case that this could have been done with a simple motion sensor, but if the neural network discriminates sufficiently well between cats and (for instance) his wife, this is an improved solution for sure. Because the single-board computer he’s chosen for the project has a ridiculous amount of horsepower, he can afford to do a lot of image processing, so there’s a chance that everyone on two legs will stay dry. And the code is up on GitHub for you to see, if you’re interested.

[Bob] promises more detail about the neural network in the future. We can’t wait. (And we’d love to see a sentry-turret style build in the future. Think of the water savings!)

Via the NVIDIA blog, and thanks [Jaqen] for the tip!

Continuous Delivery For Your ESP8266

There’s nothing to be ashamed of. It’s a problem we all have. You change your code a lot — you can’t help it, you just need to tweak one last little bit. And then you have to go downstairs, fetch your ESP8266 module, plug it in to your computer, flash the new firmware in, and then run back down and re-install your wine-cellar temperature monitor. If only there were a way to continuously update your ESP8266 over the air, pulling new code down from your GitHub repository, automatically running your test suite on it, and then pushing it off to the ESP.

OK, it’s ridiculous overkill, but [squix] strung together a bunch of open-source continuous integration tools and made them work with the ESP8266. A simple PHP script connects the ESP to the rest of the web infrastructure.

[squix] says the word “security” in the same way that gin aficionados whisper “vermouth” over their Martinis. Which is to say, there is none. But for a home solution, or if you want to play around with continuous development, it’s a good start.

And this is a cool project because it makes use of the ESP8266 OTA (over-the-air) programming library to push the code across. And we do hate having to run around the house to update firmware.

So check it out if you want to push code to your ESP8266s without physically going to fetch them, or if you want to integrate your web development with your home deployment.

Absurd Clock Uses Twelve ESP8266 Modules

Quick quiz: How many ESP8266 modules do you need to make an LED clock? Hint: a clock displays 12 hours.

Nope! Twelve is not the answer. But that didn’t stop Hackaday.io user [tamberg] from building a 12-ESP clock during the Bilbao, Spain Maker Faire. The “advantage” of using so many ESP8266s is that each one can independently control one hour LED and its associated slice of five minute-marker LEDs. Each ESP fetches the time over the Internet, but only lights up when it’s time.

It’s like parallel processing or something. Or maybe it’s redundant and failsafe. Or maybe it’s just an attempt to put the maximum Internet into one Thing. Maybe they had a team of twelve people and wanted to split up the load evenly. (We couldn’t think of a real reason you’d want to do this.)

All snark aside, the project looks great as you can see in this Flickr gallery, and all of the design files are available if you’d like to re-use any parts of this project. We’re thinking that the clock face is pretty cool.

Continue reading “Absurd Clock Uses Twelve ESP8266 Modules”

Halloween Doorbell Prop In Rube-Goldberg Overdrive

[Conor] wired up his 3D-printed coffin doorbell to an array of RGB LEDs, a screaming speaker, and a spinning skull on a cordless screw driver to make a “quick” Halloween scare. Along the way, he included half of the Adafruit module catalog, a relay circuit board, and ESP8266 WiFi module, a Banana Pi, and more Arduinos of varying shapes and sizes than you could shake a stick at.

Our head spins, not unlike [Conor]’s screaming skull, just reading through this Rube Goldbergy arrangement. (We’re sure that’s half the fun for the builder!) Smoke ’em if ya got ’em!

Start with the RGB LEDs; rather than control them directly, [Conor] connected them to a WiFi-enabled strip controller. Great, now he can control the strip over the airwaves. But the control protocol was closed, so he spent a week learning Wireshark to sniff the network data, and then wrote a Bash script to send the relevant UDP packets to turn on the lights. But that was not fancy-schmancy enough, so [Conor] re-wrote the script in Go.

Yes, that’s right — a Go routine on a Banana Pi sends out custom UDP packets over WiFi to a WiFi-to-LED-driver bridge. To make lights blink. Wait until you see the skull.

spooky_eye_animThe plastic skull has Neopixels in each ping-pong ball eye, controlled by an Arduino Nano and battery taped to the skull’s head. The skull is cemented to a driver bit that’s chucked in a cordless drill. A relay board and another Arduino make it trigger for 10 seconds at a time when the doorbell rings. Finally (wait for it!) an Arduino connected to the doorbell gives the signal, and sets a wire high that all the other Arduini and the Banana Pi are connected to.

Gentle Hackaday reader, now is not the time for “I could do that with a 555 and some chewing gum.” Now is the time to revel in the sheer hackery of it all. Because Halloween’s over, and we’re sure that [Conor] has unplugged all of the breadboards and Arduini and put them to use in his next project. And now he knows a thing or two about sniffing UDP packets.

Continue reading “Halloween Doorbell Prop In Rube-Goldberg Overdrive”