RFM69 To MQTT Gateway On The Super-Cheap

[Martin] is working on a RFM69-to-MQTT bridge device. If you’re at all interested in DIY home automation, this is going to be worth following. Why? When your home automation network gets big enough, you’re going to have to think seriously about how the different parts talk to each other. There are a number of ways to handle this messaging problem, but MQTT is certainly a contender.

MQTT is a “lightweight” publish-subscribe framework that’s aimed at machine-to-machine data sharing, and runs on top of a normal TCP/IP network. IBM has been a mover behind MQTT since the beginning, and now Amazon is using it too.

But most MQTT servers need a TCP/IP network, which pretty much means WiFi, and this can be a killer for remote sensors that you’d like to run on battery power, or with limited processing power. For these use cases, a low-power, simple sub-gigahertz radio module is a better choice than WiFi. But then how to do you get your low-power radios to speak to your MQTT devices?

That’s the point of [Martin]’s MQTT bridge. Previously he had built a sub-gig radio add-on for a Raspberry Pi, and let the Pi handle the networking. But it looks like there’s enough processing power in a lowly ESP8266 to handle the MQTT side of things (over WiFi, naturally). Which means that you could now connect your 868 MHz radio devices to MQTT for less than the cost of two pumpkin spice, double-pump lattes.

On the firmware side, [Martin] has enlisted the help of [Felix], who developed the Arduino-plus-RFM69 project, the Moteino. [Felix] has apparently ported his RFM69 library to the ESP8266. We’re dying to see this working.

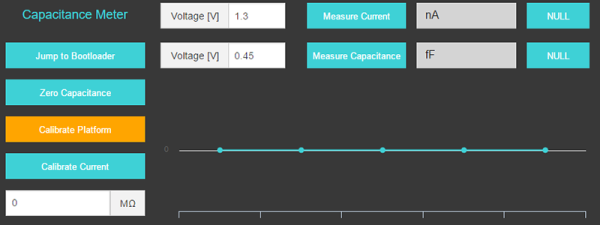
For now, we’ve got some suggestive screenshots which hint at some LAN-exposed configuration screens. We’re especially interested in the RFM + MQTT debug console window, which should really help in figuring out what’s gone wrong in a system that spans two radio protocols.

The bottom line of all of this? Super-cheap, power-efficient RFM69-based radio nodes can talk with your sophisticated MQTT network. Keep your eyes on this project.

Eyedrivomatic Wins The 2015 Hackaday Prize

Update: We’ve published an in-depth article about The Gaze-Controlled Wheelchair that Won the Hackaday Prize.

Eyedriveomatic are the Grand Prize winners of the 2015 Hackaday Prize. The winners were just announced on stage at the Hackaday Superconference, and awarded by the prize Judges. Eyedriveomatic is a non-invasive method of adding eye-control to powered wheelchairs. Many times these wheelchairs are rented and permanent alterations cannot be made. This inexpensive and easily adaptable hardware has the power to improve life for those who need more options for controlling powered wheelchairs.

We will be publishing more information about this year’s winners in the coming week. The full standings are listed below. Please check out all of the 2015 Hackaday Prize Finalist and the Best Product Finalists.

Continue reading “Eyedrivomatic Wins The 2015 Hackaday Prize”

Measuring Capacitors Over Their Working Voltage

Ceramic capacitors are small, they don’t leak, they’re convenient, but they are downright strange. Certain types of caps will lose their capacitance depending on the voltage they’re operating at. If you’re using ceramic caps for filters, DC to DC power supplies, bypass caps, or anything where you need an exact capacitance in a circuit, this can be a problem.

[Mathieu] has come up with a tool that’s able to measure the capacitance of a cap over its entire working range. He’s calling it the OpenCVMeter, and although the name might be slightly confusing, the functionality is not. This little box will measure the capacitance of a part over a voltage range from 1.3 to 15.5V.

By attaching the SMD tweezers or test clips to a capacitor, the OpenCVMeter ramps up the voltage and measures the capacitance of the part through the test cycle. This data is then dumped to a Chrome app – a surprisingly popular platform for test equipment apps – and a determination of the cap’s ability will to work in a circuit is displayed on the screen

If you’ve ever tooled around with antique electronic equipment, you’ll know the first thing to go bad in any piece of equipment are caps. Either caps had extremely loose manufacturing tolerances back in the day or the values really were that critical, but a dodgy cap can bring down everything from tube amps to computers. It’s a very neat tool, and something that doesn’t really exist in a single dedicated device.

Turning A Teensy Into A Better U2F Key

A few days ago, we saw a project that used a Teensy to build a Universal 2nd Factor (U2F) key. While this project was just an experiment in how to implement U2F on any ‘ol microcontroller, and the creator admitted it wasn’t very secure, the comments for that post said otherwise: “making your own thing is the ONLY way to be secure,” read the comments.

In a stunning turn of events, writing comments on a blog post doesn’t mean you know what you’re talking about. It turns out, to perform a security analysis of a system, you need to look at the code. Shocking, yes, but [makomk] took a good, hard look at the code and found it was horribly broken.

The critical error of the Teensy U2F key crypto is simply how U2F is performed. During authentication, the device sends the U2F key handle to whatever service is trying to authenticating it. Because the key in the Teensy implementation is only ‘encrypted’ with XOR, it only takes 256 signing requests to recover the private key.

The original experimentation with using the Teensy as a U2F key was an educational endeavor, and it was never meant to be used by anyone. The attack on this small lesson in security is interesting, though, and [makomk] wrote a proof of concept that demonstrates his attack. This could be used to perform attacks from a remote server, but hopefully that won’t happen, because the original code should never be used in the wild.

Low Parts Count ARM SDR

[Alberto di Bene] wanted to build an SDR for relatively low frequencies. Usually, you’d start with some front end to get the radio frequency signal down where you can work with it. But [Alberto] practically just fed an antenna into an STM32F429 Discovery board and did all the radio processing in the onboard ARM chip.

There is a little more to it than that, but only a little. If you open the PDF file on [Alberto’s] site, you’ll see there is a simple front end filter (a transformer, along with a few capacitors and inductors). This low pass filter prevents high frequencies from reaching the ARM processor’s analog to digital converter. In addition, a capacitor and a couple of resistors ensure the converter only sees positive voltages.

The CPU digitizes the incoming signal and processes it, demodulating several different types of radio transmission. The recovered audio is sent through the onboard digital to analog converter.

In addition to an input filter, the output also needs a filter to prevent high frequencies from reaching the speaker. Unlike the input filter, this one is a bit more complicated. The inductors needed for a passive filter were too large to be practical, so the output filter is an active one with a few transistors. The only other external circuitry is the power supply for the Discovery board.

The document does a great job of explaining the rationale behind the design choices and how the whole system works. It also includes simulations of both analog and digital filters used in the design.

This is really bare metal SDR and reading the code is educational. However, if you want to start with something simpler, consider GNU Radio and either an SDRPlay or a cheap RTL-SDR dongle.


An E-Waste 3D Printer For Every Child?

The lofty goal of making sure every school kid has access to a laptop has yet to be reached when along comes an effort to put a 3D printer in the hands of every kid. And not just any printer – a printer the kid builds from a cheap kit of parts and a little e-waste.

The design of the Curiosity printer is pretty simple, and bears a strong resemblance to an earlier e-waste 3D printer we covered back in December. This one has a laser-cut MDF frame rather than acrylic, but the guts are very similar – up-cycled DVD drives for the X- and Z-axes, and a floppy drive for the Y-axis. A NEMA 17 frame stepper motor provides the oomph needed to drive the filament into an off-the-shelf hot end, and an Arduino runs the show. The instructions for assembly are very clear and easy to follow, although we suspect that variability in the sizes of DVD and floppy drives could require a little improvisation at assembly time. But since the assembly of the printer is intended to be as educational as its use, throwing a little variability into the mix is probably a good idea.

The complete kit, less only the e-waste drives and power supply, is currently selling for $149USD. That’s not exactly free, but it’s probably within range of being funded by a few bake sales. Even with the tiny print volume, this effort could get some kids into 3D printers early in their school career.


FCC Clears The Air With Wi-Fi Software Updates

A few months ago, the Internet resounded with news that the FCC would ban open source router firmware. This threat came from proposed rules to devices operating in the U-NII bands – 5GHz WiFi, basically. These rules would have required all devices operating in this band to prevent modification to the radio inside these devices. Thanks to the highly integrated architecture of these devices, Systems-on-Chips, and other cost cutting measures from router manufacturers, the fear was these regulations would ultimately prevent modifications to these devices. It’s a legitimate argument, and a number of the keepers of the Open Source flame aired their concerns on the matter.

Now, the FCC has decided to clear the air on firmware upgrades to wireless routers. There was a fair bit of confusion in the original document, given the wording, “how [its] device is protected from ‘flashing’ and the installation of third-party firmware such as DD-WRT.” This appeared to mandate wholesale blocking of Open Source firmware on devices, with no suggestion as to how manufacturers would accomplish this impossible task.

[Julias Knapp], chief of the FCC’s Office of Engineering and Technology has since clarified the Commission’s position. In response to the deluge of comments to the FCC’s Notice of Proposed Rulemaking, the phrase, ‘protected from flashing… Open Source firmware” has been removed from the upcoming regulation. There’s new, narrow wording (PDF) in this version that better completes the Commission’s goal of stopping overpowered radios without encroching on the Open Source firmware scene. The people spoke, and the FCC listened — democracy at work.