Turning OLEDs And Acrylic Into Faux Nixie Tubes

Love ’em or hate ’em, Nixies and the retro clocks they adorn are here to stay. At least until the world’s stock of surplus Soviet tubes is finally depleted, that is. The glow discharge tubes were last mass manufactured in the 1980s, and while they’re not too hard to get a hold of yet, they will be eventually. And what better way to get ready for that dreaded day than by rolling your own OLED faux Nixie tubes?

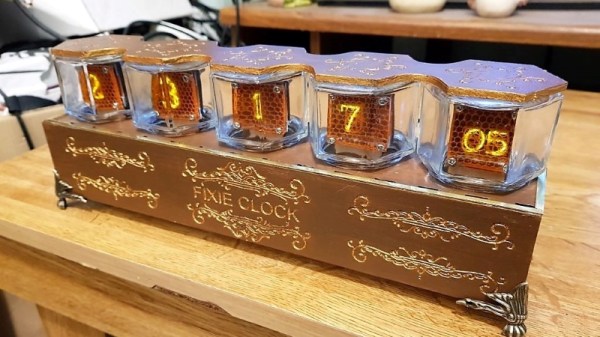
Granted, [Derek]’s faux Nixies, appropriately dubbed “Fixies,” require just a touch of willing suspension of disbelief. We’ve never see Nixies with tiny jam jars as envelopes, so that’s probably the first giveaway. But looking past that, the innards of these fake displays do a pretty convincing job of imitating the texture of the real thing.

The numbers themselves are displayed on a 128×64 white OLED display using a Nixie-like True Type font. An orange acrylic filter in front of the display gives it that warm amber Nixie glow, with laser etchings mimicking both the fine hexagonal anode grid and the ghostly cathodes of the non-illuminated numerals. The tubes looked convincing enough that a clock was in order, and after sorting through an I2C bottleneck with the help of a multiplexer, [Derek] had a pretty decent faux-Nixie clock, complete with a solenoid-actuated mechanical gong. The double-digit display for the seconds will no doubt cause some consternation among Nixie purists, but that’s probably part of the fun.

Of course, just because Nixies aren’t being mass-produced today doesn’t mean you can’t get new ones. You just have to be willing to pay for them, and [Dalibor Farný] will gladly set you up with his handmade artisanal Nixies, or even a clock kit using them.

Continue reading “Turning OLEDs And Acrylic Into Faux Nixie Tubes”

How To Run ML Applications On Particle Hardware

With the release of TensorFlow Lite at Google I/O 2019, the accessible machine learning library is no longer limited to applications with access to GPUs. You can now run machine learning algorithms on microcontrollers much more easily, improving on-board inference and computation.

[Brandon Satrom] published a demo on how to run TFLite on Particle devices (tested on Photon, Argon, Boron,  and Xenon) making it possible to make predictions on live data with pre-trained models. While some of the easier computation that occurs on MCUs requires manipulating data with existing equations (mapping analog inputs to a percentage range, for instance), many applications require understanding large, complex sets of sensor data gathered in real time. It’s often more difficult to get accurate results from a simple equation.

The current method is to train ML models on specialty hardware, deploy the models on cloud infrastructure, and backhaul sensor data to the cloud for inference. By running the inference and decision-making on-board, MCUs can simply take action without backhauling any data.

He starts off by constructing a simple TGLite model for MCU execution, using mean squared error for loss and stochastic gradient descent for the optimization. After training the model on sample data, you can save the model and convert it to a C array for the MCU. On the MCU, you can load the model, TFLite libraries, and operations resolver, as well as instantiate an interpreter and tensors. From there you invoke the model on the MCU and see your results!

[Thanks dcschelt for the tip!]

Fail Of The Week: Z-Tape Is No Substitute For Solder

Here at Hackaday, we see all kinds of mechanical construction methods. Some are impressively solid and permanent, while others are obviously temporary in nature. The latter group is dominated by adhesives – sticky stuff like cyanoacrylate glue, Kapton tape, and the ever-popular hot glue. They’ve all got their uses in assembling enclosures or fixing components together mechanically, but surely they have no place in making solid electrical connections, right?

Maybe, maybe not. As [Tom Verbeure] relates, so-called Z-tape just might be an adhesive that can stand in for solder under certain circumstances. Trouble is, he couldn’t find the right conditions to make the tape work. Z-tape, more properly called “Electrically Conductive Adhesive Transfer Tape 9703”,  derives its nickname from the fact that it’s electrically conductive, but only in the Z-axis. [Tom] learned about Z-tape in [Joe FitzPatrick]’s malicious hardware prototyping workshop at the 2019 Hackaday Superconference, and decided to put it to the test.

A card from a Cisco router served as a testbed thanks to an unpopulated chip footprint. The 0.5-mm pin spacing on the TSOP-48 chip was within spec for the Z-tape, but the area of each pin was 30 times smaller than the recommended minimum bonding area. While the chip was held down mechanically by the Z-tape, only five of the 48 pins were electrically connected to the pads. Emboldened by the partial success, [Tom] tried a 28-pin SOIC chip next. The larger pins and pads were still six times smaller than the minimum, and while more of the pins ended up connected by the tape, he was unable to make all 28 connections.

Reading the datasheet for the adhesive revealed that constant pressure from a clamp or clip might be necessary for reliable connections, which suggests that gluing down SMD chips is probably not the best application for the stuff. Still, we appreciate the effort, and the fine photomicrographs [Tom] made showing the particles within the Z-tape that make it work – at least in some applications.

Progressive Or Thrash? How Metal Detectors Discriminate

Metal detecting is a fun pastime, even when all you can find is a little bit of peace and a whole lot of pop tabs. [Huygens Optics] has a VLF-based metal detector that offers much more feedback than just a beep or no beep. This thing is fancy enough to discriminate between types of metal and report back a numerical ID value from a corresponding range of conductivity.

Most pop tabs rated an ID of 76 or 77, so [Huygens Optics] started ignoring these until the day he found a platinum wedding band without looking at the ID readout. Turns out, the ring registered in the throwaway range. Now thoroughly intrigued by the detector’s ID system, [Huygens Optics] set up a test rig with an oscilloscope to see for himself how the thing was telling different metals apart. His valuable and sweeping video walk-through is hiding after the break.

A Very Low-Frequency (VLF) detector uses two coils, one to emit and one to receive. They are overlapped just enough so that the reception coil can’t see the emission coil’s magnetic field. This frees up the reception coil’s magnetic field to be interrupted only by third-party metal, i.e. hidden treasures in the ground.

Once [Huygens Optics] determined which coil was which, he started passing metal objects near the reception coil to see what happened on the ‘scope. Depending on the material type and the size and shape of the object, the waveform it produced showed a shift in phase from the emission coil’s waveform. This is pretty much directly translated to the ID readout — the higher the phase shift value, the higher the ID value.

We’ve picked up DIY metal detectors of all sizes over the years, but this one is the ATtiny-ist.

Continue reading “Progressive Or Thrash? How Metal Detectors Discriminate”

Agora, A Hackable E-Paper Clock

[Daniel Zilinec] appreciates the aesthetics of e-paper and thought it would make a great clock. 

The natural appearance of e-paper certainly appeals to a lot of hackers. We’ve seen everything from typewriters to trackers for imaginary money. The Agora clock is designed to be battery powered,;a classic night-stand alarm clock. With its wide angle viewing and even response to light it will be easily viewable even at dawn.

He saves the user a lot of time by designing the PCB up-front. It’s got a charging IC built in, back-light LEDs and pads for buttons. All you need to do is print out the case from the available thingiverse files and assemble. The schematic and firmware are available for the more enterprising hacker to work out as well.

There’s also a somewhat puzzling watch version of the clock. It would certainly be a fashion statement to wear one of these. Still, the is something nice about the organic feel and possible fonts that make it worth considering.

The Young Engineers Guide To University Capstone Projects

Engineering degrees are as wide and varied as the potential careers on offer out in the real world. There’s plenty of maths to learn, and a cavalcade of tough topics, from thermodynamics to fluid mechanics. However, the real challenge is the capstone project. Generally taking place in the senior year of a four-year degree, it’s a chance for students to apply everything they’ve learned on a real-world engineering project.

Known for endless late nights and the gruelling effort required, it’s an challenge that is revered beforehand, and boasted about after the fact. During the project, everyone is usually far too busy to talk about it. My experience was very much along these lines, when I undertook the Submarine That Can Fly project back in 2012.  The project taught me a lot about engineering, in a way that solving problems out of textbooks never could. What follows are some of the lessons I picked up along the way. Continue reading “The Young Engineers Guide To University Capstone Projects”

A Super Easy Laser Engraver

CNC comes in all shapes and sizes, from huge industrial lathes to homebuilt wire benders. [MJKZZ] has built their own compact rig, using optical drive parts to create a cute but effective laser engraver. (Video embedded below.)

The build aims to keep things simple by holding the laser stationary, and moving the bed instead. The laser in question is a 500 mW unit, driven by the Z axis on the Arduino CNC shield used to run the system. A DVD drive is taken apart, and the worm drive stepper motor assembly is used to slew the carriage back and forth, atop which is glued a bed. Upon this bed, a copy of the same assembly is then installed, offset 90 degrees, giving the X and Y axes.

The result of this setup is a lightweight moveable bed, controllable through Gcode with GRBL. With the laser situated above on some camera mounting gear, paper can be installed on the bed and engraved with ease. The resulting accuracy is admirable, and at full power, the laser is capable of cutting through the paper.

While it’s a lightweight rig, it could serve a purpose as a cheap and easy way to produce stencils from computerized artwork. Optical drives remain popular in the DIY CNC scene, as they’re a great way to source a moveable platform with all the mechanical considerations already worked out.

Continue reading “A Super Easy Laser Engraver”