A Homemade Tube Amplifier Featuring Homemade Tubes

With the wealth of cheap and highly integrated audio amplifier modules on the market today, it takes a special dedication to roll your own from parts. Especially when those parts include vacuum tubes, and doubly so when you make the vacuum tubes from scratch too.

Now, we get it — some readers are going to find it hard to invest an hour in watching [jdflyback] make a pair of triodes to build his amplifier. But really, you’ve got to check this out. Making vacuum tubes with all the proper equipment — glassblower’s lathe, various kinds of oxy-fuel torches, all the right hand tools — is hard enough. But when your lathe is a cordless drill, and you’re using a spot welder that looks like it’s cobbled together from junk, your tube-making game gets a lot harder. Given all that, you’d expect the tubes to look a lot rougher than they are, but even with plain tungsten wire heaters and grids made from thick copper wire, they actually work pretty well. Sure, the heaters glow as bright as light bulbs, but that’s all part of the charm.

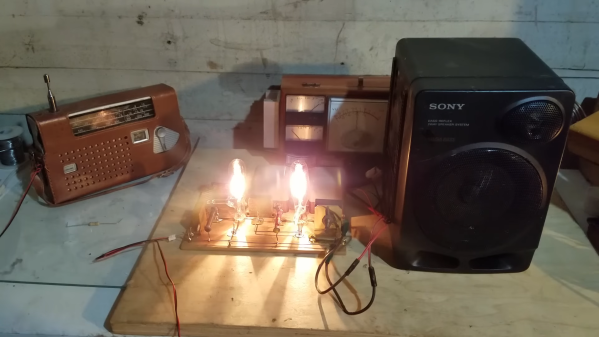
Speaking of charm, we just love the amp these tubes went into. Built in 1920s breadboard-style, the features some beautiful vintage mica capacitors and wirewound resistors, plus a variable resistor the likes of which we’ve never seen. The one nod to modernity is the clever use of doorbell transformers, one for a choke and one for the speaker transformer. They don’t sound great, but there’s no doubt they work.

We may have seen other homemade vacuum tubes before — we even recently featured a DIY X-ray tube — but there’s something about [jdflyback]’s tubes that really gets us going.

Continue reading “A Homemade Tube Amplifier Featuring Homemade Tubes”

DIY Tuning Capacitors From Washers And 3D-Printed Parts

The inside of classic radios holds wonders that the sterile chips and SMD components of today’s circuits can’t hold a candle to. Chunky resistors and capacitors, vacuum tubes with cathodes aglow, and seemingly free-form loops of wire forming inductors will all likely make an appearance. But the most fascinating bit of any old radio was connected to the tuning knob: the big variable capacitor with its interdigitating metal plates. Watching one at work, with its plates evenly and finely spaced, is still a joy to behold.

In an attempt to recapture a little of that magic, [Jeremy S. Cook] came up with this home-brew variable tuning capacitor. The frame is built mainly from 3D-printed parts, which supports a shaft made from a common bolt. Plates are fashioned from stainless steel fender washers cut in half; the fixed plates are press-fit into the frame while the rotary plates ride on the shaft. The spacing between the rotary plates is maintained by printed spacers, which also serve to lock the rotor into one solid unit. [Jeremy]’s prototype, for which he provides STL files, can be tuned between about 7 and 15 pF. Check out the build in the video below.

We love the look of this, and we can imagine custom tuning caps would come in handy for certain retro radio builds. The tuning range is a little narrow, but that could be fixed with more plates or closer spacing. That might be a tall order with thick steel washers, but we’ve seen really thin aluminum machined and closely spaced before, so this might be one approach to higher capacitance. Continue reading “DIY Tuning Capacitors From Washers And 3D-Printed Parts”

RepRap Acrylic Extrusion Using Hotbed

[Nophead] started the year off by successfully extruding acrylic using a RepRap machine. The problem when working with this material is that when the hot ooze hits the cold air the printed material tends to warp, badly. [Nophead] raised the ambient air temperature around the part being extruded by replacing the bed of the RepRap machine with a heated aluminum plate.

We took at look at his build details for the hotbed. The plate itself is aluminum that he had milled by a machinist friend of his. It looks like the heat is produced by a network of power resistors bolted and soldered to the bottom of the plate. The original idea was to produce a controllable SMT soldering platform. Unfortunately this heating method doesn’t have the power needed to raise the temp quickly but that failure turned out to be a RepRap success.