DIY Powder Coating

If you don’t yet have a toaster oven you can’t use with food, here’s yet another reason: DIY powder coating. Powder coating is much harder and more durable than paint – a property imbued to it by the fact that it’s baked on to a part. [Thomas] had a go at powder coating some skateboard trucks, and with the right tools, found the process downright easy.

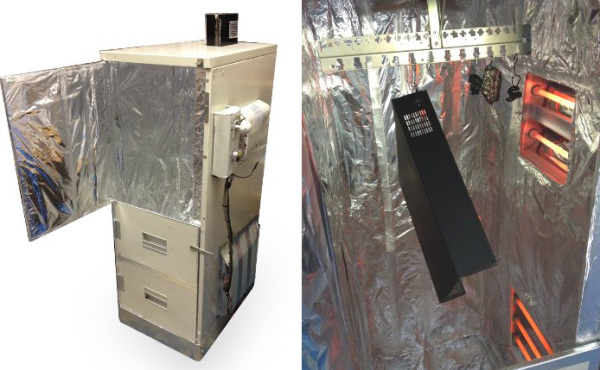
[Thomas] only needed a few things to powder coat his parts, the first and most important being a powder coat gun. A few years ago, Craftsman produced a powder coat gun that’s still available on Amazon and eBay for about $50. Powders are plentiful and cheap in small quantities. The only other tools needed were an N95 or better respirator, some high temperature tape for masking off the part and a toaster oven. If you want to coat big parts, there are DIY oven options for that.

After the part was sandblasted down to bare metal, [Thomas] masked off all the holes and threads of the part with polyimide tape. Any tape that’s capable of withstanding high temperatures will do, and most of us have a roll of Kapton sitting next to a 3D printer, anyway.

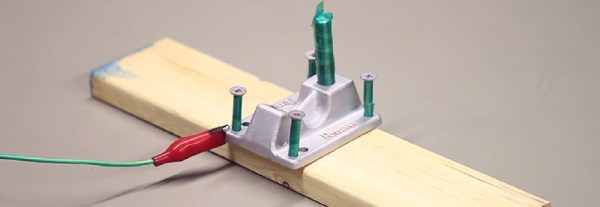
The part is coated with powder via an electrostatic charge, and this means attaching a ground lead from the gun to the part. After that, it’s just filling the gun with powder, putting it in the oven set at 450°F, and letting the powder liquefy.

In the video below, you can see [Thomas] sandblasting, powdering, and baking a set of aluminum skateboard trucks using his method. Compared to other methods of finishing metal parts – anodizing or plating, for instance, powder coating is remarkably easy and something anyone can do in a garage.

Thanks [Tyler] for sending this one in.

Continue reading “DIY Powder Coating”

Porsche-themed Mancave Clock: There Is No Substitute

With an extra Porsche brake rotor lying about and a persistent friend to be silenced, [GordsGarage] decided to fabricate a one-of-a-kind man cave wall clock.

This was not to be a boring old hang-it-flat-on-the-wall design, though. The Porsche rotor is a composite design, with a steel hub and a ceramic disc weighing only a third of what an all-steel rotor weighs. That inspired [GordsGarage] to fabricate a wall bracket to hold the rotor and allow it to spin, showing off both sides. The business side has a brushed aluminum clock face with decals cut with a s vinyl-plotter and designed to look like a Porsche tachometer, while the reverse side has a nice custom badge for his friend’s shop. The build log shares some of the nice touches that went into the clock, like powder coated parts to mimic stock Porsche red brake calipers, and the secret [GordsGarage] logo.

It may not have been a clock for social good, but it’s a great design and a nice build that’s sure to brighten up his friend’s shop. And mancave warming presents are apparently a thing now, so we’ll be sure to keep our finger on the pulse of this social trend.

DIY Powder Coating Oven Gets Things Cooking

[Bob] needed an oven for powder coating metal parts. Commercial ovens can cost thousands of dollars, which [Bob] didn’t have. He did have an rusty old file cabinet though.  And thus, a plan was born. The file cabinet’s steel shell would make a perfect oven body. He just had to remove all the drawers, sliders, and anything combustible. A few minutes with an angle grinder made quick work of the sheet metal. The drawer fronts we re-attached with hinges, allowing the newly fashioned door to swing out-of-the-way while parts are loaded into the oven.

The oven’s heating elements are two converted electric space heaters. The heating elements can be individually switched off to vary power to the oven. When all the elements are running, the oven pulls around 2000 watts, though full power is only used for pre-heating.

[Bob] used a lot of pop rivets in while building this oven, and plenty of them went into attaching sheet metal guards to protect the outside of the heating units. To complete the electrical equipment, a small fan was placed on top of the oven to circulate the air inside.

The most important part of the build was insulation. The entire inside of the oven was coated with aluminum foil and sealed with heat proof aluminum tape. On top of that went two layers of fiberglass matting. Metal strips kept the fiberglass in place, and the stays were held down with rivets. One last layer of aluminum foil was laid down on top of the fiberglass. Curing powder coating produces some nasty gasses, so [Bob] sealed the gaps of the oven with rolled fiberglass matting covered by aluminum foil and tape.

[Bob] was a bit worried about the outside of the oven getting hot enough to start a fire. There were no such problems though. The fiberglass matting makes for an extremely good insulator. So good that the oven goes from room temperature to 400 °F in just 5 minutes. After an hour of operation, the oven skin is just warm to the touch.

If you need to find [Bob], he’ll be out in his workshop – cooking up some fresh powder coated parts.


PCBs With Powder Coat

pcb

The toner transfer method of PCB production should be a staple in every maker’s bag of tricks. That being said, it’s a far from ideal solution with a lot of things that can go wrong, ruining hours of work. [Ryan] thinks he has a better solution up his sleeve, still using heat activated toner, but replacing the laser printer with a powder coating gun and a laser engraver.

[Ryan] is using a powder coating gun he picked up from Amazon for about $100. The theory behind it is simple: particles of toner coming out of the gun are statically charged, and bonded to the grounded copper clad board. In real powder coat shops, this coating is baked, resulting in a perfectly hard, mirror-like finish. [Ryan] skipped the baking step and instead through the powder coated board into a laser engraver where the PCB design is melted onto the copper. After that, wash the board off, etch it, and Bob’s your uncle.

What’s really interesting about this method of PCB production is that it doesn’t require a very high power laser. [Ryan] was actually having a problem with the toner burning with his laser engraver, so it might be possible to fab PCBs with a high power handheld laser, or even a Blu Ray laser diode.

Color-matching Powder Coat Paints

[Zitt] is sharing some methods he’s honed for color-matching powder coat paint. He developed these techniques while restoring a 1982 Star Trek coin-op machine. The image above shows a paddle used for the game. The plate that houses the control was beat up, and he needed to repaint it but wanted to make sure it didn’t look out-of-place with the molded plastic that surrounds it.

He gets his powder paints from Harbor Freight, a favorite depot for hackable goods (like drill motors, or metal carts). Usually these paints would be applied by attracting them to the piece using electrostatic charges. [Zitt’s] not doing that, but applying them with a paint sprayer instead.

The first step is to match your color. He’s using an electronic color matching device which gives data to plug into a chart on the web for a color match. Once you’ve got a formula, mix up the powder coat, and then dissolve it into some Methyl Ethyl Ketone. This goes into the spray gun and is applied in an even coat. Before heading into an oven for curing, it’s important to wait for this coat to dry. [Zitt] observed some boiling MEK on a wet test piece that left an undesirable texture on the baked paint after curing. After running a few test pieces he picked the blend that was the best match and then painted all of his restored parts.

Powder Coating At Home

[j_tenkely] wanted to do his own powder coat painting at home so he built everything he needed, including a coating booth and baking oven. The oven is double walled and built around a frame of steel building studs. Electric oven elements are controlled by a digital control panel and thermostat.

A spray booth is fashioned from a large storage bin. The powder coat gun used in this setup is a commercial project. But don’t fret, this is something you can build rather than buy.

[Thanks goat]