Rolling Your Own Minimal USB To Serial Arduino Programmer

usb-to-serial-programmer

[Hans Peter] wanted to move away from using full Arduino boards in his projects. One of the components he rarely used after the development stage is the USB hardware. Once the firmware is flashed to the chip he didn’t need it any longer. So he tried his hand with some really small SMD parts by building this USB to serial Arduino programmer.

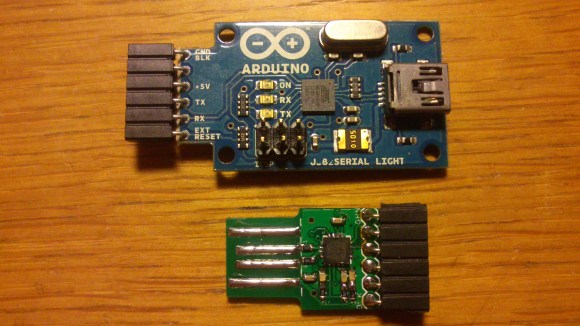
The chip he went with isn’t the FTDI part we’re used to. Instead of using an FT232RL, he opted for its smaller cousin the FT230x. This chip doesn’t fully implement the communications protocol of the 232, but it does work with AVRdude and that’s all that really matters. Above you can see [Hans’] creation next to the official Arduino USB-to-serial programmer. He used the same connection scheme, but went with an edge connector for the USB instead of using a mini-B jack.

It’s pretty impressive to see his prototyping work with the 16-pin QFN package. He soldered it dead-bug style to a couple of SIL pin headers in order to test it on a breadboard. The first board he assembled was too loose in the USB port, but he added some tape to the back to make it thicker, and coated the edge connector traces with a bit of solder and that did the trick.

PIC Programming Adapter For The Raspberry Pi

Here’s another offering when it comes to PIC programming from the Raspberry Pi. The design seeks to adapt the GPIO header so that it may be used for programming PIC microcontrollers, but this does involve a bit more than just physically connecting pins to the target chip. Most of the PIC family require a 12V programming level, and this setup makes that possible.

The sets of NPN transistors shown in the schematic fragment above are arranged in darlington pairs. They’re actually switching voltage from the 6V linear regulator built into the system using the Pi’s 3.3V pins. There’s also a 12V regulator, so you’re going to need a power supply that is capable of sourcing more than that.

We’ve seen a similar concept before but this design carries it a step further. There are several status LEDs built into the programmer, and it includes support for detecting which chip is being programmed. So far this covers just four different chips, but we’re sure that it could be adapted to fit your own needs.

[via Reddit]

AVR Programmer Made Without A Programmer

[blueHash] uses this cheap development board as an AVR programmer. What’s interesting to us is that it solves the chicken-or-egg problem that is usually encountered when bootstrapping a programmer. We’ve written about this issue before. Most programmers use microcontrollers, which first need to be flashed using a programmer. But it turns out the chip on this dev board has a DFU mode which gets around that conundrum.

He grabbed a uSD dev board for about $6. It’s got a crystal, an ATmega32u4 chip, and on the other side there’s a MicroSD card slot. We looked around and found an Atmel Datasheet (PDF) which describes the Device Firmware Upgrade mechanism. The AVR devices which support DFU are factory configured to use it. This dev board is designed to use DFU so all [blueHash] needed to do is find and configure a ISP firmware package that worked with this chip.

Raspberry Pi As A PIC Programmer

[Giorgio Vazzana] turned his Raspberry Pi into a PIC programmer using a rather small collection of common parts. It supports about a dozen different chips from the 16F family. But we’d guess that software is the limiting factor when it comes to supporting more chips.

Generally the problem with PIC programming is the need for a 12V supply. He chose to use an external 12V supply and a 78L05 linear regulator to derive the 5V rails from it. With the power worked out there are some level conversion issues to account for. The RPi provides 3.3V on the GPIO header pins, but 5V logic levels are needed for programming. He built transistor and voltage divider circuits to act as level converters. The programming software bit bangs the pins with a write time of less than eight seconds per 1k words of program data. So far this does not work with ICSP, but he plans to add that feature in a future version.

Hacking A Parallel Port Flash Memory Programmer

[Pulko Mandy] doesn’t use his flash ROM programmer very often, but he does use it. When he tried to get support for a new chip and the manufacturer suggested he just buy a newer version he decided to hack the programmer and it’s software instead.

This device connects to the parallel port and was intended for use with MS-DOS systems (no wonder there’s no longer support from the company). The board uses logic chips to add read and write function. So the first step was to analyze how they connect together and come up with a set of commands. While at it he also made some changes to the board to bring the voltage more in spec and ensure the logic levels on the parallel port met the correct voltages.

His plan was to use the board with a Linux system so the parallel port interface can stay. He used what he learned from the hardware inspection to write his own interface in C++. It works with a chip he was able to use under the MS-DOS software, but he hasn’t gotten it to work with the chip that sparked this adventure. If you’re familiar with how the AT29C040A works please consider lending a hand.

ATtiny85 Sketch Flashing Rig

We’re happy to see Arduino enthusiasts championing the use of smaller hardware when the need for a full-blown ATmega-based board just isn’t there. [Chris] has been doing just that, using ATtiny85 chips in his projects. But he’s tired of hooking jumper wires to flash the sketches. He finally got around to etching this ATtiny85 programming adapter.

If the project is not pin hungry, an ATtiny85 can run Arduino sketches without the need to port the code. The best news is that the Arduino board you used to prototype the project can be used as the programmer for the standalone chip. Here that’s a Boarduino, and [Chris] laid out a double row of female pin headers for quick plug-in. To the right you can see the DIP socket for the target chip. Although this works perfectly well, we would have liked to also see the inclusion of a 2×3 AVR ISP programming header which could be used with the full range of AT chips.

Program Your Arduino Via IR Using The Arduino IDE

Here’s a way to program an Arduino wirelessly while still using the stock IDE. It uses an alternative bootloader called SuperDuplex along with an IR receiver like the ones used for TV remotes.

As you can see, this does take two parts. There is the target device which has the IR receiver, as well as the transmitting unit which connects to the computer via USB. You can see a demonstration of the programming process after the break. It might be a bit slow, but nothing outrageous.

With hobby electronics we always thing that “what does it do?/what is it for?” is the wrong question. But in this case we there’s a very apparent use for it. If you’ve built a gadget for use in a harsh environment and want to keep the number of openings in the enclosure to a minimum (like for an underwater ROV) this is perfect. Just make sure there’s a window for the IR receiver and you’ll be able to program as much as you want. Of course it still looks like you need a method to manually reset the target chip, but you’ll think of something.

Continue reading “Program Your Arduino Via IR Using The Arduino IDE”