Amazing STARGᐰTE With DHD And Infinity Mirror Wormhole

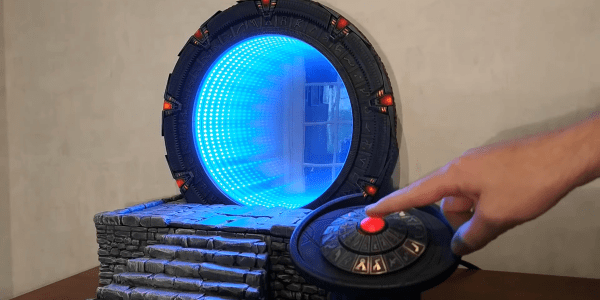
The Stargate Universe franchise has spawned numerous movies, serials, books, comics and games since 1994, and has been a favorite among science fiction fans. Prop makers and hackers often try building their own Stargate replica – the Einstein–Rosen bridge portal that allows almost instantaneous travel between two distant locations. Building an authentic looking prop requires a lot of attention to detail, and [Kristian]’s The Stargate Project is an amazingly well built rendition of the portal.

[Kristian]’s Stargate is mostly 3D printed and features a symbol ring, with chevrons that lock and light up when engaged. When the correct address has been dialled in, the wormhole is established, via an infinity mirror effect that uses 122 RGB LEDs. The Dial Home Device (DHD) is a replica of the original pedestal shaped computer, with two concentric sets of 19 buttons and a central activation button.

The Stargate ring is assembled from multiple 3D printed in sections, and measures 390 mm across. The seven Chevrons move along 3D printed rack-and-pinion gears, driven by geared micro-motors. The symbol ring is driven by a separate NEMA14 stepper motor. A Raspberry Pi with three piggy backed motor hats controls the various motors and LEDs. A USB sound card and a powered speaker provide audio effects while dialling. Once a worm hole is established, random audio snippets are played. The wormhole is maintained for 38 minutes, after which the Stargate powers down.

The Dial Home Device is built around a custom, circular PCB which holds the keypad buttons, LEDs and an ATmega 32u4 micro-controller which connects to the Raspberry Pi via USB. The 39 LEDs are APA102C’s so they only need two GPIO pins. For the keyboard, four banks of nine buttons and another bank of three are connected via a resistive ladder to the analog GPIO’s. This allows all 39 buttons to be connected via five analog inputs and was probably done to simplify PCB track layout. The back lit button key caps were printed in two parts. The translucent bases are covered with the opaque symbol caps.

Making a prop like this look like the real deal requires a lot of effort in painting the various parts, and this shows in [Kristian]’s final result, right down to the stone platform on which the Stargate sits. The one improvement we would like to see is a wireless DHD, just like it’s supposed to be. Doing so shouldn’t be too difficult, and losing the USB tether between the Stargate and its DHD would be a great upgrade to this amazing project. Check out the videos after the break, and there are many more on [Kristian]’s project page.

And if you are a fan of the franchise, then the amazingly Droolworthy Animatronic Stargate Horus Helmet is an excellent companion project to this Stargate.

Continue reading “Amazing STARGᐰTE With DHD And Infinity Mirror Wormhole”

Fool Giants With Novelty-Sized Gold Bricks

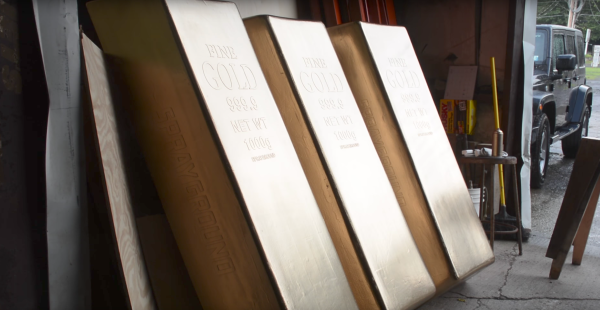
If you ever wondered how to make a giant-sized gold bar out of sheets of pink household insulation, well, there is a video showing you the steps. YouTube workshop guru [Jimmy DiResta] built oversized prop gold bricks out of foam. He cut sheets of 1.5″ Owens Corning foam insulation on his Saw Stop, making angled edges onto each piece so they could fit together in the trapezoidal ingot shape we know and love.

The pieces were put together with Great Stuff insulating foam sealant, the sort of spray foam used for filling up gaps in your house’s insulation, but here serving as glue.  [Jimmy] created lettering by lasering out the shapes in what appears to be cardboard, then gluing the letters in place, using the leftover material from the laser cut to place the letters in neat rows. He then sanded down the edges, priming and painting the bars with gold paint–but there were too many imperfections visible so he re-sanded and repainted.

We have been inundated in foam projects recently, like this ultralight built out of foam insulation and a foam cutter built with a 9V battery.

Continue reading “Fool Giants With Novelty-Sized Gold Bricks”

Droolworthy Animatronic Stargate Horus Helmet

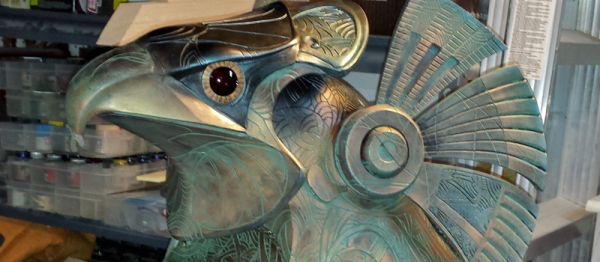
It’s incredibly likely that, unless you own one of the original movie props, your Stargate Horus helmet is not as cool as [jeromekelty]’s. We say this with some confidence because [jerome] got access to the original molds and put in an incredible amount of time on the animatronics. (See his latest video embedded below.)

Surprisingly, a number of the parts for this amazing piece were bought off the shelf. The irises that open and close they eyes, for instance, were bought on eBay. This is not to downplay the amount of custom design, though. The mechanism that moves the feathers is a sight to see, and there’s a lot of hand-machined metal holding it all together. But the payoff is watching the thing move under remote control. The eye dimming and closing, combined with the head movements, make it look almost alive.

Continue reading “Droolworthy Animatronic Stargate Horus Helmet”

An Introduction To Casting With Nuka Cola

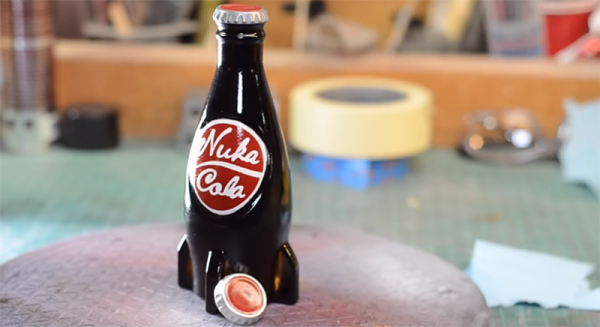
There’s less than a month until the next Star Wars is released, and consequently a few weeks until amateur propmakers and cosplayers go insane fabricating their own lightsabers with lightsaber cross guards and rolling robots. Until then, Fallout is pretty cool and [Bill] is here to give us an introduction to prop making with one of the defining objects of this post-apocalyptic universe. He created a real life copy of a Nuka Cola bottle and created a great introduction to resin casting in the process.

As with all proper part making endeavours, this project began with getting reasonably accurate models of the object to be copied. In Fallout, we’re lucky enough to have a way to look at a specific object while zooming and spinning around it, giving [Bill] the basic shape. The size was rather easy as well: all bottlecaps are the same size, so [Bill] just scaled the model to that.

With the model created and the part printed out, assembled, and finished, it was time to create the mold. [Bill] used a two-part silicone mold for the basic shape. The actual casting was done by rolling around a little resin on the inside of the mold. There’s no need for a solid, bottle-shaped block of resin; bottles are hollow anyway.

There are a few neat tricks [Bill] has up his sleeve, including coating the inside of the mold with aluminum powder and using a vinyl cutter to get the labels and logos exactly right. The finished product turns out great, perfect for leaving in the Wasteland for 200 years until the Sole Survivor stumbles upon it.

Video below.

Continue reading “An Introduction To Casting With Nuka Cola”

The Making Of The Hackaday Prize Video

As you’re probably aware, there’s a video announcing the launch of The Hackaday Prize blocking the front page of Hackaday right now. This is by design, and surprisingly we haven’t gotten any complaints saying, ‘not a hack’ yet. I’m proud of you. Yes, all of you.

Making this video wasn’t easy. The initial plans for it were something along the lines of the new Star Wars trailer. Then we realized we could do something cooler. The idea still had Star Wars in it, but we were going for the classics, and not the prequels. As much as we love spending two hours watching a movie about trade disputes, we needed to go to Tatooine.

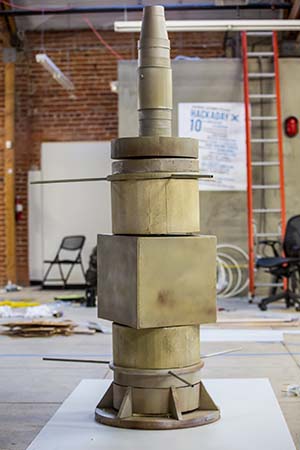
QV4A4035I just wanted to go to Toshi station

This meant building a prop. We decided on the moisture vaporators from Uncle Owen’s farm. It’s a simple enough structure to build at the Hackaspace in a weekend, and could be broken down relatively easily for transport to the shooting site. I’ve created a hackaday.io project for the actual build, but the basic idea is a few pieces of plywood, an iron pipe for the structural support, and some Coroplast and spray paint to make everything look like it’s been sitting underneath two suns for several decades.

Oh, I was the only person at the hackaspace that knew what greebles were. That’s not pertinent in any way, I’d just like to point that out.

The Suit

The vaporator is the star of the show, but we also rented a space suit. No one expected teflon-covered beta cloth when we were calling up costume rental places, but the suit can really only be described as a space-suit shaped piece of clothing. The inlet and outlet ports are resin, and the backpack is a block of foam. If anyone knows where we can get an Orlan spacesuit, or even a NASA IVA or Air Force high altitude suit, let us know.

Credits

[Matt Berggren] led the prop build and starred in the assembly footage. [Aleksandar Braic] and [Rich Hogben] rented a ridiculous amount of camera equipment. On set for the hijinks was [Aleksandar “Bilke” Bilanovic], [Brian Benchoff] (me), [Jasmine Bracket], [Sophi Kravitz], and [Mike Szczys].

Beautiful Replica Team Fortress 2 Weapons

gun

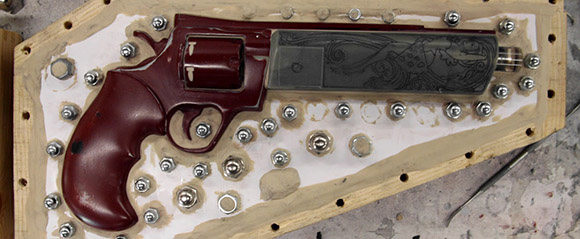
We’ve seen our share of replica props, but [Nathan]’s replica of the spy’s sidearm from Team Fortress 2 is the bee’s knees.

The build began as an off-the-shelf Airsoft gun. After removing the barrel and cylinder, [Nathan] used Apoxie Sculpt and a whole lot of sanding to turn a stock piece of metal and plastic into something that came straight from the Mann Co. store. The in-game version of the Ambassador also includes an engraving of the object of the spy’s affection, replicated by [Nathan] with some very careful Dremel work. Once the prop was done, [Nathan] built a mold box out of plywood and filled it with silicone rubber. This allowed him to make several castings of his prop weapon

This isn’t [Nathan]’s only TF2 replica prop; he also made a replica of the stock sniper gun and scout’s scattergun and a megaphone from Borderlands. In an effort to out do himself, [Nathan] is gearing to build a gun that fires two hundred-dollar, custom-tooled cartridges at ten thousand rounds per minute. He has yet to craft any hats.