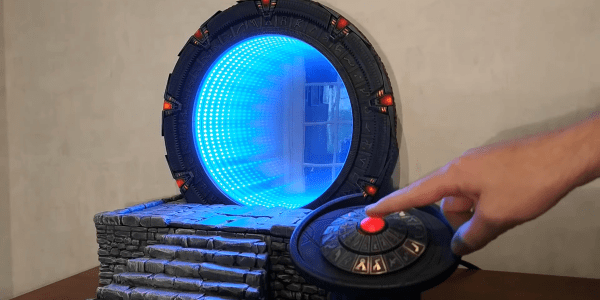
The Stargate Universe franchise has spawned numerous movies, serials, books, comics and games since 1994, and has been a favorite among science fiction fans. Prop makers and hackers often try building their own Stargate replica – the Einstein–Rosen bridge portal that allows almost instantaneous travel between two distant locations. Building an authentic looking prop requires a lot of attention to detail, and [Kristian]’s The Stargate Project is an amazingly well built rendition of the portal.
[Kristian]’s Stargate is mostly 3D printed and features a symbol ring, with chevrons that lock and light up when engaged. When the correct address has been dialled in, the wormhole is established, via an infinity mirror effect that uses 122 RGB LEDs. The Dial Home Device (DHD) is a replica of the original pedestal shaped computer, with two concentric sets of 19 buttons and a central activation button.
The Stargate ring is assembled from multiple 3D printed in sections, and measures 390 mm across. The seven Chevrons move along 3D printed rack-and-pinion gears, driven by geared micro-motors. The symbol ring is driven by a separate NEMA14 stepper motor. A Raspberry Pi with three piggy backed motor hats controls the various motors and LEDs. A USB sound card and a powered speaker provide audio effects while dialling. Once a worm hole is established, random audio snippets are played. The wormhole is maintained for 38 minutes, after which the Stargate powers down.
The Dial Home Device is built around a custom, circular PCB which holds the keypad buttons, LEDs and an ATmega 32u4 micro-controller which connects to the Raspberry Pi via USB. The 39 LEDs are APA102C’s so they only need two GPIO pins. For the keyboard, four banks of nine buttons and another bank of three are connected via a resistive ladder to the analog GPIO’s. This allows all 39 buttons to be connected via five analog inputs and was probably done to simplify PCB track layout. The back lit button key caps were printed in two parts. The translucent bases are covered with the opaque symbol caps.
Making a prop like this look like the real deal requires a lot of effort in painting the various parts, and this shows in [Kristian]’s final result, right down to the stone platform on which the Stargate sits. The one improvement we would like to see is a wireless DHD, just like it’s supposed to be. Doing so shouldn’t be too difficult, and losing the USB tether between the Stargate and its DHD would be a great upgrade to this amazing project. Check out the videos after the break, and there are many more on [Kristian]’s project page.
And if you are a fan of the franchise, then the amazingly Droolworthy Animatronic Stargate Horus Helmet is an excellent companion project to this Stargate.
Continue reading “Amazing STARGᐰTE With DHD And Infinity Mirror Wormhole” →

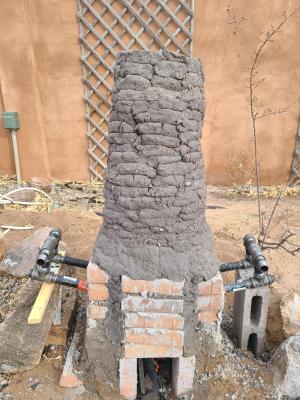 This began by collecting 150 pounds (!) of magnetic dirt from dry lake beds while hiking using a magnet pickup tool with release lever that he got from Harbor Freight. Several repeated magnetic refining passes separated the black ore from non-metallic sands ready for the furnace that he built. That is used to fire up the raw materials using 150 pounds of charcoal, changing the chemical composition by adding carbon and resulting in a gnarly lump of iron