glue stick linear actuator

Glue Stick + Servo = Linear Actuator

What do you get when you cross a glue stick with a hobby servo motor? A linear actuator, of course! Although this could be done with other household implements, the form factor of this glue stick seems perfectly suited to sit on top of a servo horn.

The servo, as you might have guessed, has to be converted to rotate fully instead of the 180 degrees or so that is typical of these types of motors. The trick to this, and what really makes it shine in our eyes, is that instead of attaching two resistors in a normal continuous rotation mod, the potentiometer is used on the glue stick allowing for position feedback.

The resulting force from this gear-reduced actuator is quite impressive, giving an “err” (over 3 Kilograms) on the scale used for testing. [Gareth] or [Chiprobot] gives a great tutorial of how to make one of these after the break, but if you’d rather just see it in action, skip to around 8:20! Continue reading “Glue Stick + Servo = Linear Actuator”

Increasing A Digital Servo Motor’s Range Of Motion

Unhappy with the 120 degree range of movement for this digital servo motor [Malte] set out to expand its flexibility. He settled upon a hack that alters the feedback potentiometer in order to give the motor a wider range (translated).

The test video (embedded after the break) shows tick marks for before and after his alterations. You can see that the wider tick marks get much closer to the 180 degree range he’s interested in. The control method is no different than it was before, the internal circuitry is still listening for a control signal with pulses between 1 and 2ms to establish the position of the servo horn. [Malte] added resistors on the two outside legs of the feedback potentiometer. This is what that control circuit measures in order to judge the position of the servo horn. He’s using 1.6k Ohm resistors in this demonstration. But he didn’t just drop them in willy-nilly. His writeup discusses the calculations he used to determine the target voltage for the motor position he wants.

Continue reading “Increasing A Digital Servo Motor’s Range Of Motion”

Robotic Doodle Clock

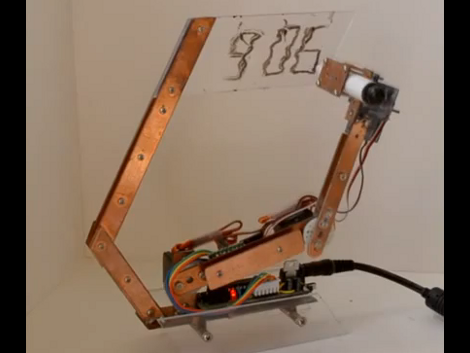
This clock has a robotic twist to it. It will show you the time by drawing it in dry-erase marker. There’s a bit of play in the arm joints and some loose motor precision which results in a wavy font that prompted [Ekaggrat] to name his project the Doodle Clock.

The shape and building material used here really make the timepiece look great. We think if the arm holding the acrylic writing surface had been at right angles this would not look nearly as pleasing. The video after the break shows the bot in action, at first flexing its wrist to switch back and forth between marker and eraser. From there it starts to draw the time, tracing the segments of each digit multiple times to achieve a readable number. The entire thing is driven by an Arduino compatible board mounted on the base of the clock.

This reminds us of that felt-tipped Turing Machine. A variation on that would also make a really nice clock display.

Continue reading “Robotic Doodle Clock”

Poking Machine

We may be showing our age here, but we have no idea what a ‘poke’ on Facebook actually means. Whether it’s the passive-aggressive manifestations of online stalkers or an extension of  the ‘like’ button, all we know is [Jasper] and [Bartholomäus] built a machine that translates virtual pokes into our analog world.

The “Poking Machine” as [Jasper] and [Bart] call it, syncs to your phone over a Bluetooth connection. The build is incredibly simple: just an ATtiny running Arduino for ATtiny, a Bluetooth controller (possibly this one from Sparkfun), and a servo. When the Facebook app on [Jasper] and [Bart]’s phone receives notification of a ‘poke’, the servo is powered and gently taps the wearer on the arm.

One thing we really like about this project is the case made of several layers of laser-cut acrylic bolted together. This case offers a very clean look even if it is a bit ungainly. We suppose the guys could have used a simple vibration/pager motor for this build, but it wouldn’t exactly be a poking machine at that point. Check out the build video after the break.

Continue reading “Poking Machine”

Live Out Your Inner Animist With Animatronic Cat Ears

While having a great white shark as your spirit animal may sound cool, we’ve found walking around in public wearing a gigantic set of mechanical jaws to be a bit of a hindrance. [abetusk] doesn’t have that problem; he can wear his awesome animatronic cat ears anywhere he pleases.

The build was inspired by these extremely Japanese animatronic ears loaded with EEG hardware to read the emotional state of the wearer. [abetusk] decided that tearing apart some brain scanning hardware was too much work for not enough benefit, so he decided servos controlled by push buttons would be just fine.

On the electronic side of the build, servos attached to a head band are controlled by an ATtiny13. A single button goes through three states for the ears: a long button press is surprise, a tap followed by a long hold is angry or sad, and tapping three times is an ‘ear wink.’ All of the code is up on GitHub, and you can check out these cat ear emotions with [abetusk]’s lovely assistant in the video after the break.

Continue reading “Live Out Your Inner Animist With Animatronic Cat Ears”

Reverse Geocache Box Looks Great And Packed With Features

[Ranger Bob] crafted this great looking Reverse Geocache box. Our favorite feature is the black piece of acrylic on top. It’s laser cut (not sure if the letters are engraved or not) and gives a great finished look while hiding a couple of things at the same time.

The orange box is a metal cash box, and there’s a smooth indentation in the lid where the handle resides when not being carried. [Bob] removed the handle and mounted the GPS module in that void. But there’s also an OLED display mounted next to it. As you can see in the demo video after the break, the screen is bright enough to be seen clearly through the smoky acrylic covering that depression.

This project gave [Bob] the chance to order his first professionally made circuit board. He did the design in Eagle, managing to keep within the 5cmx5cm limits of Seeed Studio’s least expensive Fusion PCB option. The board hosts the PIC 18F87J50 responsible for handing the screen, GPS module, input button, and USB port. Power comes from an internal Lithium battery.

We’ve featured a lot of Reverse Geocache boxes and they’re still one of our favorite projects because so much love goes into the design and build process. Here’s another one that we chose randomly for your amusement.

Continue reading “Reverse Geocache Box Looks Great And Packed With Features”

[Pythagoras], A Delta Robot For Drawing

[Pythagoras] is a delta robot built originally using RC servos. Humbly, [Aaron] “concedes” that the first version of his delta robot using hobby servos was easy to build. As anyone who has built any kind of robot knows though, there is definitely a lot of work involved in even the simplest robot. Coordinating three axes and programming it to draw a picture is a really great accomplishment.

The second version, however is currently in development and uses stepper motors instead of servos. These upgraded motors should make the robot faster, more controllable, and more accurate. This version is at least somewhat working as evidenced by the time-lapse video after the break.

Although the title page listed above is a little sparse on build details, if you dig deeper into the page, there are actually 15 articles about the ‘bot, so be sure to poke around. Continue reading “[Pythagoras], A Delta Robot For Drawing”