Discarded Plastic Laser-Cut And Reassembled

The longevity of plastic is both a blessing and a curse. On the one hand, it’s extremely durable, inexpensive, and easy to work with, but it also doesn’t biodegrade and lasts indefinitely in the environment when not disposed of properly. While this can mean devastating impacts to various ecosystems, it can also be a benefit if you happen to pick this plastic up and also happen to have a laser cutter around.

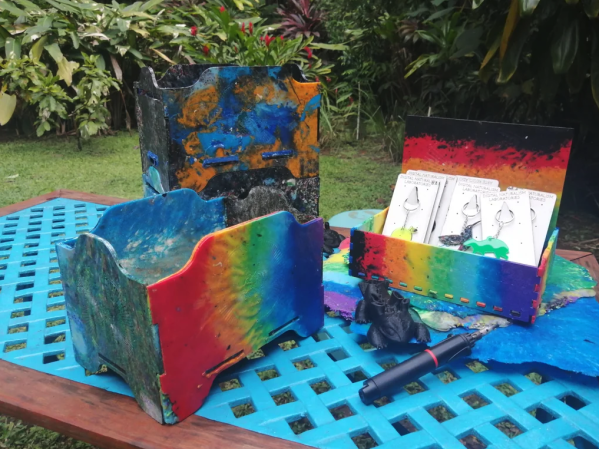
After cleaning and sorting plastic that they had found from various places, including scraps from a 3D printing facility, the folks at [dinalab] set about turning waste plastic into something that would be usable once more. After sorting it they shredded it and then melted it into sheets. They found that a sandwich press yielded the best results, as it kept the plastic at a low enough temperature to keep it from burning. Once its off of the press and properly cooled, the flat sheets of plastic can be sent to the laser cutter to be made into whatever useful thing they happen to need.

Not only does this process reuse plastic that would otherwise end up in the landfill (or worse, the ocean), it can also reuse plastic from itself since the scraps can be re-melted back into sheets. Plastic does lose some of its favorable material properties with repeated heat cycles, but we’d have to imagine this is negligible for the types of things that [dinalab] is creating. Of course, you can always skip the heat cycles entirely and turn waste plastic directly into 3D printer filament instead.

Continue reading “Discarded Plastic Laser-Cut And Reassembled”

Using Lasagna To Make Cost-Saving Molds

Building a one-off prototype is usually pretty straightforward. Find some perfboard and start soldering, weld up some scrap metal, or break out the 3D printer. But if you’re going to do a production run of a product then things need to have a little more polish. In [Eric Strebel]’s case this means saving on weight and material by converting a solid molded part into something that is hollow, with the help of some lasagna.

What [Eric] walks us through in this video is how to build a weep mold. First, the solid part is cast in silicone. Using the cast, some “sheet clay” is applied to the inside which will eventually form the void for the new part’s walls. The clay needs to be flush with the top of the mold, though, and a trick to accomplish this task is to freeze the mold (next to the lasagna) which allows the clay to be scraped without deforming.

From there, the second half of the mold is poured in, using special channels that allow the resin to “weep” out of the mold (hence the name). This two-part process creates a much more efficient part with thin walls, rather than the expensive solid prototype part.

[Eric] is no stranger around these parts, either. He’s an industrial designer with many tips and tricks of the profession, including a method for building a machining tool out of a drill press and a vise as well as some tips for how to get the most out of a low-volume production run of a product you might be producing.

Continue reading “Using Lasagna To Make Cost-Saving Molds”

Horn Antenna

Building A Horn Antenna For Radar

So you’ve built yourself an awesome radar system but it’s not performing as well as you had hoped. You assume this may have something to do with the tin cans you are using for antennas. The obvious next step is to design and build a horn antenna spec’d to work for your radar system. [Henrik] did exactly this as a way to improve upon his frequency modulated continuous wave radar system.

To start out, [Henrik] designed the antenna using CST software, an electromagnetic simulation program intended for this type of work. His final design consists of a horn shape with a 100mm x 85mm aperture and a length of 90mm. The software simulation showed an expected gain of 14.4dB and a beam width of 35 degrees. His old cantennas only had about 6dB with a width of around 100 degrees.

The two-dimensional components of the antenna were all cut from sheet metal. These pieces were then welded together. [Henrik] admits that his precision may be off by as much as 2mm in some cases, which will affect the performance of the antenna. A sheet of metal was also placed between the two horns in order to reduce coupling between the antennas.

[Henrik] tested his new antenna in a local football field. He found that his real life antenna did not perform quite as well as the simulation. He was able to achieve about 10dB gain with a field width of 44 degrees. It’s still a vast improvement over the cantenna design.

If you haven’t given Radar a whirl yet, check out [Greg Charvat’s] words of encouragement and then dive right in!