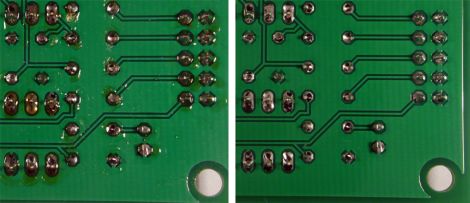
Solar Monsters… You Know… For Kids!

Teaching kids to solder using kits is a fun time, but most of these beginner kits are a bit mundane. Not this one, it’s a solar-powered monster project. The components and their wiring connections are printed on a sheet of paper along with a background for that particular monster. The base of the paper is glued to a block of wood and at each solder junction there’s a copper nail. This way the kids can line up the components, check the picture to make sure the polarization is correct for each, then solder onto the large and stable nail head. As you can see in the video after the break, when the solar cell collects enough electricity the transistor triggers a motor to spin the monster.

But don’t get the idea that kits are only for kids. If you haven’t tried your hand with SMD soldering yet, this kit is for you.

Continue reading “Solar Monsters… You Know… For Kids!”

DIY Clamp Helps With Surface Mount Soldering

Hackaday writer [Gerrit Coetzee] built a simple clamp to aid in surface mount component soldering. This cheap, easily made device uses gravity to hold tiny components in place. The tip of the bolt is pointed, but gently like a ballpoint pen so as not to harm the components with a sharp tip. Roughly position your component, rest the tip of the clamp on its center, then nudge for final positioning. [Gerrit] also points out that this acts as a heat sink, helping to prevent damage to the component if you’re too lethargic with the soldering iron.

It seems like this device has been around in one form or another for quite a long time. But the best ideas do keep on popping up. Another nice tip to go along with this one is the use of a dowel when ironing during toner transfer for your PCBs.

Programmable Game Boy Cartridge Walk Through

We looked at [Gerry’s] PLCC based programmable Game Boy cartridge back in May and mentioned that he was working on a how-to video. He did quite a bit more than that. He’s made a PDF version of the instructions but went into deep detail with a collection of four videos on his YouTube channel. We’ve embedded all four after the break. They include an introduction and background about the cartridges, desoldering the ROM chip, preparing sockets and wire, and making the solder connections. Whether you’re interested in this particular hack or not, seeing [Gerry’s] soldering practices make the videos worth watching.

Continue reading “Programmable Game Boy Cartridge Walk Through”

Wire Glue

[John P. Barker] writes up an interesting product called Wire Glue. This conductive adhesive is a paint-on alternative to soldering. At first it seems like a bizarre product but we can think of a few uses. Who hasn’t had a solder joint on a free-formed circuit break? One thing’s for sure, we’d recommend throwing a resistor into that LED circuit he’s working on.

Tools: Aoyue 968 3-in-1 Soldering And Rework Station

The $10 “fire-starter” is the most common beginner soldering iron. These are simple irons with a hot end, a handle, and little else. There’s no temperature control or indication. Despite their simplicity, they’ll do just about anything. You can solder any legged chip type with this type of iron. We used fire-starters in the lab for years.

Eventually, we wanted a hot air rework tool to salvage SMD parts and solder QFN chips. Aoyue is a relatively unknown Chinese brand that makes soldering stations very similar in appearance and function to Hakko. Aoyue stations are recommended and used by Sparkfun Electronics, something that factored heavily in our decision to buy an Aoyue. Read more about our experiences with this tool after the break.

Continue reading “Tools: Aoyue 968 3-in-1 Soldering And Rework Station”

PID SMD Reflow Hot Plate

[mightyohm] put together a nice piece of lab kit. It’s a PID controlled hot plate. The plate is capable of reaching 500F, hot enough to do SMD reflow soldering. The large chunk of metal has a hole drilled through the center to contain a cartridge heater. A thermocouple is used to monitor the temperature of the plate. Ceramic standoffs separate the plate from the rest of the device, but he still needs to come up with a way to stop the radiant heating. The control box houses the surplus PID controller along with the power switch and solid state relay (SSR).

Making A Cold Heat Soldering Iron

cold_heat

Cold Heat soldering irons are pretty cool. They heat up in seconds and cool down just as quickly. [photozz] shows us how we can make one from stuff we probably have sitting around right now. Cold Heat soldering irons work off of resistance, the tip material heats very quickly when electricity is passed through the two halves. Upon assessing what he had lying around, [photozz] realized that graphite would work much the same way.  He modified a regular soldering iron with a new two piece graphite tip, and powered it with an old pc power supply. The end result is quite nice, though it still needs some kind of temperature control.  You may recall seeing other electrical uses for graphite, such as making quick and dirty light.