Adafruit Builds The Back To The Future Time Circuit Display

back-to-the-future-time-circuit-clock

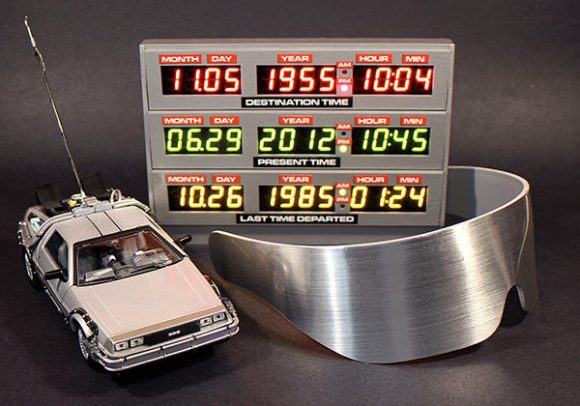
If you were growing up in the ’80s this display panel will be instantly recognizable. It’s the time circuit display which [Doc Brown] built into his 88 mph per hour DeLoren time machine. If this still doesn’t jog your memory (or if — *gasp* — you’ve never seen the movie Back to the Future) take a gander at the montage video below.

The thing is, if you look really closely you’ll find this isn’t an exact match. Hackaday alum [Phil Burgess] put together a guide for Adafruit that shows how to build this version. But the movie actually cheated when it came to the month display. In production the month was displayed as alpha characters by painting glass slides. To make that happen here you would need some sixteen segment modules (like in this project). But we don’t mind the change one bit. The nostalgic look stands on its own even if it’s not an exact replica.

We’re sure you’ve figured out by now that this is backed by a dead-accurate real time clock (chronodot) and powered by a Teensy microcontroller board. Which means you can use it for just about any of your timekeeping needs.

Continue reading “Adafruit Builds The Back To The Future Time Circuit Display”

A Custom Starcraft Keyboard

keybaord

What do you do if you’re looking for a project, but don’t know what to do? If you’re [gltovar], just look around at your hobbies. He’s been playing Starcraft for a while and finally decided to build a custom Starcraft keyboard.

[gltovar] came across an interesting keyboard layout known as TheCore. Ostensibly, this layout allows the player faster access to the commands most used when playing Starcraft. [gltovar] decided he needed a keyboard specifically designed for TheCore, and set about making one of his own design.

The keyboard matrix is designed around a 1×5 row of keys, each attached to a Teensy microcontroller acting as a USB device. Each of these rows are a separate circuit board, allowing [gltovar] to move the rows up and down ergonomically in a custom enclosure.

It’s everything [gltovar] wanted in a custom keyboard. Whether it improves his Starcraft game is another story entirely, but we’re sure he’s at least having fun.

Continue reading “A Custom Starcraft Keyboard”

Benchmarking USB Transfer Speeds

boards

[Paul Stoffregen], creator of the Teensy series of microcontroller dev boards, noticed a lot of project driving huge LED arrays recently and decided to look into how fast microcontroller dev boards can receive data from a computer. More bits per second means more glowey LEDs, of course, so his benchmarking efforts are sure to be a hit with anyone planning some large-scale microcontroller projects.

The microcontrollers [Paul] tested included the Teensy 2.0, Teensy 3.0, the Leonardo and Due Arduinos, and the Fubarino Mini and Leaflabs Maple. These were tested in Linux ( Ubuntu 12.04 live CD ), OSX Lion, and Windows 7, all running on a 2012 MacBook Pro. When not considering the Teensy 2.0 and 3.0, the results of the tests were what you would expect: faster devices were able to receive more bytes per second.  When the Teensys were thrown into the mix, though, the results changed drastically. The Teensy 2.0, with the same microcontroller as the Arduino Leonardo, was able to outperform every board except for the Teensy 3.0.

[Paul] also took the effort to benchmark the different operating systems he used. Bottom line, if you’re transferring a lot of bytes at once, it really doesn’t matter which OS you’re using. For transferring small amounts of data, you may want to go with OS X. Windows is terrible for transferring single bytes; at one byte per transfer, Windows only manages 4kBps. With the same task, Linux and OS X manage about 53 and 860 (!) kBps, respectively.

So there you go. If you’re building a huge LED array, use a Teensy 3.0 with a MacBook. Of course [Paul] made all the code for his benchmarks open source, so feel free to replicate this experiment.

Mac EFI PIN Lock Brute Force Attack (unsuccessful)

[Oliver] wiped the hard drive from a Macbook Pro using the ‘dd’ command on another machine. This does a great job of getting everything off the drive, but he was still faced with the EFI PIN lock protection when he tried to put it back into the Mac. You used to be able to clear the NVRAM to get around this issue, but that exploit has now been patched. So [Oliver] set out to use a microcontroller to brute-force the EFI PIN.

You can read his back story at the link above. He had the chance to enter a 4-digit pin before the format process. Now that he’s wiped the drive the code is at least 6 characters long, which is a lot more possibilities (at least it’s numeric characters only!). To automate the process he programmed this Teensy board to try every possible combination. It worked great on a text editor but sometimes the characters, or the enter command wouldn’t register. He guesses this was some type of protection against automated attackers. To get around the issue he added different delays between the key presses, and between entering each code. This fixed the issue, as you can see in the clip after the break. Unfortunately after two 48-hour runs that tried every code he still hasn’t gained access!

Continue reading “Mac EFI PIN Lock Brute Force Attack (unsuccessful)”

Building Huge Displays With LED Strips

Building RGB LED displays is one of the most interesting programming and engineering challenges we see here on Hackaday. Not only do the creators of large displays and LED cubes have to deal with the power requirements of driving a whole bunch of LEDs, but there’s also the issue of getting the frame rate high enough to display video. It’s a non-trivial task, but [Paul Stoffregen] has an interesting solution. He wrote an LED strip library that can control eight meter-long LED strips that can also be used on daisy chained Teensy 3.0 microcontrollers for really large displays.

[Paul]’s LED library works with LED strips based on the WS2811 LED controller IC. These chips are the most common controller chips for the individually controllable LED strips you can find at Adafruit or hundreds of Chinese resellers. The library requires DMA transfer to display images, so if you’re looking to build a ginormous RGB LED display, you might want to pick up a few of [Paul]’s Teensy 3.0 boards

[Paul] also created a Processing app that takes a video file and turns it into serial data for his LED strip library. You can check out a video of this app, library, and a 60×32 RGB LED display after the break.

Continue reading “Building Huge Displays With LED Strips”

Extracting Data With USB HID

sd_adaptor

High security workstations have some pretty peculiar ways of securing data. One of these is disabling any USB flash drives that may find their way into a system’s USB port. Security is a cat and mouse game, so of course there’s a way around these measures. [d3ad0ne] came up with a way of dumping files onto an SD card by using the USB HID protocol.

We’ve seen this sort of thing before where a microcontroller carries an executable to extract data. Previously, the best method was to blink the Caps Lock LED on a keyboard, sending one bit at a time to a micocontroller. [d3ad0ne]’s build exploits the USB HID protocol, but instead of 1 bit per second, he’s getting about 10kBps.

To extract data from a system, [ d3ad0ne] connects a Teensy microcontroller to the USB port. After opening up Notepad, [ d3ad0ne] mashes the Caps Lock key to force the Teensy to type out a script that can be made into an executable. This executable is a bare-bones application that can send any file back over the USB cable to the Teensy where it’s stored on an SD card. Short of filling the USB ports in a workstation with epoxy, there’s really no way to prevent secure files from leaking out of a computer.

Buzzed Buzzer Gives You A Breathalyzer Test While Ringing In The New Year

We’re not sure if there’s enough time to get a parts order delivered, but no geeky New Year’s party will be complete without a party buzzer that doubles as a Breathalyzer. The Buzzed Buzzer hides all of the necessary bits inside of a paper and plastic party favor. We guess it only buzzes if you’re over the limit? Actually that’s not the case at all. The accuracy of the sensor used in the project really just measures the presence of alcohol and can’t quantify BAC.

A Teensy 2.0 microcontroller board drives the project. Powered by a Lithium cell, it monitors an MQ-3 Alcohol gas sensor and drives a buzzer. The components are just small enough to be hidden by the cone of the party buzzer. You can see a demonstration of this in the short clip after the jump.

This is a fun project, but we’re still big fans of getting the crowd involved with this large LED meter which is hooked up to the same style of alcohol sensor.

Continue reading “Buzzed Buzzer Gives You A Breathalyzer Test While Ringing In The New Year”