Fat Bottomed-Keebs, You Make The Clackin’ World Go Round

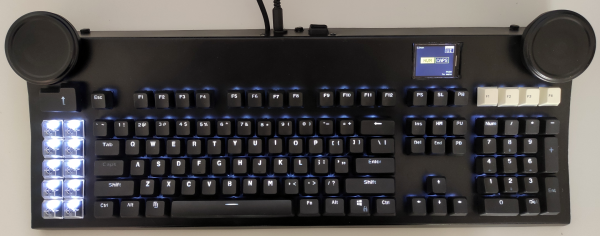
Depending on the circles you run in, it can seem like the mechanical keyboard community is all about reduced layouts, and keebs without ten-keys are about as big as it gets. But trust us, there’s plenty of love out there for the bigger ‘boards like [Ben]’s tasty fat-bottomed keyboard. Man oh man, what a delicious slab of throwback to the days when keyboards doubled as melee weapons.

More specifically, this is a 199-key modified Sun Type 5 layout. It runs on two Teensy 2.0s — one for the keyboard matrix, and one for everything else. [Ben] made the metal enclosure entirely by hand without a CNC or laser cutter. While I don’t personally care for linear switches, I have mad respect for these, which are vintage Cherry Blacks pulled from various 1980s AT/XT boards. That 10-key island on the left is dedicated to elementary macros like undo/redo, cut/copy/paste, and open/close/save.

We absolutely love the gigantic rotary encoders, which give it a bit of a boombox look. There’s even reuse involved here, because the encoder knobs are made from jam jar lids that are stuffed with homemade Sugru. [Ben] can use them to play PONG on the LCD and other games not yet implemented on the everything-else Teensy.

Here’s another Sun-inspired keeb, but this one has a reverse 10-key layout that matches the DTMF phone dial.

Vintage Keyboard Gets The QMK Treatment

While nobody could deny that computing technology has some a long way in the last few decades, there are many out there who believe peak keyboard was sometime before the turn of the new millennium. They prefer the look, feel, and especially the sounds, of those classic keyboards to what passes for an input device these days. So much so that it’s not uncommon to see one of these old mammoths get freshened up and pushed into service with a modern computer.

Which is exactly what [Juan Pablo Kutianski] has done with his Compaq MX-11800. This keyboard, which is actually a branded version of the Cherry G80-11800, really stands out in a crowd. With an integrated trackball and a two-row arrangement for the function keys, it’s not hard to see why he’d want to show it off. But while the hardware itself was solid, the features and capabilities of this old school keyboard left something to be desired.

The solution was to replace the keyboard’s original electronics with a Teensy++2.0 running the popular QMK firmware. This not only made the keyboard USB, but allowed [Juan] to tweak things such as the trackball sensitivity and add in support for layers and macros. All of which can be managed through VIA, a graphical configuration tool for QMK.

As we’ve seen in so many projects, the combination of QMK running on the Teensy is a powerful tool for getting the most out of your keyboard. Whether breathing new life into a vintage piece of hardware or creating something truly custom like our very own [Kristina Panos] recently did, it’s definitely something to keep in mind if you’re considering any keyboard hacking.

Inputs Of Interest: Curves Are The Key To My Type

While I may have fallen in love aesthetically with the ErgoDox I built, beauty is only skin deep. And that’s funny, because you can see right through it. But the thing is, it’s just too big and knife-edged to be my daily driver. I keep missing the space bar and thumb-thumping the acrylic wasteland between the thumb cluster and the mainland.

The point was to make a nice portable keeb, even though all my trips for he foreseeable future are going to be limited to the bed or the couch. But it has to be comfortable, and the ErgoDox in its present state simply is not long-term comfortable. I’d take it over a rectangle any day, but it would probably end up being a half day.

Ergo isn’t so much a preference for me as it is a necessity at this point. I feel like I can honestly say that I might not be typing these words to you now if it weren’t for the Kinesis. I don’t want my fingers to do unnecessary legwork, or downgrade from the quality of typing life that concave keys have afforded me. So let me just say that using the ErgoDox made me want to build a dactyl even more than before.

Continue reading “Inputs Of Interest: Curves Are The Key To My Type”

Up Your Game With A Battle Tested Input Device

If you’re looking to add some realism to your flight setup without converting the guest bedroom into a full-scale cockpit simulator, you might be interested in the compromise [MelkorsGreatestHits] came up with. He bolted a genuine military keypad to his PC joystick and instantly added 100% more Top Gun to his desktop.

The Rockwell Collins manufactured keypad came from eBay, and appears to have been used in aircraft such as the EA-6B Prowler and Lockheed C-130 Hercules for data input. Each key on the pad is wired to the 37 pin connector on the rear, which [MelkorsGreatestHits] eventually mapped out after some painstaking work with a breakout board.

Once the matrix was figured out, he made up a cable that would go from the connector to a Teensy 2.0 microcontroller. The Teensy reads the keypad status and converts button presses over to standard USB HID that can be picked up in any game.

The joystick side of the build is a VKB Gunfighter, which is already a pretty nice piece of kit on its own. No modifications were necessary to the joystick itself, other than the fact that it’s now mounted to the top of a black project enclosure. It still connects directly to the computer via its original USB cable, as the keypad has its own separate connection. As luck would have it, the joystick is almost a perfect fit in the opening on the keypad, which presumably would have been for a small screen when installed in the aircraft.

Finding cockpit components from military aircraft on eBay is not as hard as you may think; something to keep in mind if you ever decide to tackle that custom flight simulator build.

Sunny Custom Keyboard Illuminates The Past

Ever wonder why keyboard number pads and telephone dials have reversed layouts? Theories abound, but the most plausible one is that, shrug, it just happened that way. And now we’re stuck with it.

Well, that answer’s not good enough for [Jesse], so he punched up his own keyboard design that combines the golden years of function-rich Sun and IBM keyboards with Ma Bell’s DTMF number arrangement. That’s right, Sundial has 24 function keys total, and the number pad matches Ma Bell’s all the way down to the asterisk/zero/octothorpe pattern on the bottom row. How do we know what the unlabeled ones are, you ask? It’s all mapped out in this layout editor. We love that it has all the key lock indicator lights, because that practice should’ve never faded out in the first place.

Though inspired by this beautiful unicorn of an Arduino keyboard we covered a few months ago, the Sundial uses a Teensy 2.0 to translate [Jesse]’s Cherry MX clone-driven wishes into software commands. It’s also painstakingly hand-wired, so here’s the build log for you to drool over. Just cover up your keyboard first.

Teensy Script Plays Nintendo Switch, Strikes Out

The most recent of the Zelda franchise, Breath of the Wild, is known for its many, many puzzles.  One of the more frustrating ones involved bowling with a giant snowball at the top of a hillside.  [Bertrand] did not like this, so he cheated the system hacked the Nintendo Switch so that he “genuinely earned” a strike every time he played.  He achieved this by writing a script for a Teensy module that got him those sweet rupees.

The Teensy houses an Atmel 90USB1286 microcontroller.  When paired with LUFA software, it can emulate numerous controllers including keyboards, joysticks, etc.  It also handily has a Mini-B USB connector located on its rear, allowing it to communicate to the Switch with ease.  After confirming the hardware was compatible, [Bertrand] looked towards the software side noticing the similarity between what already existed and what he was attempting to accomplish.  He happened upon this in a Splatoon 2 fork that allows players to draw posts. 

In essence, it takes image files as input and emulates the controls and buttons to draw a 1-bit version of the image automatically.  This takes care of syncing the hardware as well as how to simulate the button presses.  But instead of reading an image file, it needed to take a custom script as the input.  This required starting from scratch.  The first logical step — of course — was to create a language similar to Logo, a name that surely brings back memories of the time of big hair and shoulder pads.  He only needed a handful of simple commands to control Link:

typedef enum {
	UP,
	DOWN,
	LEFT,
	RIGHT,
	X,
	Y,
	A,
	B,
	L,
	R,
	THROW,
	NOTHING,
	TRIGGERS
} Buttons_t;

Continue reading “Teensy Script Plays Nintendo Switch, Strikes Out”

Wii U RetroPie Console Looks Gorgeous

What to do with your broken gaming consoles? Gut it and turn it into a different gaming console! Sudomod forum user [banjokazooie] has concocted his own RetroPie console from the husk of a WiiU controller — an ingenious demonstration of how one can recycle hardware to a perfectly suited purpose.

[banjokazooie] actually used an original shell for this build, but if you happen to have a broken controller around — or know someone who does — this is a great use for it. A Raspberry Pi 3 is the brains of this operation (not counting [banjokazooie]), and it features a 6.5″ HDMI display, a Teensy 2.0 setup for the inputs, a headphone jack with automatic speaker disconnection, dual 3400 mAh batteries, an external SD card slot, and a lot of hard work on the power supply circuit — although [banjokazooie] reports that the hardest part was cutting to size a custom PCB to mount it all on. The original plan was to see if the idea was possible, and after a three month effort, it appears to work beautifully.

Continue reading “Wii U RetroPie Console Looks Gorgeous”