Hackaday Prize Entry: Measuring 3D Magnetic Fields

Sometimes you have to start out with big goals. Ninth-graders [Finja Schneider] and [Myrijam Stoetzer] are aiming to make a magnetic field scanner that would be helpful in finding large underground metallic objects, like unexploded WWII bombs that pose a real threat whenever a new parking garage is excavated in Germany. But even big goals have to start out somewhere, so they’re gaining experience with the sensors and the math necessary to recreate 3D magnetic flux vector fields on household objects like sawblades and magnetized screwdrivers.

Magnetized screwdriver in the "valley"
Magnetized screwdriver in the “valley”

For their science-fair project, [Finja] and [Myrijam] took a mid-80s fischertechnik “toy” 2D scanner kit, mounted a 3D magnetic sensor to it, and wrote some firmware to scan around and pass the data back to a computer where they reconstructed the field lines and made some nice visualizations. Along the way, they tried a number of designs, from a DIY chassis on carbon-fiber rails to sensors with ferrofluid. They document their successes and failures equally nicely in their lab report (PDF, German). You can get a lot of the gist, however, from [Myrijam]’s blog and their Hackaday.io entry.

You might also recognize [Myrijam] from her work with [Paul Foltin] on their eye-controlled wheelchair interface. These are some really cool projects! We’re excited to see how they develop, and are stoked that the future of hacking is in such capable hands.


Hackaday Prize Entry: Linear Stepper Motors

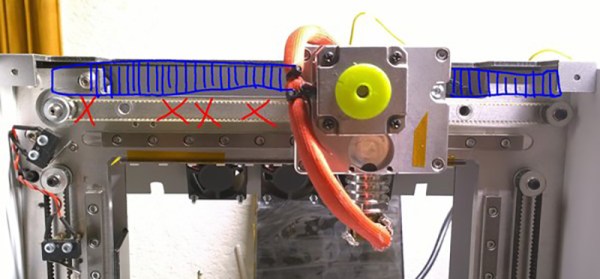
Today, your average desktop 3D printer is a mess of belts, leadscrews, and pulleys. For his Hackaday Prize entry, [DeepSOIC] is eliminating them entirely. How’s he doing this? With a linear stepper motor.

Search Google for ‘linear stepper motor’ and you’ll find a bunch of NEMA-bodied motors with leadscrews down the middle. This is not a linear stepper motor. This is a stepper motor with a leadscrew down the middle. The motor [DeepSOIC] has in mind is more like a mashup of a rack gear and a maglev train. The ‘linear’ part of this motor is a track of magnets perpendicular to the axis of the motor, with alternating polarities. The ‘motor’ part of this motor is a carriage with two field windings. It’s an unrolled stepper motor, basically, and could run a 3D printer much faster without as much slop and backlash.

Right now [DeepSOIC] is in the experimental phase, and he had a plan to print the axis of his linear stepper in ferromagnetic filament. This did not work well. The steel found in electric motors has a magnetic permeability of about 4000, while the magnetic permeability of his brand of ferromagnetic filament is about 2. Even if the idea of printing part of a motor was a complete failure, it was a great success at characterizing the properties of a magnetic 3D printing filament. That makes it a great entry for the Hackaday Prize, and a perfect example of what we’re looking for in the Citizen Science portion of the Prize.

Hackaday Prize Entry: A Simple CNC

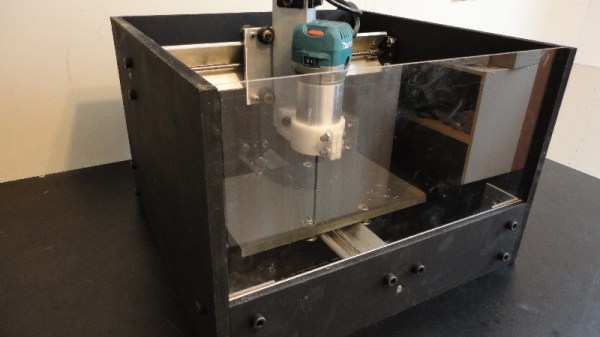
3D printers are all the rage, but there’s still space for more traditional CNC machines. For their Hackaday Prize entry, [Andy], [Tim], and [Chris] are building the Sienci Mill – a simple desktop CNC mill that’s able to cut drill and carve everything from wood to circuit boards.

As far as desktop CNC machines go, it doesn’t get much more simple than this. They’re using steel plates for the rails, NEMA 17s for the motors, and a simple stepper motor driver Arduino shield for the controller. The more complex parts are 3D printed, and the BOM doesn’t add up to much.

Right now, the guys are testing their mill on wood, plastic, and aluminum. With 3D printed parts, they’re also able to test a bunch of different spindles from the ubiquitous router to the smaller Dremel. It’s a great project and should be fantastically cheap when the guys finalize the plans, making this a great entry for the Hackaday Prize.

The HackadayPrize2016 is Sponsored by:

Hackaday Prize Entry: The World’s First Tampon Monitor

[Amanda], [Jacob], [Katherine], and [vyshaalij] had a class project for their ‘Critical Making’ class at UC Berkeley. The task was to design a ‘Neo-Wearable’ that would fulfill an unmet need. Realizing women make up about 50% of the population and experience monthly periods for about half of their lives, they decided to make what can only be described as a tampon monitor. It’s a small device that monitors the… uh… ‘fullness’ of a tampon. Yes, it’s wearable technology that is actually useful, and a great entry for the Hackaday Prize.

The my.Flow, as the team are calling it, uses mechanical means to measure the saturation level of a tampon. Why would anyone want to do this? Because of leakage, anxiety, and risk of Toxic Shock Syndrome (TSS).

A ‘smart’ tampon needs some electronics, and the team’s solution to this is rather ingenious. They’re using a small, flat, wearable clip that attaches to the user’s undergarments and is connected to the tampon by an elongated tail.

Already the team is seeing a lot of success – the market research for this product showed a whopping 82% of women are ready to buy a product that would help prevent TSS. This fledgling startup was picked up by the HAX accelerator and moved to China to bring this product to life. It’s a great idea, and also a great entry for the Hackaday Prize.

The HackadayPrize2016 is Sponsored by:

Hackaday Prize Entry: Electronics Anywhere, Any Time

There has always been a need for electronic graph paper – a digital device that records ones and zeros, writes bits, and keeps track of analog voltages. Many moons ago, this sort of device was graph paper, wrapped around a drum, slowly spinning around once per day. With the advent of cheap, powerful microcontrollers and SD cards these devices have become even more capable.

For their entry to the Hackaday Prize, [Kuldeep] and [Sandeep] have built Box0. It’s a lab in a bag, an open source data acquisition unit, and a USB device that toggles pins, all in one simple device.

The hardware for this devices consists of an STM32F0 microcontroller, a USB port, and enough pins to offer up a few SPIs, an I2C bus, eight channels of digital output, two PWM channels, a UART, analog in, and analog out.

Of course, hardware is the easy part. If you want to do something useful with a device like this, you need some software. Here is where the project really shines. They have libraries for Python, Julia, C, Java, and JavaScript. That’s enough to make anyone happy, and makes this Box0 exceptionally capable. For a demonstration, they’ve built a curve tracer for transistors and red, green, and blue LEDs with the Box0. It works, and it looks like this actually is an exceptionally useful device.

Hackaday Prize Entry: MiniSam-Zero

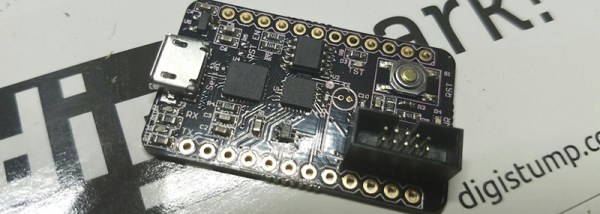
Thanks to the Arduino, Atmel’s SAM line of ARM microcontrollers are seeing a lot of use as 32-bit learning tools. For his Hackaday Prize project, [Jeremey] is using one of these chips without all the Arduino drama. He’s built a tiny Atmel SAM dev board that’s cheap, simple, and interestingly for a 32-bit ARM board, easy to program.

For this board, [Jeremy] is using Atmel’s SAM D09, the smallest member of the family that also includes the chip on the new Arduino Zero and the Arduino M0 (built by the other Arduino). The MiniSam-Zero uses a slightly smaller chip with 8 kB of on-chip Flash. Eagle-eyed complainers will notice the SAM D09 does not have internal EEPROM, so an EEPROM is added on-board. Also on board is a temperature sensor and a Silicon Labs CP2102 for serial communications.

That last chip – the Serial USART – allows for a rather interesting build if the firmware is done right. Instead of futzing about with ARM SWD while programming the device, a serial bootloader would allow anyone to plug a USB cable into this board and upload code straight from an IDE. This is perhaps the coolest feature of the MiniSam-Zero, and something [Jeremy] has worked tirelessly to get right. He can upload directly from Atmel Studio, and after a bit more work, [Jeremy] will be able to program this board directly from the Arduino IDE. That’s great work, and although this board isn’t as capable as other ARM microcontroller offerings, it’s still a fantastically useful device.

The HackadayPrize2016 is Sponsored by:

Hackaday Prize Entry: Reverse Engineering Blood Glucose Monitors

Blood glucose monitors are pretty ubiquitous today. For most people with diabetes, these cheap and reliable sensors are their primary means of managing their blood sugar. But what is the enterprising diabetic hacker to do if he wakes up and realizes, with horror, that a primary aspect of his daily routine doesn’t involve an Arduino?

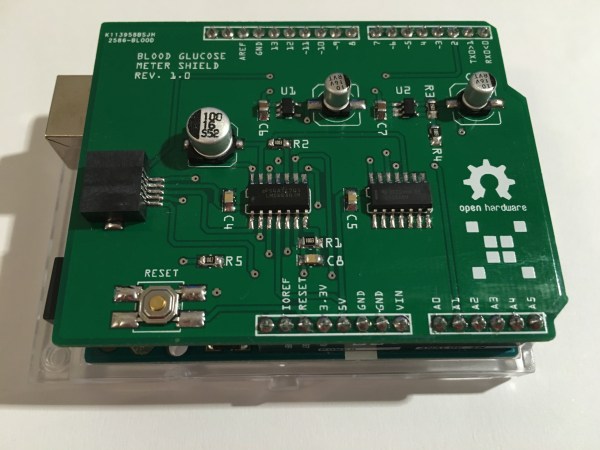
Rather than succumb to an Arduino-less reality, he can hopefully use the shield [M. Bindhammer] is working on to take his glucose measurement into his own hands.

[Bindhammer]’s initial work is based around the popular one-touch brand of strips. These are the cheapest, use very little blood, and the included needle is not as bad as it could be. His first challenge was just getting the connector for the strips. Naturally he could cannibalize a monitor from the pharmacy, but for someone making a shield that needs a supply line, this isn’t the best option. Surprisingly, the connectors used aren’t patented, so the companies are instead just more rigorous about who they sell them to. After a bit of work, he managed to find a source.

The next challenge is reverse engineering the actual algorithm used by the commercial sensor. It’s challenging. A simple mixture of water and glucose, for example, made the sensor throw an error. He’ll get it eventually, though, making this a great entry for the Hackaday Prize.

The HackadayPrize2016 is Sponsored by: