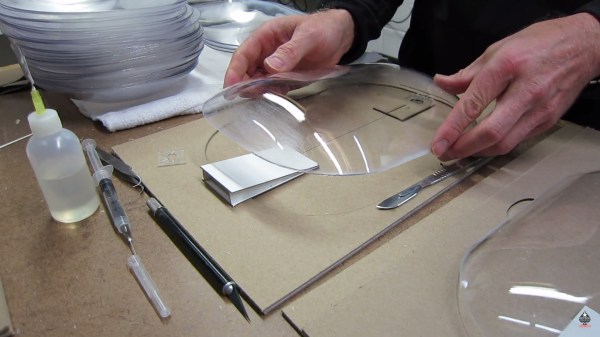
High Vacuum With Mercury And Glassware

If you want to build your own vacuum tubes, whether amplifying, Nixie or cathode-ray, you’re going to need a vacuum. It’s in the name, after all. For a few thousand bucks, you can probably pick up a used turbo-molecular pump. But how did they make high vacuums back in the day? How did Edison evacuate his light bulbs?

Strangely enough, you could do worse than turn to YouTube for the answer: [Cody] demonstrates building a Sprengel vacuum pump (video embedded below). As tipster [BrightBlueJim] wrote us, this project has everything: high vacuum, home-made torch glassware, and large quantities of toxic heavy metals. (Somehow [Jim] missed out on the high-voltage from the static electricity generated by sliding mercury down glass tubes for days on end.)

Continue reading “High Vacuum With Mercury And Glassware”

That Sucks! Death Of A Tesla Coil

[Electroboom] always has some entertaining videos. He recently tried to run his Tesla coil in a vacuum. The video shows some interesting results, along with his usual bleeped out expletives as he drills into his hand and suffers other indignities in the name of electronics.

Unfortunately, a bit of extra bolt caused the coil to arc internally, eventually leading to the impressive device shuffling off its mortal… um, well, let’s just say its untimely demise. Along the way, though, you get to see some interesting techniques for building a silicone seal for the vacuum chamber, and some neat Tesla coil tricks with a closed off syringe.

Continue reading “That Sucks! Death Of A Tesla Coil”

The Fab Lab Next Door: DIY Semiconductors

You think you’ve got it going on because you can wire up some eBay modules and make some LEDs blink, or because you designed your own PCB, or maybe even because you’re an RF wizard. Then you see that someone is fabricating semiconductors at home, and you realize there’s always another mountain to climb.

We were mesmerized when we first saw [Sam Zeloof]’s awesome garage-turned-semiconductor fab lab. He says he’s only been acquiring equipment since October of 2016, but in that short time he’s built quite an impressive array of gear; a spin-coating centrifuge, furnaces, tons of lab supplies and toxic chemicals, a turbomolecular vacuum pump, and a vacuum chamber that looks like something from a CERN lab.

[Sam]’s goal is to get set up for thin-film deposition so he can make integrated circuits, but with what he has on hand he’s managed to build a few diodes, some photovoltaic cells, and a couple of MOSFETs. He’s not growing silicon crystals and making his own wafers — yet — but relies on eBay to supply his wafers. The video below is a longish intro to [Sam]’s methods, and his YouTube channel has a video tour of his fab and a few videos on making specific devices.

[Sam] credits [Jeri Ellsworth]’s DIY semiconductor efforts, which we’ve covered before, as inspiration for his fab, and we’re going to be watching to see where he takes it from here. For now, though, we’d better boost the aspiration level of our future projects.

Continue reading “The Fab Lab Next Door: DIY Semiconductors”

[Dave’s] Not Just A Member Of The Air Club For Tweezers

We are always surprised how much useful hacking gear is in the typical craft store. You just have to think outside the box. Need a hot air gun? Think embossing tool. A soldering iron? Check the stained glass section. Magnification gear? Sewing department.

We’ve figured out that people who deal with beads use lots of fine tools and have great storage boxes. But [Dave] found out they also use vacuum pickup tweezers. He had been shopping for a set and found that one with all the features he wanted (foot pedal, adjustable air flow, and standard tips) would run about $1000.

By picking up a pump used for bead makers and adding some components, he put together a good-looking system for about $200. You can see a video of the device, below, and there are several other videos detailing the construction.

Continue reading “[Dave’s] Not Just A Member Of The Air Club For Tweezers”

A DIY Vacuum Pickup Tool For $75

If you’re assembling prototypes of SMD boards on your own, placing the parts accurately can be a pain. Of course, it’d be nice to have a full pick and place machine, but those are rather expensive and time consuming to set up, especially for a small run of boards. Instead, a vacuum pickup tool can help you place the parts quickly and accurately by hand.

The folks over at Ohmnilabs have put together their own DIY pickup tool for about $75, and it’s become part of their in-house prototyping process. They grew tired of placing components with tweezers, which require you to remove parts from the tape before lifting them, and have a tendency to flip parts over at the worst time.

The build consists of a couple parts that can be bought from Amazon. An electric vacuum pump does the sucking, and the vacuum level is regulated with an adjustable buck converter. A solid foot switch keeps your hands free, and syringe tips are used to pick the parts up.

This looks like a simple afternoon build, but if you’re prototyping, it could save you tons of time. To see it in action, check out the video after the break.

Continue reading “A DIY Vacuum Pickup Tool For $75”

Heatmap of vacuum cleaning robot

A Glimpse Into The Mind Of A Robot Vacuum Cleaner

What’s going through the mind of those your autonomous vacuum cleaning robots as they traverse a room? There are different ways to find out such as covering the floor with dirt and seeing what remains afterwards (a less desirable approach) or mounting an LED to the top and taking a long exposure photo. [Saulius] decided to do it by videoing his robot with a fisheye lens from near the ceiling and then making a heatmap of the result. Not being satisfied with just a finished photo, he made a video showing the path taken as the room is being traversed, giving us a glimpse of the algorithm itself.

Looking down on the room and robot

The robot he used was the Vorwerk VR200 which he’d borrowed for testing. In preparation he cleared the room and strategically placed a few obstacles, some of which he knew the robot wouldn’t get between. He started the camera and let the robot do its thing. The resulting video file was then loaded into some quickly written Python code that uses the OpenCV library to do background subtraction, normalizing, grayscaling, and then heatmapping. The individual frames were then rendered into an animated gif and the video which you can see below.

Continue reading “A Glimpse Into The Mind Of A Robot Vacuum Cleaner”

Measuring capacitance with wax dielectric

How To Measure The Dielectric Constant For DIY Capacitors

Every now and then you need to make your own capacitor. That includes choosing a dielectric for it, the insulating material that goes between the plates. One dielectric material that I use a lot is paraffin wax which can be found in art stores and is normally used for making candles. Another is resin, the easiest to find being automotive resin used for automotive body repairs.

The problem is that you sometimes need to do the calculations for the capacitor dimensions ahead of time, rather than just throwing something together. And that means you need to know the dielectric constant of the dielectric material. That’s something that the manufacturer of the paraffin wax that makes it for art stores won’t know, nor will the manufacturers of automotive body repair resin. The intended customers just don’t care.

It’s therefore left up to you to measure the dielectric constant yourself, and here I’ll talk about the method I use for doing that.

Continue reading “How To Measure The Dielectric Constant For DIY Capacitors”