Forget Siri – Make Wolfram Alpha Your Personal Assistant

So you can spend a bundle on a new phone and it comes with a voice-activated digital assistant. But let’s be honest, it’s much more satisfying if you coded up this feature yourself. Here’s a guide on doing just that by combining an Asterisk server with the Wolfram Alpha API.

Asterisk is a package we are already familiar with. It’s an open source Private Branch Exchange suite that lets you build your own telephone network. Chances are, you’re not going to build one just for this project, but if you do make sure to document the process and let us know about it. With the Asterisk server in place you just need to give the assistant script an extension (in this case it’s 4747).

But then there’s the problem of translating your speech into text which can be submitted as a Wolfram query. There’s an API for that too which uses Google to do that translation. From there you can tweak abbreviations and other parameters, but all-in-all your new assistant is ready to go. Call it up and ask what to do when you have a flat tire (yeah, that commercial drives us crazy too).

[Thanks M]

Commandeer X10-based Home Automation With Your Favorite Microcontroller

X10 has been around for a long time. It’s the brand name for a set of wireless modules used to switch electrical devices in the home. There’s all kinds of different units (bulb sockets, electrical outlets and plug pass-throughs, etc.) and they’re mass-produced which makes them really inexpensive. Whether you already have some X10 controlled devices or just plan to add them later, we think you’ll find [Jeff Ledger’s] post on controlling the system with a Propeller chip interesting. The technique is not Propeller specific and will be simple to port to your microcontroller of choice.

[Jeff] got his hands on an X10 Firecracker. This provides a DB-9 serial connection meant to be used for computer control. But the interface is so simple all you need is two I/O pins feeding the level converter circuit seen above. You can get the TC4427 for less than a dollar, and the Firecrcker module for as little as $6. Since [Jeff] has already covered adding Ethernet via a ENC28J60 he goes on to detail a web-server that lets him switch his devices, all served from the Propeller chip.

Here’s a different ENC28J60 Ethernet tutorial for those interested in webpages from microcontrollers. And then there’s also a ZigBee home automation project if you’re not warming up to the idea of using X10 modules.

Sensor Array Tries To Outdo The Other Guys

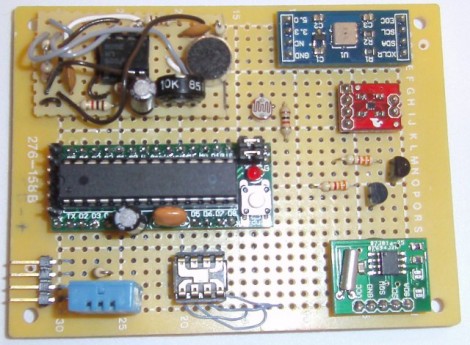
The team over at the Louisville Hackerspace LVL1 is not going to be outdone when it comes to collecting environmental data. They put together this Frankenstein of sensor boards that lets you collect a heap of data showing what is going on around it.

At the center-left a small Arduino clone is responsible for collecting the data. Data storage is not talked about on their write-up, but if that’s an ATmega328 chip you should be able to work out an easy way to store data on the 1k of internal EEPROM. If that’s not enough, there is an I2C bus included on the board making it easy to add a compatible EEPROM.

The sensor on the bottom left should look familiar. It’s a DHT11 temperature and humidity sensor we’ve seen popping up in projects lately. But wait, there’s also a TMP102 temperature sensor; but that’s not the end of it. A BMP085 pressure sensor also includes a third temperature sensing option. Want to see when the lights go on in the room? There’s a CdS sensor and a TSL230R Lux sensor for that. An op-amp circuit can measure the sound level in the room via one of the Arduino’s ADC pins. And finally, an RTC board is used for time stamping the data.

Obviously this is overkill, and we’re sure it’s meant as a test platform for various sensors. All of them have been mounted on the protoboard and wired up using the point-to-point soldering method.

Tutorial: Replacing Bad Capacitors

[glytch] sent in a tutorial on replacing dying capacitors on a motherboard, and we honestly can’t think of a better subject for an introductory tutorial. There’s nothing like having your friends think you’re a wizard for bringing broken electronics back from the grave.

For the repair a dead motherboard was [glytch]’s quarry. After taking a look at the board, he found a few bulging caps that were ready to burst. After ordering a few caps with the same voltage, capacitance, and dimensions (trust us, you want the same size cap), [glytch] took an iron and desoldering braid to the board and replaced a few caps.

Sooner or later, all capacitors are going to go break down. This isn’t always a bad thing – we picked up quite a few “broken LCD monitors” in the years after the capacitor plague and repaired them with a few dollars worth of caps. A lot of the caps in our late 80s computers have been replaced, and these machines are still chugging along.

Augmented Reality Using Pez Dispensers

[Johan] really got himself out of a bind with this one.

After his son started playing AppMates, he desperately wanted the requisite figures to complete the experience. AppMates is an iPad game where a child drives a small plastic car around a virtual environment displayed on the touchscreen. Unfortunately for [Johan]’s son, the officially licensed Cars characters would take at least three months to make it to his home in Sweden. [Johan] did the next best thing and made his own.

[Johan] took a pair of Cars Pez dispensers and took off the figure. The bottom of the character was covered with a bit of plastic from the base of the Pez dispenser and a little bit of conductive foam and was added to the body. Now [Johan]’s son can drive his toys around Radiator Springs just like he could with the official figurines. There’s also the aspect of not making a child wait months for a bit of plastic, so we’ll call this one a win for [Johan].

Continue reading “Augmented Reality Using Pez Dispensers”

Adding Sound To Children’s Museum Exhibits

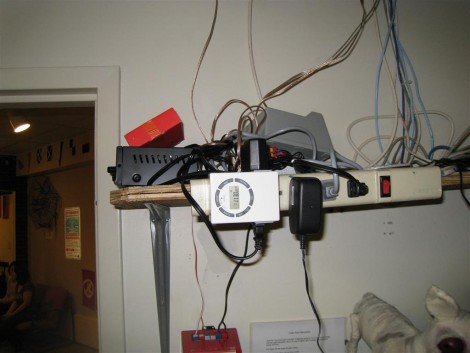
Believe it or not, the local Children’s Museum staff was happy that [Bill Porter] left this mess of wires and equipment in one of their offices. It makes up an ambient sound system for a couple of their exhibits. A movie without sound just doesn’t fully entertain, and the same can be said for these exhibits. The ambient sound that goes with a boat room, and a hospital room in the Museum really helps to snag your attention. And [Bill’s] material cost came in at just over $200 for both rooms.

He started off by purchasing a speaker, amp, and MP3 breakout board (SparkFun). The speaker mounts in one of the ceiling tiles, with the wire running to a different room where the audio equipment is housed. There were a couple of problems with this; the museum staff forgot to turn on the system, and for all of its expense this only provided one room with audio. Bill figured that since only one speaker was being used he could make an audio file with a different clip on the left and right channel, then feed them to different rooms. He also added that programmable timer so the sounds will turn themselves on and off.

This isn’t the first time we’ve seen hacks end up as museum pieces. Check out this other project that rigs up some interactive telephones.

The EMGRobotics Robot Control Board

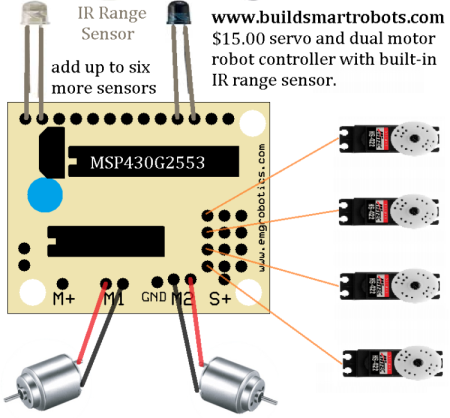
There are many microcontrollers available to make robots with, but few that are built with the exact features that you would need to construct one. Meet the [EMGRobotics  MSP430G2553] robot controller board.

At $15 without the CPU or $17 with a [MSP430G2553] already plugged into the socket, this control board may make some Arduino enthusiasts take note for their next project.  Besides a very attractive price (you’ll have to go to the home page to make a purchase), this board ships with a built in IR range sensor and accommodations to drive up to four hobby servo motors. If this isn’t enough for you, two 3 volt DC motors can be soldered directly to connections on the board and controlled independently and in either direction. In other words you don’t have to muck about with trying to build your own H-bridge circuit, it’s all taken care of for you!

The article shows it controlling a Hexbug spider. [EMGRobotics] has actually done something similar (and well-documented) before with this platform, so be sure to check out the post about hacking the Hexbug iteslf!