Smart Speed Bumps Slow Only Speeding Cars

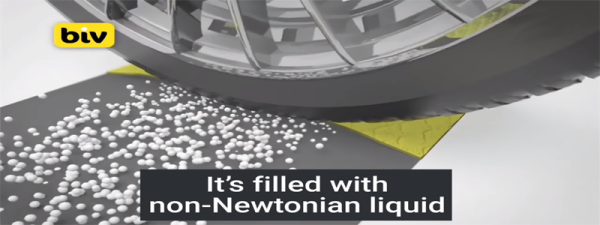
Like it or not speed bumps are an essential part of our road infrastructure especially in built-up places like near schools [Business Insider UK] reports non-Newtonian liquid filled speed bumps are being tested in Spain, Israel and Germany.

Traditional speed bumps do have their drawbacks; damage to the underside of low vehicles is common. While they should be uniform in dimensions, in practice they can vary significantly, making driving over unfamiliar bumps a bit unpredictable. This is all set to change with non-Newtonian bumps which are soft to drive over at slow speeds but for speeding drivers they harden up and act more like traditional bumps. This gives drivers following the letter of the law a better driving experience whilst still deterring speeding drivers..

Non-Newtonian materials are nothing new but we think this is a great way of purposing these type of materials. Roads are getting smart whether you like it or not. It’s time to embrace technology and improve our commutes.  Continue reading “Smart Speed Bumps Slow Only Speeding Cars”

WiFi Deauthentication VS WiFi Jamming: What Is The Difference?

Terminology is something that gets us all mixed up at some point. [Seytonic] does a great job of explaining the difference between WiFi jammers and deauthenticators in the video embedded below. A lot of you will already know the difference however it is useful to point out the difference since so many people call deauth devices “WiFi Jammers”.

In their YouTube video they go on to explain that jammers basically throw out a load of noise on all WiFi channels making the frequencies unusable in a given distance from the jammer. Jammers are also normally quite expensive, mostly illegal, and thus hard to find unless of course you build your own.

WiFi deauthentication on the other hand works in a very different way. WiFi sends unencrypted packets of data called management frames. Because these are unencrypted, even if the network is using WPA2, malicious parties can send deauthentication commands which boot users off of an access point. There is hope though with 802.11w which encrypts management frames. It’s been around for a while however manufacturers don’t seem bothered and don’t implement it, even though it would improve the security of a WiFi device from these types of attacks.

Continue reading “WiFi Deauthentication VS WiFi Jamming: What Is The Difference?”

Dead Bug Soldered LED Ring Of Awesome

Sometimes the simplest things in life are the most beautiful. [The Tweaker] has soldered an LED circle on the top of an ATmega328P chip, and it looks great.

Using nothing more than some solder, wire, 20 x Pico 0402 (1mm x 0.5mm) blue LEDs and an ATmega328P (7mm x 7mm), [The Tweaker] managed to cram 20 LEDs into a circle on the top of the chip soldered in dead bug style. The chip is running some Arduino code and is operating on the 8 MHz internal crystal oscillator, so that manages to keep the part count low. The soldering is done in a spiral so the LED terminals are hooked up to the right pins, but it seems to add to the aesthetics of the project and looks like it would take a really steady hand. Once you connect a power source it displays chasing lights as well as other light patterns.

There may not be much to this project but it does look great.

Continue reading “Dead Bug Soldered LED Ring Of Awesome”

False Claims On Kickstarter: What’s New?

Kickstarter and its ilk seem like the Wild West when it comes to claims of being “The world’s most (Insert feature here) device!” It does add something special when you can truly say you have the world record for a device though, and [MellBell Electronics] are currently running a Kickstarter claiming the worlds smallest Arduino compatible board called Pico.

We don’t want to knock them too much, they seem like a legit Kickstarter campaign who have at time of writing doubled their goal, but after watching their promo video, checking out their Kickstarter, and around a couple of minutes research, their claim of being the world’s smallest Arduino-compatible board seems to have been debunked. The Pico measures in at an impressive 0.6 in. x 0.6 in. with a total area of 0.36 sq.in. which is nothing to be sniffed at, but the Nanite 85 which we wrote up back in 2014 measures up at around 0.4 in. x  0.7in. with a total area of around 0.28 sq.in.. In this post-fact, fake news world we live in, does it really matter? Are we splitting hairs? Or are the Pico team a little fast and loose with facts and the truth?

There may be smaller Arduino compatible boards out there, and this is just a case study between these two. We think when it comes to making bold claims like “worlds smallest” or something similar perhaps performing a simple Google search just to be sure may be an idea.

Continue reading “False Claims On Kickstarter: What’s New?”

Give Your Bench Power Supply A Helping Hand

[Sverd Industries] have created a pretty cool bench power supply integrating soldering helping hands into the build. This helps free up some much-needed bench space along with adding that wow factor and having something that looks unique.

The build is made from a custom 3D printed enclosure (Thingiverse files here), however if you have no access to a 3D printer  you could always just re-purpose or roll your own instrument enclosure. Once the enclosure is taken care of, they go on to install the electronics. These are pretty basic, using a laptop PSU with its output attached to the input of a boost/buck module. They did have to change the potentiometers from those small PCB mounted pots to full size ones of the same value though. From there they attach 4 mm banana sockets to the output along with a cheap voltmeter/ammeter LCD module. Another buck converter is attached to the laptop PSU’s output to provide 5 V for a USB socket, along with a power switch for the whole system.

Where this project really shines is the integrated helping hands. These are made from CNC cooling tubes with alligator clips super glued to the end, then heat shrink tubing is placed over the jaws to stop any accidental short circuiting while using them.

This isn’t a life changing hack but it is quite a clever idea if space is a hot commodity where you do your tinkering, plus a DIY bench power supply is almost a rite of passage for the budding hacker.

Continue reading “Give Your Bench Power Supply A Helping Hand”

3D Printed Gearbox Lifts An Anvil With Ease

How strong can you make a 3D-printed gearbox. Would you believe strong enough to lift an anvil? [Gear Down For What?] likes testing the limits of 3D printed gearboxes. Honestly, we’re amazed.

3D printing has revolutionized DIY fabrication. But one problem normally associated with 3D printed parts is they can be quite weak unless designed and printed carefully.

Using a whole roll of filament, minus a few grams, [Gear Down For What?] printed out a big planetary gear box with a ratio of 160:1 and added some ball bearings and using a drill as a crank. Setting it up on a hoist, he started testing what it could lift. First it lifted a 70 lb truck tire and then another without any issues. It then went on to lift a 120 lb anvil. So then the truck tires were added back on, lifting a combined weight of 260 lb without the gearbox breaking a sweat.

This is pretty amazing! There have been things like functional 3D-printed car jacks made in the past, however 3D-printed gear teeth are notoriously easily broken unless designed properly. We wonder what it would take to bring this gearbox to the breaking point. If you have a spare roll of filament and some ball bearings, why not give it go yourself? STL files can be found here on Thingiverse.

Continue reading “3D Printed Gearbox Lifts An Anvil With Ease”

Make Your Own Reed Switches

[Lucid Science] shows us how to make some simple reed switches. Reed switches are simple components that detect a magnetic field and can close or open a circuit once detected. While not really a thing of beauty, these DIY reed switches should help you out if you just can’t wait to order some or you fancied trying your hands at making some components from scratch.

Reed switches normally come in very small form factors so if you need something small then this may not be for you however the video does show you on a macro scale the fundamental workings of a reed switch. To make your own reed switch you need only a few parts: some copper, enamelled wire and magnets. They really are simple devices however sometimes it’s easy to overlook how simple some things are when they are so small that you can’t really see how they work.

Making your own components from scratch is probably the best way to understand the inner workings of said component. In the past we have seen some pretty awesome self built components from these beautiful DIY Nixie tubes to even making your own LEDs

Continue reading “Make Your Own Reed Switches”