The Firebird32, A New Dev Board On The Block

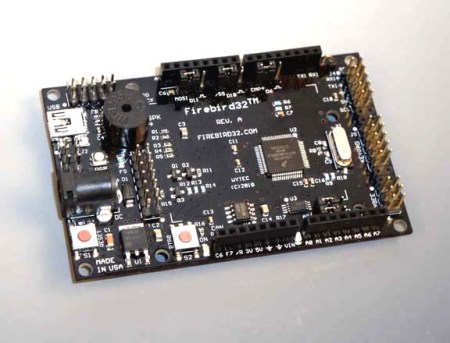
Here is yet another development board to add to your list (If you are into keeping lists), introducing the Firebird32. There seems to be no end to the production of new development boards, following the current style the Firebird32 comes in the familiar Arduino form factor to fit all of your Arduino shields.

The Firebird32 from [Wytec] is build around the 32bit Freescale Flexis MCU [MCF51JM128] running the Coldfire V1 core commonly found in industrial and medical equipment. We were kindly donated a board before release, the first thing that we noticed was  the onboard 8×2 segment LCD which makes the perfect debuging tool. The board along with fitting standard Arduino shields has extra input headers for a keypad, an accelerometer and an extra communication header (IC2/SPI/SCI). It’s also sporting 8 x 12bit analogue inputs, external 32k EEPROM, an RGB LED, a buzzer and an extra push button. The Flexis chip along with the beefy 32bit processor can run at a clock rate up to 48Mhz using PLL and has an integrated USB port, all of this for under $30.

Continue reading “The Firebird32, A New Dev Board On The Block”

Don’t Buy An IPAD, Make One!

When [Liu] decided he wanted one of the new iPads, rather than fork out the cash he decided to build his own tablet Mac. His creation functions just as you would expect any tablet PC with some nice extra features such as running on Windows XP for any of you Microsoft lovers. [Lui’s] tablet apparently only cost him about $300USD, about half the price of the real thing. The two part video shows the entire construction in fast forward including a demonstration of the final working product. It looks like the tablet is built using spare tablet/laptop components and the case is constructed from sheet aluminum before being painted and labelled with apple stickers. The final product is a bit thicker than the real thing but looks great in the laptop style case [Lui] has whipped up. Kudos to the guy for saving a few bucks and making something great in the process, the video after the break is definitely worth a watch. This isn’t the first time we’ve seen this kind of thing, actually we’ve seen a few.

Continue reading “Don’t Buy An IPAD, Make One!”

A Homemade Electric Chair Reveals A Darker Side Of Hacking

Here is an example of what happens when someone is tempted to use their hacking skills for evil. Hopefully it goes without saying, but do NOT try this one at home.

When his wife asked for a divorce [Andrew Castle] obviously did not like the idea so got busy building himself a DIY electric chair, placing a metal chair in his garage he wired it up to a 240V 13 amp wall output with the intention of luring his wife to sit in the chair for “a chat”. Fortunately the story ends as well as any story involving something as foolish as a homemade electric chair can end. We are guessing that [Andrews] wife’s suspicions were initially aroused when she was invited to sit in the lone metal chair in the garage, whilst he stood behind her holding a rubber cudgel. After a brief struggle she managed to escape unharmed and [Andrew] is now facing 10 years in prison.

All questionable morals aside, from the brief description available it looks like there may have been a few holes in the logic (or lack of) behind the construction of the chair, for one circuit breakers come to mind.

Bubble Blowing Bot Blows Big Bouncy Bubbles


[Rob] Was cleaning out his car hole when he stumbled across a servo, a PC cooling fan, an Arduino and apparently a whole lot of bubble mixture. With all of this, some scrap timber and a few trips to the dollar store, he was able to whip up this bubble blowing bot to entertain his children. It looks like a fairly simple mechanism, the servo tips the old pipe bend into the sudds and the fan provides the air to blow the bubble. The size of the bubble is varied by altering the speed that the pipe bend tips.

The video after the break shows the robot blowing some nice big bubbles, and a quick view of the fan and servo mechanism. There is not a lot of information available but we find the motion of the pipe bend and the big bubbles it blows entertaining, you know the saying, “simple things…”

Continue reading “Bubble Blowing Bot Blows Big Bouncy Bubbles”

Magic Locket

[Andrey] from RTFM has built himself a glowing LED pendant using only three parts and some simple code. The hack is not particularly complicated but [Andrey] provides some decent instructions on Pickaxe programming via an RS232 serial port and RGB LED control to produce the nice glowing effects. The pendant contains an RGB LED, a Pickaxe-08 microcontroller and a couple of button cell batteries. To cram everything inside the locket, [Andrey] had to grind down the LED and Pickaxe-08 to their minimum dimensions using a file.

All of the Basic code for the pendant is supplied on the project page and [Andrey] describes how he manages to PWM all three LED pins for the colour effects. The video after the break may be of interest to anyone who has not had a go at Picaxe programming before or for a beginner who wants to try out some new embedded devices without a big hit to the wallet.

Continue reading “Magic Locket”

A Beautiful Fibre Optic Chandelier

[Bill] Decided that his living room could use some more light, or at least some more colourful light. To meet his needs [Bill] has designed and build what he describes as a modern/contemporary chandelier. The chandelier uses about 250′ of fibre optic cable to distribute the light from eight LED’s, light from the fibre optics is being diffused using marbles in place of the globes you would normally expect in a chandelier.

Control is achieved wirelessly via a pair of Xbee modules, this will allow [Bill] to integrate it into his home automation project he plans for the future. The colours are currently set using three slide potentiometers, and the chandelier is powered using a repurposed ATX power supply. It looks like a lot of time was spent on the acrylic enclosure and it was worth it because the results are fantastic. Check out his website for build details and the video after the break for a demonstration on the chandelier in action.

Continue reading “A Beautiful Fibre Optic Chandelier”

The Perfect Beer Every Time


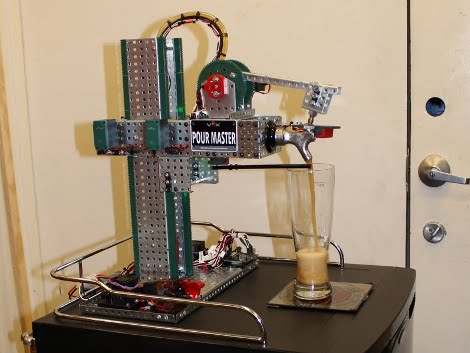
The Pour Master Pro is a beer pouring robot, designed and built by a team of beer/robot lovers as their entry to the Red Bull’s Creation Contest. Pour Master keeps it simple (opposed to some of the other bar bots we have seen), it uses a modified kegerator and tap for the beer, and a few sensors which it uses to maintain its state and pour the perfect beer. The standard tower on the kegerator was replaced with a rack and pinion driven tower constructed using the Vex Robotics Design System, this allows the Pour Master to set its height to the size of any glass using a limit switch and a set of ultrasonic rangefinders.

For a perfect pour the beer must not spill over the side of the glass and needs a decent 3/4″ head, to manage this the Pour Master uses the ultrasonic rangefinder to detect the thickness and height of the head. The entire thing is controlled by an Arduino running a finite state machine which provides state feedback to the user with an LCD display. Check out the video after the break for their competition entry, now all you need is one robot to make the beer and why not another to drink it.

Continue reading “The Perfect Beer Every Time”