If You Don’t Have A Steampunk Smartphone…

Steampunk Smartphone

[Richard] has been working on the concept of “incorporating more feeling into our digital objects”. His design is still just a concept but hopefully someone will take up the idea because we think the results would be amazing. The attention to detail in the design is impressive, the Rotary Mechanical Smartphone as he is calling it contains a generic smartphone maintaining all the features such as the touch screen, but also including a set of interchangeable rotary dials on the back. There is the true rotary dial just like an old phone and a push button dial, for complete integration of the old and new technologies.

Once the design was complete, Richard built himself a proof of concept model to show off his work. The shell was 3D printed and copper plated to get the desired steampunk finish. The rotary dials are made from brass plate and hand finished. [Richard] has put in a lot of effort getting the finish right with electroplating, painting, and sanding. The final results are nothing short of impressive. Check out his site for some very nice photos and build details.

An Even Simpler Smartphone Garage Door Opener

We have seen smartphone garage door openers in the past, but [Lou’s] Hack is beautiful in its simplicity. His door opener tackles the problem without using computers, Arduinos, wireless modules or even any smartphone based applications. For this project all that is needed is a Bluetooth headset and a single transistor. The door opener uses the Samsung HM1100 Bluetooth headset, which [Lou] has done significant testing on to show that his creation is quite secure and will not open the door unexpectedly.

When this headset connects to a phone it produces a beep from the earbud, so [Lou] removed the speaker and replaced it with a transistor. Now he can use the voltage spike produced by the amplifier before the beep as his switching signal. By wiring the transistor in parallel with the door button inside his garage he is able to open the door wirelessly by connecting then right away disconnecting from the headset. This setup is apparently perfectly secure as the only way to initially link your phone with the headset is to be inside the garage. Check out the video after the break for build instructions and a demonstration.

Continue reading “An Even Simpler Smartphone Garage Door Opener”

Thirty Year Old Pachinko Machine Meets An Arduino

When [Jim’s] thirty year old Pachinko machine started to freeze up and shorted out his computer’s graphics card he decided it was time to replace the old electronics with an Arduino. Originally the Pachinko machine ran off a 48 volt supply and control was achieved using about 20 relays, the random numbers were generated using some complex mechanical reels which we hope will find their way into a new project in the future.

All of this and the daunting amount of wire inside the machine have been replaced with an Arduino and an MP3 Shield for the sound effects, powered from a much safer 12 volts. The new machine runs just as you would expect a thirty year old machine to run, with all the grinding sounds and flickering lights. Check out the video after the break to see an overview of the project.

Continue reading “Thirty Year Old Pachinko Machine Meets An Arduino”

Blox That Play Back

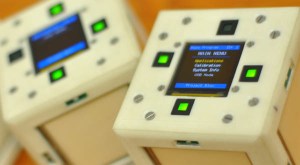
I’m sure most of us remember playing with blocks when we were kids, well now this age old children’s toy has been crammed full of electrical goodness by a team of Electrical Engineers from the University of Texas. The Blox, which are about the size of a standard Rubiks Cube each contain 16 IR sensors, 4 touch panels, a 3-axis accelerometer, a ZigBee Wireless Module, a 2″ OLED display and a battery, all controlled using an ARM Cortex processor.

The Blox show their full potential when used together as an interactive distributed computing system. Blox is an open source project so all of the build details, schematics and code can be found on the website. For an overview and demonstration of the Blox check out the video after the break.

Continue reading “Blox That Play Back”

The WALL-E Robot

[Dino’s] latest Hack a Week project, the WALL-E Robot shows quite simply what you can create from a few dollars worth of toys from garage sales and cheap stores. When he found the WALL-E toy at a garage sale, Dino decided that he had to give it a brain. Using the geared motors from some Rumble Robots, the H-bridges from some $5 remote control cars (after his own H-bridges cooked themselves), an ultrasonic sensor and an Arduino, WALL-E was brought to life.

The WALL-E Robot might not be the brightest bot, or the most stable, but the project definitely demonstrates some effective scrounging for parts that would have done WALL-E proud. It also shows how even the most simple projects can cause the most headaches when they don’t go right. Check out the video after the break for the build details, a demonstration and to see a man talk to a toy robot.

Continue reading “The WALL-E Robot”

A Prosthetic Arm That Doesn’t Cost An Arm And A Leg.

After a motorcycle accident that cost him is arm [Martin] and his son [Luke] chose not to give up. They used their considerable mechanical skills to create a replacement robotic arm which allowed Martin to start doing some of the simple things he had been unable to do with the prosthetic he was originally fitted with. There are not a lot of details but it seems the arm has 2 degrees of freedom with a claw manipulator, controlled via chin controls to free up his other arm. For anyone interested in similar projects you should check out the Open Prosthetics Project. There is a short video after the break which tells Martin’s story. If you don’t have an arm, build one, seems perfectly reasonable to us. Nice work guys! We look forward to seeing the next version.

Continue reading “A Prosthetic Arm That Doesn’t Cost An Arm And A Leg.”

Another Smarter Water Heater Timer

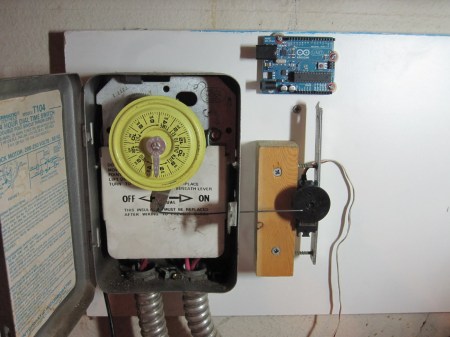
When notes stuck to the water heater failed [Ryan] decided to whip up “the world’s most expensive 240V relay” using a servo, a real time clock and of course an Arduino. All in an attempt to save a buck or two thanks to LA’s “Time-of-Use program”.

Using a protoshield Ryan soldered up a RTC module using the DS1307 chip. On board he added some LED’s and switches including a holiday switch keep the heater off, a next cycle button when you need some hot water and to hell with the expense, and a pulsing blue LED.. for no reason at all. The board flips the mechanical switch using a servo and piano wire, simple but effective. We wonder how many days/weeks it will take for it to offset its expense?