An Atari 800 XL, partially covered in battery residue

Massive Cleaning Effort Saves Acid-Drenched Atari

Anyone who’s ever had to deal with the aftermath of a leaking battery knows how much damage such a failure can cause. Degrading batteries leak corrosive chemicals that eat away PCB traces, clog up connectors and generally leave everything looking nasty. Getting your gadget working again usually calls for lots of scrubbing, followed by patiently tracing suspect connections and restoring any broken ones.

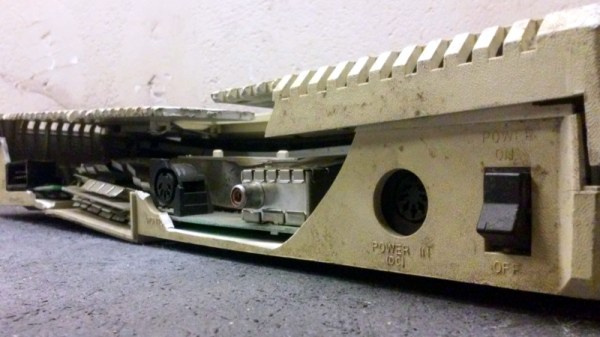
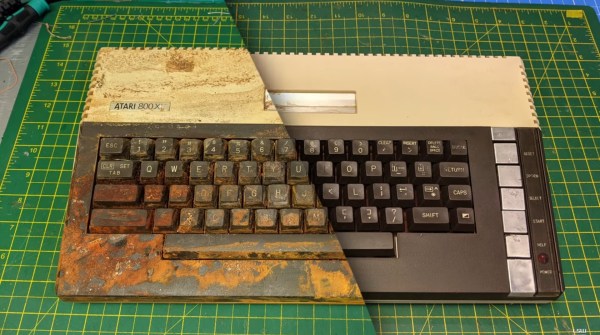
We doubt, however, that anyone has ever gone through as much effort as [Lee Smith] has on his Atari 800 XL. This example was listed on eBay in a severely damaged state, having been stored under an entire box of leaking batteries. [Lee] put in a bid and, to his own bemusement, won the auction. He was now the proud owner of a classic gaming machine which was covered in a thick brown crust of battery residue.

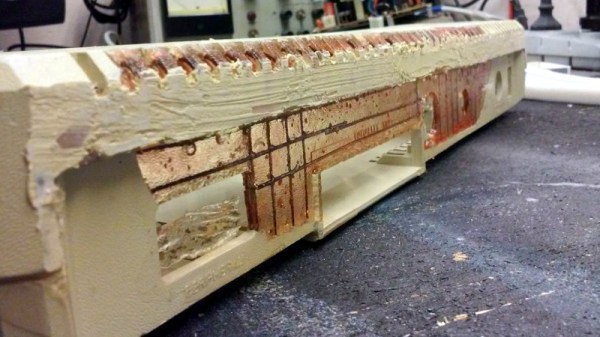
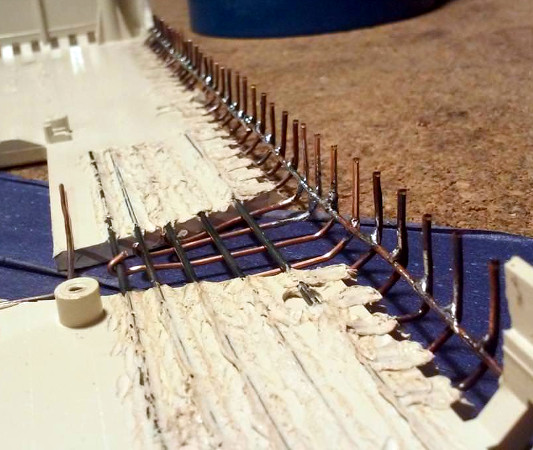
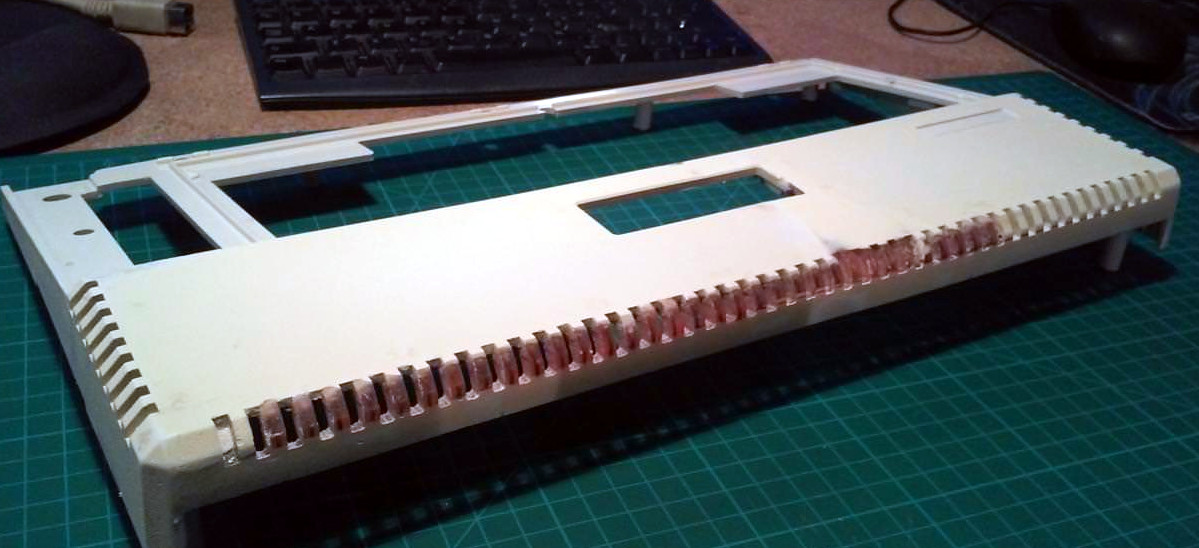
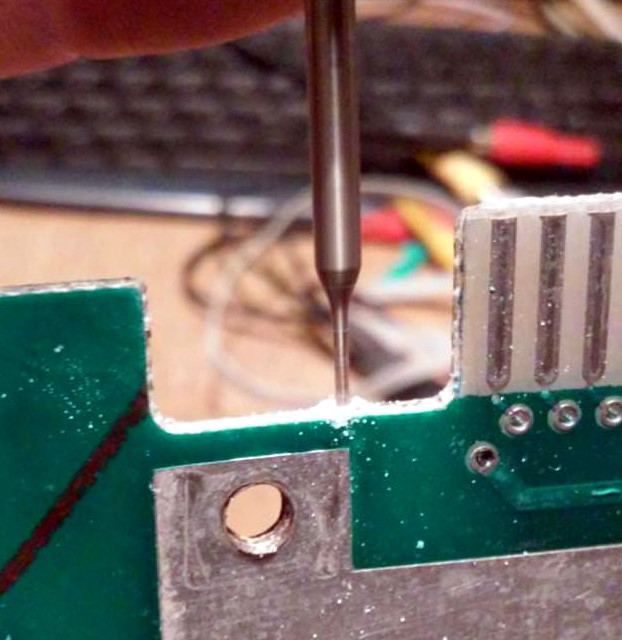
A first inspection showed that the damage was more than skin-deep: even inside the computer’s case it was one big mess of crusty brown junk. [Lee] first spent several hours on the plastic case, using different cleaning agents and an ultrasonic bath, and managed to get the case almost spotless again. The keyboard presented a larger challenge however: not only did it require thorough cleaning of every single switch and keycap, the keyboard’s matrix on the PCB had several connections missing, which had to be restored using bodge wires.

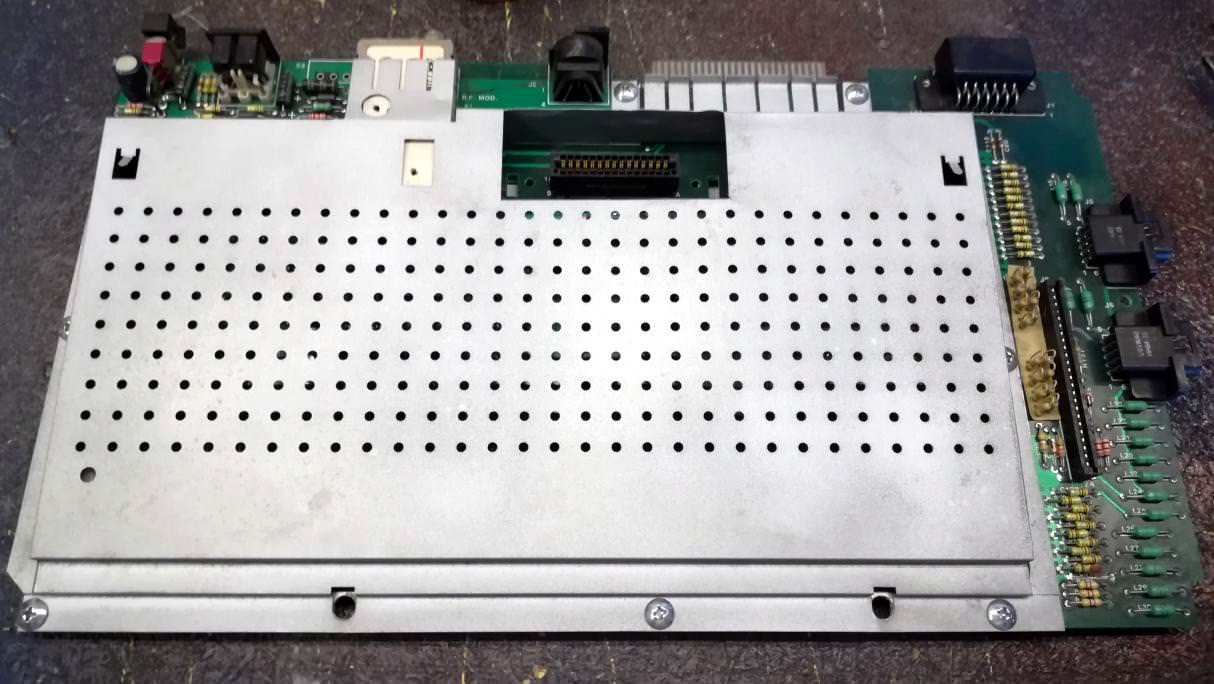
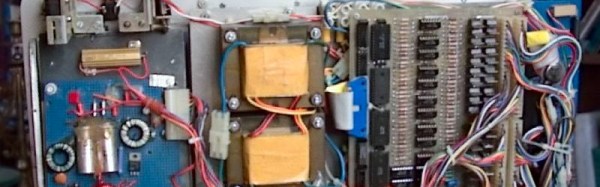
With the keyboard working again, [Lee] turned to the mainboard. This turned out to be an even greater challenge, with several components (including a few custom chips) damaged beyond repair. With the help of a few eBay replacements parts and (again) countless hours of scrubbing, the mainboard started to look healthy again. After a few tests, [Lee] felt confident enough to hook up the entire system and turn it on. And his efforts had paid off: the battered Atari dutifully displayed its BASIC prompt, ready for its second lease of life.

We’ve seen before what kind of damage a leaking battery can do to an Amiga, or faulty caps to an Xbox. But both of these seem minor inconveniences compared to what happened to this poor Atari. Thanks to [Simon] for the tip.

Continue reading “Massive Cleaning Effort Saves Acid-Drenched Atari”

Alien Inspired Cyberdeck Packs Vintage Atari 800XL

Sticking a Raspberry Pi in a Pelican-style case and calling it a cyberdeck has become something of a meme these days, and while we certainly don’t look down on such projects, we recognize they can get a bit repetitive. But we think this one is unique enough to get a pass. Sure [eizen6] mounted a Pi inside of a rugged waterproof case, but it’s simply serving as a display for the real star of the show: a vintage Atari 800XL computer.

The overall look of the build, from the stenciled Nostromo on the back to the self-destruct warning sticker over the display is a reference to Alien. Partly because both the film and the Atari 800 were released in 1979, but also because [eizen6] says this particular aesthetic is simply the way computers should look. The visual style is also meant to signify that the project embraces the old ways despite the sprinkling of modern technology.

A custom cable lets the 800XL run on USB power.

To that end, retro aficionados will be happy to hear that the Atari appears to be completely unmodified, with [eizen6] going as far as nestling the nearly 40 year old computer in foam rather than permanently mounting it to the case. The various cables for power, video, and data have all been terminated with the appropriate connectors as well, so everything can be easily unplugged should the 8-bit machine need to be returned to more pedestrian use.

In the top half of the case, [eizen6] has mounted the Raspberry Pi 3B+, a seven inch touch screen, a USB hub, and a SIO2SD that allows loading Atari disk images from an SD card. Using a USB capture device, video from the Atari can be shown on the Pi’s display with a simple VLC command. With a USB keyboard plugged into the hub, the Pi can be put to more advanced use should the need arise. It’s also worth noting that, thanks to a custom cable, the Atari is running off of a USB power bank. With a second USB power bank dedicated to running the Pi and its LCD display, this retro cyberdeck is fully mobile.

We’ve seen plenty of modern builds that try and recapture the look and feel of retro computers, but very few that actually integrate the genuine article. While the aesthetic might not be everyone’s cup of tea, we can all appreciate the respect shown for the original hardware in this build.

38 Years Later, The Atari 2600 Learns To Speak

Back in the early 1980s, there was a certain fad in making your computer produce something resembling human speech. There were several hardware solutions to this, adding voices to everything from automated telephone systems to video game consoles, all the way to Steve Jobs using the gimmick to introduce Macintosh to the world in 1984. In 1982, a software-based version of this synthesis was released for the Atari 8-bit line of computers, and ever since them [rossumur] has wondered whether or not it could run on the very constrained 2600.

Fast-forward 38 years and he found out that the answer was that yes, it was indeed possible to port a semblance of the original 1982 Software Automatic Mouth (or SAM) to run entirely on the Atari 2600, without any additional hardware. To be able to fit such a seemingly complicated piece of software into the paltry 128 bytes (yes, bytes) of RAM, [rossumur] actually uses an authoring tool in order to pre-calculate the allophones, and store only those in the ROM. This way, the 2600 alone can’t convert text to phonemes, but there’s enough space left for the allophones, which are converted into sound, that about two minutes of speech can fit into one cartridge. As for why he went through the trouble, we quote the author himself: “Because creating digital swears with 1982 speech synthesis technology on a 1977 game console is exactly what we need right now.”

For this project, [rossumur] has written an incredibly interesting article on speech synthesis in order to explain the SAM engine used here. And this isn’t his first time on the website either, always cramming software where it shouldn’t fit, such as a “Netflix”-like streaming service, or 8-bit console emulators, both on nothing but an ESP32 microcontroller. Check this one out in action after the break.

Continue reading “38 Years Later, The Atari 2600 Learns To Speak”

Incredible Atari 800XL Case Restoration

If you’ve been hanging around Hackaday for a while, you know that a large portion of the stuff we publish goes above and beyond what most people would consider a reasonable level of time and effort. One could argue that’s sort of the point: the easy way out is rarely the most exciting and interesting route you can take. We, and by extension our readers, are drawn to the projects that someone has really put their heart and soul into. If the person who created the thing wasn’t passionate about it, why should we be?

That being said, on occasion, even we are left in awe about the lengths some people will go to. A perfect example of this is the absolutely insane amount of time and effort [Drygol] has put into restoring an Atari 800XL that looked like it was run over by a truck. Through trial, error, and a bunch of polyester resin, he’s recreated whole sections of the Atari’s case that were missing.

To start the process, [Drygol] used metal rods to bridge the areas where the plastic was completely gone. By heating the rods with a torch and pushing them into the Atari’s case, he was able to create a firm base to work from. Additional rods were then soldered to these and bent, recreating the shape of the original case. With the “skeleton” of the repair in palce, the next step was filling it in.

[Drygol] borrowed an intact Atari 800XL case from a friend, and used that to create a mold of the missing sections from his own case. Most of his rear panel was missing, so it took some experimentation to create such a large mold. In the end he used silicone and a custom built tray that the case could sit in vertically, but he does mention that he never quite solved the problem of degassing the silicone. The mold still worked, but bubbles caused imperfections which needed to be filled in manually during the finishing process.

Using his silicone mold and the same tray, he was then able to pour polyester resin over the wire frame. This got him most of the way to rebuilding the case, but there was still plenty of filler and sanding required before the surface finish started to look half-way decent. When he got towards the very end of the finishing process, he used a mold he created of the case surface texture to roughen up the smooth areas left over from the filling process. Add a bit of custom spray paint, and the end result looks absolutely phenomenal considering the condition it was in originally.

We were already impressed by the work he put in during the first stages of the restoration, but this case repair is really on a whole new level. Between this and the incredible instructional videos [Eric Strebel] has been putting out, we’re really gaining a whole new respect for the power of polyester.

Continue reading “Incredible Atari 800XL Case Restoration”

Restoring An Atari 800 XL That’s Beyond Restoring

Sometimes the best way to get a hacker to do something is to tell them that they shouldn’t, or even better can’t, do it. Nothing inspires the inquisitive mind quite like the idea that they are heading down the road less traveled, if for nothing else to say that they did it. A thrown gauntlet and caffeine is often all that stands between the possible and the impossible.

Preparing the PCB for epoxy injection

So when [Drygol] heard a friend comment he had an old Atari 800 XL that was such poor shape it couldn’t be repaired, he took on the challenge of restoring the machine sight unseen. Luckily for us, his pride kept him from backing down when he saw the twisted and dirty mess of a computer in person. He’s started documenting the process on his blog, and while this is only the first phase of the restoration, the work he’s done already is impressive enough that we think you’ll want to follow him along on his quest.

There’s no word on what happened to this miserable looking Atari, but we wouldn’t be surprised if it was run over by a truck. The board was cracked and twisted, with some components missing entirely. The first step in this impossible restoration was straightening the PCB, which [Drygol] did by clamping it to some aluminum bar stock and heating the whole board up to 40C (104F) for a few days. Once the got most of the bend out, he used a small drill bit to put holes in the PCB laminate and inject epoxy to add some strength. It’s an interesting technique, and the results seem to speak for themselves.

Once the board was straight, he went through replacing blown passive components and broken chip sockets. All the ICs were pulled and treated to an isopropyl alcohol and acetone bath in an ultrasonic cleaner to get them looking like new again. The CPU was cooked and needed to get swapped out, but otherwise it was smooth sailing, and before long he had the machine booted up. While most would have been satisfied to just get this far, [Drygol] considers this to be the easy part.

He next straightened out the metal shielding with a mallet, sanded it down, and sprayed it with a new zinc coating. The plastic around the keyboard and the metal trim pieces were also removed, cleaned, and refinished where necessary. Rather than going for perfection, [Drygol] intentionally left some issues so the machine didn’t look 100% pristine. It’s supposed to be a functional computer, not a museum piece behind glass.

We’ll have to wait until the next entry in this series to see how he repairs the absolutely devastated case. Any rational person would just use a case from a donor machine, but we’ve got a feeling [Drygol] might have something a little more impressive in mind.

In the meantime we’ve got plenty of incredible restorations to keep you occupied, from this sunken VIC-20 to a Pi-packing Osborne.

Firework Shows, The Vintage Atari Way

In the summer of 1987, the Atari magazine ST-Log caried a piece entitled “Atari Sets Off Fireworks!”, a profile of the use of Atari computers in professional firework displays by Astro Pyrotechnics, a now-defunct California company. Antic podcast host [Kevin Savetz] tracked down the fireworks expert interviewed in 1987, [Robert Veline], and secured not only an interview, but a priceless trove of photographs and software. These he has put online, allowing us a fascinating glimpse into the formative years of computerized pyrotechnics.

The system uses not one, but two Ataris. An ST has all the display data and scheduling set up in the Zoomracks card file software, this is then exported to an 800XL which does the work of running the display. We’re told the code for the 800XL is loaded on a ROM cartridge for reliability. The 800XL is mounted in an aluminium briefcase with a small CRT monitor and battery, and a custom interface board stuffed with TO220 power transistors to fire the pyrotechnics themselves.

It’s unlikely that you’ll be breaking out a vintage Atari yourselves to fun a firework show three decades later, but the opportunity to examine in detail a real-world contemporary commercial use of a now-vintage computer doesn’t come along too often. You can read the original article on the Internet Archive, and listen to the [Veline] interview on the podcast episode.

This is the first Atari firework controller we’ve brought you, but we’ve shown you plenty of others like this beautifuly-executed Arduino build. And if you wonder how to trigger the fireworks themselves, how about destroying a resistor?