DIY USB Microphone Seems Overkill; Is Surprisingly In-Depth

Those of us who have been working from home through video calls for the past year can attest to the rising demand for conferencing gear such as webcams and microphones. Not wanting to spring for a boring off-the-shelf solution, serial hacker [Andy Brown] decided to design his own USB solution from scratch and show us the process from start to finish.

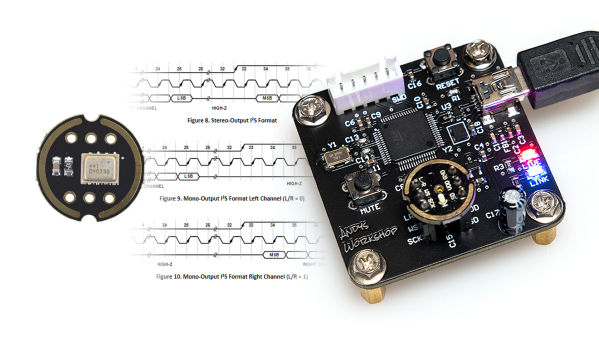
Deciding to go for a full digital design for the circuitry, the peripheral is based off of a MEMS microphone and an STM32 microcontroller doing the heavy lifting between it and a USB connection. [Andy] notes that MEMS microphones are very delicate and you have to design the PCB around the hole where the sound enters, which is why he went with a breakout board which has the component already soldered onto it.

As for the MCU, he reasons that since this is a off-one project which won’t be produced in large numbers, the 180 MHz ARM core shouldn’t be seen as overkill, since it also gives him more than plenty of headroom to do signal processing to make the sound clearer before sending it through to a computer by the USB audio device descriptor.

Once the components are chosen and the board designed, [Andy] goes into detail explaining the firmware he wrote for the STM32 to translate the PCM samples from the microphone’s I²S interface into a format better suited for the computer. He also describes how it then processes the audio, applying a graphic equalizer to reduce noise and then ST’s own Smart Volume Control filter, which works more like a compressor than a simple amplitude multiplication.

Finally, all files for the project, including board gerbers and the STM32 firmware are available at the bottom of his post, and to boot, a video demonstrating the project which you can check here after the break. [Andy]’s choice of microcontroller for this project is no surprise to us, given he’s already made his own development board for the STM32 G0 series. But if this digital microphone project is a bit too modern for you, why not try your hand at building a ribbon microphone instead?

Continue reading “DIY USB Microphone Seems Overkill; Is Surprisingly In-Depth”

Making A Kid-Friendly Computer As A Present: Or How To Be The Cool Aunt At Christmas

This article was meant to be finished up before Christmas, so it’ll be a little late whenever you’re reading it to go and prepare this for the holiday. Regardless, if, like me, should you ever be on the lookout for something to give a toddler nephew or relative, it could be worth it to look into your neglected old parts shelves. In my case, what caught my eye was a 9-year-old AMD laptop catching dust that could be better repurposed in the tiny hands of a kid eager to play video games.

The main issues here are finding a decent selection of appropriate games and streamling the whole experience so that it’s easy to use for a not-yet-hacker, all the while keeping the system secure and child-friendly. And doing it all on a budget.

This is a tall order, and requirements will be as individual as children are, of course, but I hope that my experience and considerations will help guide you if you’re in a similar boat.

Continue reading “Making A Kid-Friendly Computer As A Present: Or How To Be The Cool Aunt At Christmas”

Making Smart Bulbs Smarter With The Power Of MQTT

What’s the point of smart home automation? To make every day tasks easier, of course! According to [Tomasz Cybulski], that wasn’t the case when he installed IKEA smart lights in his closet. It’s handy to have them in a common switch, in this case a remote control, but having to look for it every time he needed the lights could use some improvement. Enter his project to make smart bulbs smarter, through the use of a simple ESP8266.

While hooking a door switch to the lights’ power supply could provide a quick solution, [Tomasz]’s wife wanted to keep the functionality of the remote control, so he had to look elsewhere. These light bulbs use the simple Zigbee protocol, so arranging for other devices was rather trivial. A USB dongle to interface with the protocol was configured for his existing Raspberry Pi automation controller, while an ESP8266 served as the real-world sensor by connecting it to reed switches installed in the closet doors.

With all the hardware sorted out, it’s a simple matter of making it all talk to each other. The ESP8266, using the Tasmota firmware, sends a signal to an MQTT server running on the Raspberry Pi, which in turn translates it to a remote trigger on the Zigbee frequency with the dongle. The lights turn on when the door opens, and off again once it closes. And since there were no further modifications to the lights themselves, the original IKEA controller still works as expected, which we’re sure [Tomasz]’s wife appreciates!

MQTT can be an interesting piece of software that goes beyond just home automation though, and if you already have a server in your home you can use it to transfer your clipboard’s contents to another device. If you are using it for home automation though, here’s an inspiration for a rather unusual dashboard to keep things interesting. Check out this hack in action after the break.

Continue reading “Making Smart Bulbs Smarter With The Power Of MQTT”

PIR Sensor In A Jar Helps You Keep Your Concentration

While there are loads of impressive and complex projects here on Hackaday, sometimes it’s the simple ones that really speak to us. In this case we were presented with [Isabell Park]’s easy-to-follow instructable on how to build an anti-procrastination device.

On the hardware side there are no surprises, it consists of a PIR sensor connected to a NodeMCU microcontroller. It checks for a signal from the sensor, and if it’s triggered, it sends a command through the Adafruit IO libraries to IFTTT. On its own it could make for a decent movement alarm, but the part that makes the project interesting is how it’s applied to become a device to help with procrastination instead.

First, you put your phone in a jar along with the electronics and close it. Then, with everything configured, the circuit is powered on and stays vigilant for any movement inside the jar. Should you try to take your phone out of it for a quick social media break (which, if you’re like us, can turn into a few hours), IFTTT will be alerted and run through whatever script you have in place. In [Isabell]’s case, she suggests sending an SMS to a trusted contact to keep you in check.

If you’re looking to keep track of how much time you’ve spent procrastinating, have we got a clock for you. But if you’re looking for more projects involving PIR sensors, we have one that alerts you when your cat is back home. Meanwhile, check out this one in action after the break. Continue reading “PIR Sensor In A Jar Helps You Keep Your Concentration”

The Game Boy Camera, Or: How I Learned To Stop Worrying And Love The Pixels

Never underestimate the power of nostalgia. In an age when there are more megapixels stuffed in the sensor of a smartphone camera than the average computer display can even represent, why would jagged images from a 20-year-old grayscale camera with pixels numbering in the thousands still grab attention? Maybe what’s old is new again, and the coolness factor of novelty is something that can’t be quantified.

The surprise I had last Monday when I saw my Twitter notifications is maybe only second to the feeling I had when I was invited to become a Hackaday contributor. I’d made a very simple web app which mimics a Game Boy Camera using the camera from your phone or desktop, and it got picked up by people so much that I’m amazed my web host is still holding. Let’s look at why something seemingly so simple gained so much traction.

Continue reading “The Game Boy Camera, Or: How I Learned To Stop Worrying And Love The Pixels”

Flash Is Dead, But Its Culture Should Live On

Flash is all but gone already, but as we approach the official Adobe end-of-life date on December 31st, it’s picking up traction one last time as people reminisce about the days of Internet past. Back in July, [Jonas Richner] created an impressive website that catalogs not only almost 20 years of Flash games, but also testimonials for the software from dozens of developers who began their careers with it.

Flash started in 1996 with the intention of being a standard for animations and vector graphics on the early Web. With the release of Flash Player 5 in August of 2000, Macromedia (later acquired by Adobe) presented the first version of ActionScript, an object-oriented scripting language meant to bring interactivity to animated Flash movies. Since then, thousands of games made with the platform were released online through websites like Newgrounds and shared all over the world, with the most popular games easily reaching tens of millions of plays.

These games became popular in part thanks to how quickly they could be created with the Flash authoring tools, but also because it was so easy for players to run them. With a single plugin for your web browser of choice, the barrier of entry was extremely low. Most home computers from the mid-2000s were able to run Flash software without needing dedicated graphics hardware. This prompted a “creative chaos” as [Richner] puts it, spawning millions of games and animations which started genres and careers lasting to this day.

Unfortunately, browsers have been dropping support for the plugin due to vulnerabilities in the most recent iterations of its scripting engine and Google no longer indexes Flash files. It would seem this particularly creative era of the Internet is coming to an end. However, you can still relive old games and animations made with plugins such as Flash and Shockwave with [BlueMaxima]’s Flashpoint, and like [Richner], we also hope that the people building today’s platforms and technologies keep the lessons from Flash in mind.

The Adorable Robot Spot, Now In Affordable Form

If you’ve been following the Boston Dynamics project Spot, you’ve seen its capabilities and how we’re starting to see it being used in public more since its official release last year. But in a true display of how hobbyist electronics have been evolving and catching up with the big companies over the past few years, [Miguel Ayuso Parrilla] shows us his own take on the walking robot with CHOP, one of the finalists in this year’s Hackaday Prize.

CHOP is a DIY quadruped robot that works much in the same way as Spot, although in a smaller form-factor and, perhaps most impressive of all, a bill of materials that can be all acquired for under $500. The entire project is open source, meaning that anyone can built their own version of it with off-the-shelf parts and some 3D printing. If you can’t get the hardware however, you can still play with the PyBullet simulation of the mechanics that were used during the debugging process.

Running the show are two main components, a Raspberry Pi 4B and an Arduino Mega. While the Mega interfaces with the servo controllers and provides filtering for sensors like the inertial measurement unit, the Pi takes all that data in and uses a series of Python scripts in order to determine the gait of the robot and which way the servos should move through an inverse kinematics model. To control the direction in which the body of the robot should accelerate, a Bluetooth remote controller sends commands to the Raspberry Pi.

We’re excited to see home-grown projects rise to this level of complexity, which would be mostly unheard of a few years ago in the maker scene, and only presented by large tech companies with tons of money to spend on research and development. There are other quadruped robots to inspire yourself on than Spot though, like this one with a spherical design and fold-out legs. Check this one in action after the break.

Continue reading “The Adorable Robot Spot, Now In Affordable Form”