Hackaday Links: December 11, 2016

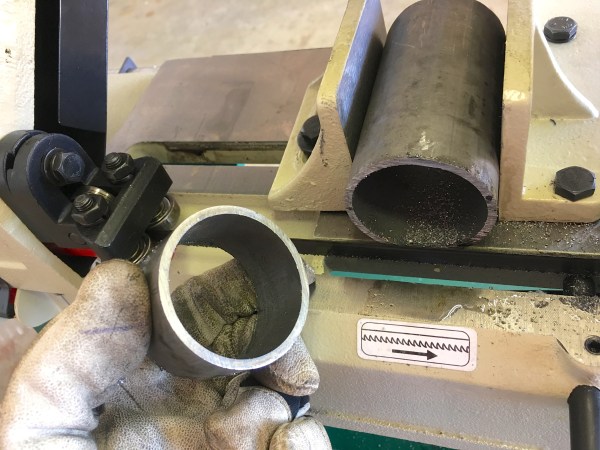
We have a contest going on right now challenging you to do the most with 1 kB of data. If you want to get into this, here’s how you do it for a dollar. Use the PIC12C508A. It’s an 8-pin DIP, has 768 bytes of program ROM and 25 bytes of data RAM. [Shaos] is trying to generate NTSC on this thing.

Remember that Internet of Cookie Oven Kickstarter from the links post a few weeks ago? It was funded. It has a heating element that is ‘more energy efficient than traditional electric elements’, and there’s still no consensus over how a resistive heating element can be more efficient. It’s either 100% efficient, or 0% efficient, depending on how you look at it.

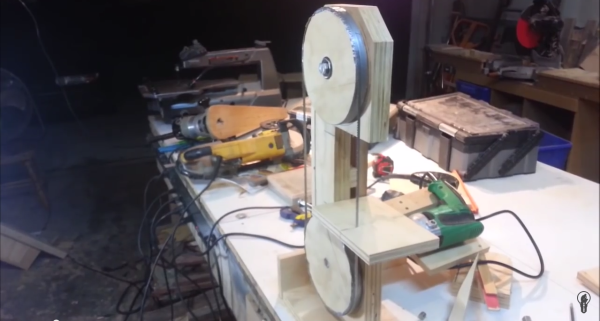
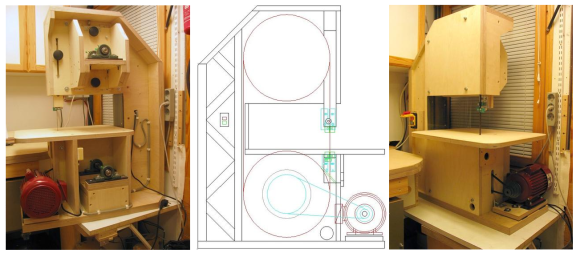
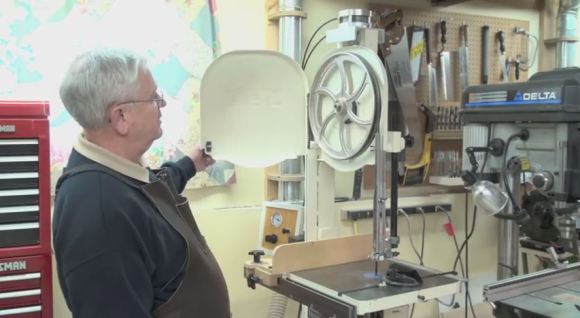
[Matthias Wandell], master of wood gears recently built a 20″ bandsaw from scratch. It’s a wood frame, wood wheels, a (currently) underpowered motor, and a few bits of metal and rubber. The video build log is fantastic, so start here and work your way forward.

Way back in the day, Sparkfun sold a Bluetooth rotary phone. Yes, at some point in the past, phones didn’t have touchscreens or even buttons. In any event, Sparkfun hasn’t sold these phones for quite a long time. Now there’s a new hotness: giving these rotary phones a GSM module.

Here’s a little Hackaday Events housekeeping. On January 23rd, we’re going to have a meetup in NYC. We’ll also have a meetup in LA sometime in January as well. Also in January I’ll be attending CES, reporting on the latest Internet of Toasters. A week later, Hackaday will be at ShmooCon in Washington, DC. At ShmooCon last year, we had a breakfast meetup in the DC Hilton. This year, I want to do something similar. If you have an idea of what to do, leave a note in the comments.

How To Have An Above Average Time With A Cheap Horizontal Bandsaw

[Quinn Dunki] has brought yet another wayward import tool into her garage. This one, all covered in cosmoline and radiating formaldehyde fumes, is a horizontal bandsaw.

Now, many of us have all have some experience with this particular model of horizontal saw. It waits for us at our work’s machine shop, daring us to rely on it during crunch time. It lingers in the corner of our hackerspace’s metalworking area, permanently stuck in the vertical position; at least until someone finally removes that stripped screw. Either that or it’s been cannibalized for its motor, the castings moldering in a corner of the boneyard.

This article follows on the heels of [Quinn]’s other work, a treatise on the calibration of a drill press, and it outlines all the steps one has to take to bring one of these misunderstood tools into consistent and reliable operation. It starts with cultivating a healthy distrust of the factory’s assurances that this device is, “calibrated,” and needs, “no further attention.” It is not, and it does. Guides have to be percussively maintained out of the blade’s way. Screws have to be loosened and adjusted. It takes some effort to get the machine running right and compromises will have to be made.

In the end though, with a high quality blade on, the machine performs quite well. Producing clean and quality cuts in a variety of materials. A welcome addition to the shop.

Fixing A Broken Bandsaw With A Custom Steel Part

When a large bandsaw broke down due to a cast iron part snapping in two, [Amr] took the opportunity to record the entire process of designing and creating a solid steel replacement for the broken part using a (non-CNC) mill and lathe.

For those of us unfamiliar with the process a machinist would go through to accomplish such a thing, the video is extremely educational; it can be sobering both to see how much design work happens before anything gets powered up, and just how much time and work goes into cutting and shaping some steel into what at first glance looks like a relatively uncomplicated part.

Continue reading “Fixing A Broken Bandsaw With A Custom Steel Part”

DIY Drill Powered Band Saw

Hand Drill To Band Saw Conversion

Need a band saw but only have a drill kicking around? That may not be a common problem but if you ever run into it, [Izzy] has got you covered. He’s on a mission to make a drill-powered workshop and in his YouTube video, he shows a small bench top band saw he made that is powered by a corded hand drill.

The main frame is made from doubled up 3/4″ plywood. The saw blade is strung between two wooden wheels. Those wheels have tape applied to their outer diameter to create a crowned roller. That crown keeps the saw blade tracking in the middle of the wheel. The bottom wheel is mounted to an axle that is supported by bearings in the main frame. That axle pokes out the back and is connected to the drill. The top wheel has integrated bearings and ride on a stud mounted to the frame. The blade seems to be pretty tight although there is no noticeable tensioning system.

The video shows that this DIY band saw can cut through 1.5 inch wood fairly easily. Even so, there are clearly some needed features, like guide bearings for the blade and an overall cover to prevent accidental lacerations. But we suppose, even professional saws can be dangerous if not treated with respect.

Wooden Band Saw Fears Its Wood-Cutting Brethren

DIY Wooden Bandsaw

What is cooler than building a band saw out of wood? Building two, of course! And that is exactly what [Pekka] did. The first was a small bench top model while the second was a much larger version with the saw blade strung between big 13-3/4 inch wheels. For those who are unfamiliar with band saws, they are tools that have a long thin blade that is routed around rotating wheels. The wheels are spread apart to make the blade taut. Unlike the reciprocating action of a jigsaw, saws-all or scroll saw, the band saw blade continually rotates in one direction. These blades are typically thin making it easy to cut irregular and curved shapes.

The frame of [Pekka’s] larger machine is made from 35mm (~1-3/8″) plywood. This proved to be a sturdy frame material. The previously mentioned wheels were made by gluing pieces of oak together, mounting the assembly on a wood lathe and turning the outer diameter down to size. By using multiple piece of wood to construct the wheels allows the grain direction of each portion to be parallel with the blade. This method of construction ensures any expansion/contraction of the wood is uniform around the wheel. A strip of rubber around the blade’s outer diameter provides the friction required to prevent the blade from slipping.

[Pekka’s] friend was nice enough to turn the flanged axle shafts on his metal lathe. These shafts support the wooded wheels and are mounted in pillow block bearings. The upper pillow blocks are mounted to a sliding support that allows adjusting the tension of the saw blade. [Pekka] was not going to be satisfied with a one-speed band saw so he grabbed a motor he had kicking around that originally came from a wood lathe and already had 4 different sized pulleys mounted on the shaft.

This is a great project that shows what can be done with a little desire and ingenuity.

Air-Tensioned Bandsaw Simplifies Woodworking Life

bandsaw

If you’ve ever had the pleasure of owning a band-saw you’ll know exactly how much fun it is to try to replace the blade, or properly tension it even. [Richard T] got tired of it and decided to upgrade his band saw with a bit of pneumatic power.

To remove the band saw blade or tension it you have to turn an adjustment knob on the top of the band saw — it’s kind of awkward and really annoying. [Richard] has taken the lead screw out and replaced it with a pneumatic cylinder. He’s added a little control panel with a main valve, and pressure regulator. To remove the band saw blade, he bleeds the system with the valve, and to tension it, he turns up the regulator! It’s simple and super effective.

This is especially convenient for tensioning because you can watch the blade during the “Flutter Test” while gently turning up the regulator.

If you look in the right places you could probably build a system like this for less than $50. For a complete explanation stick around to hear it from [Richard] himself!

Continue reading “Air-Tensioned Bandsaw Simplifies Woodworking Life”

RFID RGB Lamp Goes The Distance

rfid-RGB-lamp

[Philippe Chrétien’s] project makes it to our front page just based on its completeness. When you hear about a multicolored lamp which changes based on an RFID tag you might not get too excited. When you look at the refined electronics and the quality of the wooden enclosure it’s another story entirely.

As we’ve said many times before, coming up with the idea for a project is the hardest part… especially when you just want to start hacking. With his kids in mind [Philippe] figured this would be something fun for them to play around with, opening the door to discussing the electronics concepts behind it.

He prototyped on a breadboard using three N-type MOSFETs to drive the colors of an RGB LED strip. The proven circuit was laid out and etched at home to arrive at the clean-looking Arduino shield shown off above. The entire thing gets a custom enclosure cut using layered plywood, a paper template, and a bandsaw.

Need a use for this once the novelty has worn off? Why not mod it to use as a motion activated night light? Alas the actual project link for that one is dead, but you get the idea.