Mademoiselle Pinball Table Gets Rock ‘n Roll Makeover

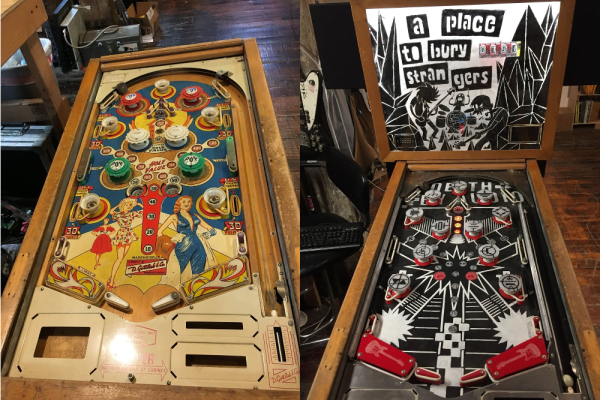
Once upon a time, there was a music venue/artist collective/effects pedal company that helped redefine industry in Williamsburg, Brooklyn. That place was called Death By Audio. In 2014, it suffered a death by gentrification when Vice Media bought the building that DBA had worked so hard to transform. From the ashes rose the Death By Audio Arcade, which showcases DIY pinball cabinets made by indie artists.

Their most recent creation is called A Place To Bury Strangers (APTBS). It’s built on a 1959 Gottlieb Mademoiselle table and themed around a local noise/shoegaze band of the same name that was deeply connected to Death By Audio. According to [Mark Kleeb], this table is an homage to APTBS’s whiz-bang pinball-like performance style of total sensory overload. Hardly a sense is spared when playing this table, which features strobe lights, black lights, video and audio clips of APTBS, and a fog machine. Yeah.

[Mark] picked up this project from a friend, who had already cut some wires and started hacking on it. Nearly every bit of the table’s guts had to be upgraded with OEM parts or else replaced entirely. Now there’s a Teensy running the bumpers, and another Teensy on the switches. An Arduino drives the NeoPixel strips that light up the playfield, and a second Uno displays the score on those sweet VFD tubes. All four micros are tied together with Python and a Raspi 3.

If you’re anywhere near NYC, you can play the glow-in-the-dark ball yourself on July 15th at Le Poisson Rouge. If not, don’t flip—just nudge that break to see her in action. Did we mention there’s a strobe light? Consider yourself warned.

Want to get into DIY pinball on a smaller scale? Build yourself a sandbox and start playing.

Continue reading “Mademoiselle Pinball Table Gets Rock ‘n Roll Makeover”

LED display controlled by Bluetooth speaker

How Many Hacks In An LED Display?

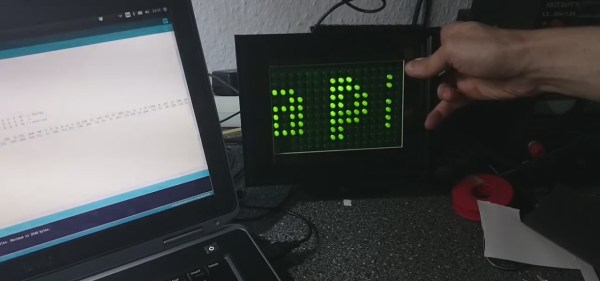
There are so many nice hacks in [Joekutz]’s retro LED display project that it’s hard to know where to start. There’s his DIY LED display controlled by an Arduino UNO. To have some text or picture for the display, he’s wired the output of a Bluetooth speaker directly to the Arduino, and sends it speaker tones that encode the text to draw. And as if that wasn’t enough, he’s hacked a quartz driver board from an analog clock to use the display as a clock as well.

Let’s start with the LED matrix display, perhaps the best excuse for trying your hand at shift registers. This display uses two such 8-bit shift registers daisy chained together feeding two 8-bit Darlington arrays. The display has ten rows of sixteen columns, and you guessed it, the columns are controlled by the sixteen shift registers. Two Arduino pins tell the shift registers which column to turn on. The rows are turned on and off using ten transistors controlled by ten more Arduino pins. Scanning at 80 frames per second he gets a nice, flickerless display.

To make both the LED matrix circuit board and the control board, [Joekutz] carved out isolation paths in copper clad boards using his homemade CNC mill. Be sure to check out the first video below to see his misadventures with it that ultimately led to his gorgeous boards.

Continue reading “How Many Hacks In An LED Display?”

Mindless Toddler Toy Becomes Teaching Tool

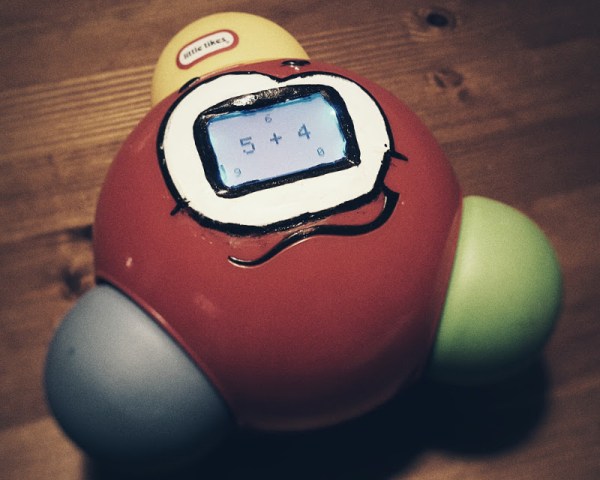
If you want to sell a toy for the toddler crowd, it ought to be pretty close to indestructible. A lot of toys out there are just plain nonsense game-wise and therefore waste their beefy potential. [2dom]’s wife was close to throwing out such a toy—a Little Tikes Goofy Ball. The thing literally does nothing but let you push its big buttons in. After some time passes, it pops them back out again and giggles. Game over. [2dom] rescued it from the trash and turned it into a toy that plays math games.

[2dom] removed the existing board and replaced it with an Arduino Pro Mini and a Darlington array that drives the motor that pops the buttons back out, the speaker, and a Nokia 5110 screen. Upon startup, the user chooses between addition, subtraction, and multiplication questions using the appropriate button. Questions appear in the middle of the screen and multiple choice answers in the corners.

Choose the right answer and the ball cheers and shows one of a few faces. Choose the wrong answer and it makes a buzzing sound and shows an X. There is an adaptive level system for the questions that [2dom] doesn’t show in the demonstration video after the break. For every five correct answers, you level up. His 3- and 5-year-olds love it. For more advanced teachable moments, there’s this toy-turned-enigma-machine.

Continue reading “Mindless Toddler Toy Becomes Teaching Tool”

Great Junk-yard Find Leads To A Reclaimed Control Panel Project

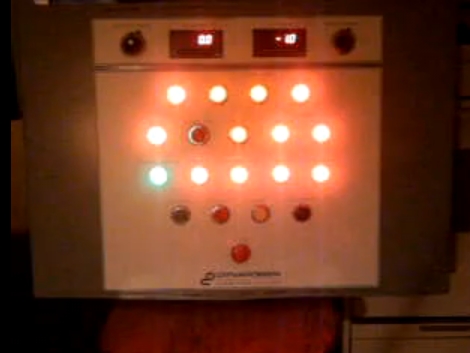
Having the “can you believe somebody threw this away?” mentality has gotten us into some trouble through the years, but look what [Joshua] found at the scrap yard! It’s a door from a power conversion station and it contains fourteen indicator lights and a lot of other doodads. But since this is just the door, he needed a way to monitor the controls and drive the indicators. At the heart of the hack he used to get this up and running is a PIC 18F2550. It has no trouble driving the indicators thanks to a pair of ULN2803 darlington arrays which switch the higher 24 volt levels.

His writeup doesn’t mention the method used, but the panel also has a couple of meters at the top. In the video after the break you can clearly see that he’s got them both working. We’d bet there’s a plan for each of the buttons as well, since this will be prominently featured in their alien-invasion themed Halloween display this year.

Continue reading “Great Junk-yard Find Leads To A Reclaimed Control Panel Project”

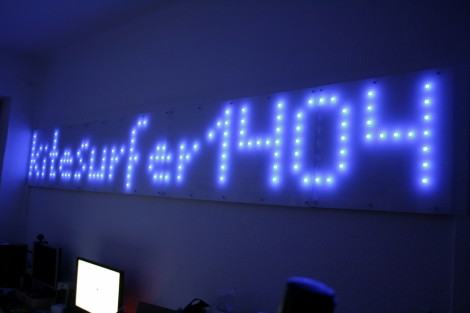
12 Foot LED Display Keeps Your Office Informed

Don’t reach for a sticky note when you need to leave a message for your office mates, write it down on a 12 foot LED marquee. [Kitesurfer1404] built this for his home office, but we’re sure he’ll find fun stuff to use it for. The display has 512 LEDs driven by plain old 595 shift registers for the high-side columns, with an ULN2803A Darlington Array to pull the eight rows to ground. The whole thing is controlled by an ATmega8 via a serial connection. Our compliments to the builder for accurately drilling a grid of 64×8 holes in each hardboard panel of the display. The buses for each row and column also look nice and clean. For the final look a 79% light transmittance frosted acrylic panel was added to diffuse the light.

We used the same method to build our LED pumpkin. Transistors ran the low side, and if we had needed more columns, shift registers are a popular go-to for I/O expansion. Check out that project to learn more about display multiplexing.