When it comes to computers, it seems like the only thing that matters is speed. The more the better, in general, and the same applies to peripherals. We want the fastest network adapters, the fastest video card, and the fastest printer. So why in the world would anyone intentionally build a really slow inkjet printer? For art, of course.
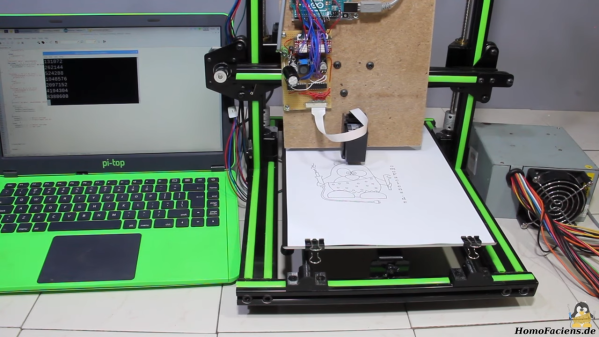
At least that’s the story [HomoFaciens] tells us in the video below. His efforts are in support of a friend’s art project, which seeks to print slowly but continuously on a roll of paper. [HomoFaciens]’s printer is based on an H-P C6602 inkjet cartridge, one of those high-priced consumables that make buying a new printer more attractive than replacing them once depleted. After figuring out how to drive the printhead — 5 to 6 μs pulses of 18 volts through a ULN2803 Darlington array driver chip seemed to do the trick — he mounted everything to the gantry of an old 3D printer. It’s interesting to watch the images slowly being built up — something that printers usually hide from prying eyes — and to see how the DPI count of the printer can be increased by interlacing each printed line.
Near the end of the video, we get a glimpse of his “tattoo gun printer”, which reminded us of all the other cool things he’s done over the years. From a CNC machine made from paperclips and cardboard to an encoder made from a wheel of resistors, [HomoFaciens] has some interesting designs that you really should check out.
Continue reading “No Need For Speed With This Arduino-Based Inkjet Printer”


