Hacker Tactic: Multi-Design Panels

Last time, we talked about single-PCB-design panels, all the cool aspects of it, including some cost savings and handling convenience. Naturally, you might wonder, and many did – can you put multiple different PCBs on a single panel? The answer is “yes, without a doubt!” The tool we used last time, KiKit, will not be as helpful here, so we’ll be looking elsewhere.

Making multi-PCB panels can help you save money, naturally, but it can also make your assembly a whole lot easier, and it can bring you hacking to a whole new level. It sure helped with mine! You might have already learned that some fabs scoff at multi-design panels and add surcharges. Well, you’ll be delighted to learn that there are more hacker-friendly fabs out there, too.

Developing PCBs In Bulk

So far, I’ve worked on about 300 different PCB designs, with half of them available in my monorepo. I’ve assembled and tested just about half of these. You might guess that this would cost a lot of money, and that assembly would take a fair bit of time, but I have some tricks up my sleeve. For a start, you can easily order PCBs 10-12 times more cheaply if you do multi-panel.

Continue reading “Hacker Tactic: Multi-Design Panels”

A Mainframe Computer For The Modern Age

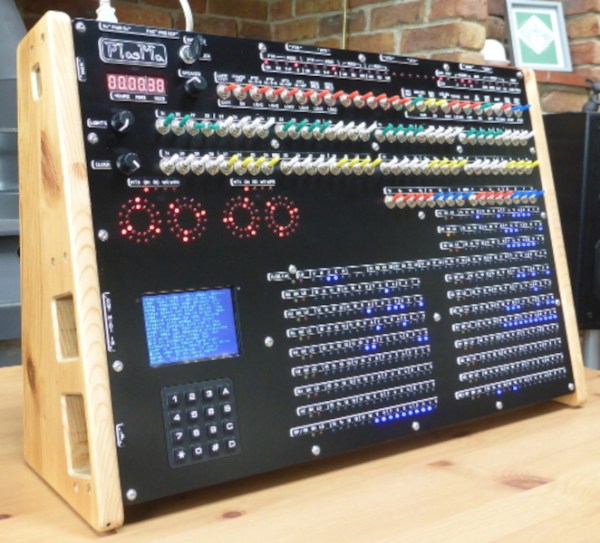
The era of mainframe computers and directly programming machines with switches is long past, but plenty of us look back on that era with a certain nostalgia. Getting that close to the hardware and knowing precisely what’s going on is becoming a little bit of a lost art. That’s why [Phil] took it upon himself to build this homage to the mainframe computer of the 70s, which all but disappeared when PCs and microcontrollers took over the scene decades ago.

The machine, known as PlasMa, is not a recreation of any specific computer but instead looks to recreate the feel of computers of this era in a more manageable size. [Phil] built the entire machine from scratch, and it can be programmed directly using toggle switches to input values into registers and memory. Programs can be run or single-stepped, and breakpoints can be set for debugging. The internal workings of the machine, including the program counter, instruction register, accumulator, and work registers, are visible in binary lights. Front panel switches let you control those same items.

The computer also hosts three different microcodes, each providing a unique instruction set. Two are based on computers from Princeton, Toy-A, and Toy-B, used as teaching tools. The third is a more advanced instruction set that allows using things like emulated peripherals, including storage devices. If you want to build one or just follow along as the machine is constructed, programmed, and used, [Phil] has a series of videos demonstrating its functionality, and he’s made everything open-source for those more curious. It’s a great way to get a grasp on the fundamentals of computing, and the only way we could think of to get even more into the inner workings of a machine like this is to build something like a relay computer.

Continue reading “A Mainframe Computer For The Modern Age”

Tracking Maximum Power Point For Solar Efficiency

In days of yore when solar panels weren’t dirt cheap, many people (and even large energy companies) used solar trackers to ensure their panels were always physically pointed at the sun to make sure they harvested every watt of energy possible. Since the price of panels has plummeted, though, it’s not economical to install complex machines to track the sun anymore. But all solar farms still track something else, called the Maximum Power Point (MPP), which ensures that even stationary panels are optimized for power production.

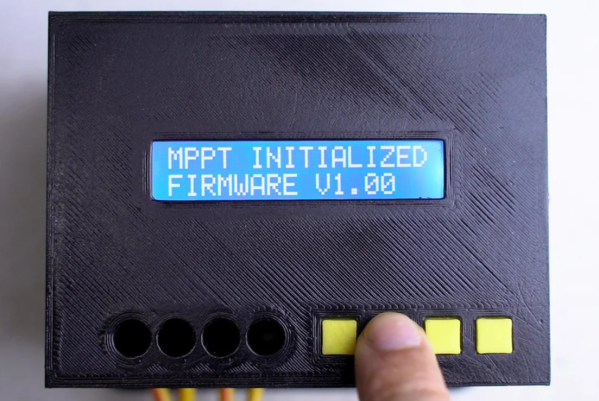
While small MPP trackers (MPPT) are available in solar charge controllers in the $200 range that are quite capable for small off-grid setups, [ASCAS] aka [TechBuilder] decided to roll out an open source version with a much lower price tag since most of the costs of these units are in R&D rather than in the actual components themselves. To that end, the methods that he uses for his MPPT are essentially the same as any commercial unit, known as synchronous buck conversion. This uses a specially configured switch-mode power supply (SMPS) in order to match the power output of the panels to the best power point for any given set of conditions extremely rapidly. It even works on many different battery configurations and chemistries, all configurable in software.

This build is incredibly extensive and goes deep into electrical theory and design choices. One design choice of note is the use of an ESP32 over an Arduino due to the higher resolution available when doing analog to digital conversion. There’s even a lengthy lecture on inductor core designs, and of course everything on this project is open source. We have also seen the ESP32 put to work with MPPT before, although in a slightly less refined but still intriguing way.

Thanks to [Sofia] for the tip!

Continue reading “Tracking Maximum Power Point For Solar Efficiency”

MicroLEDs: Lighting The Way To A Solid OLED Competitor

We’re accustomed to seeing giant LED-powered screens in sports venues and outdoor displays. What would it take to bring this same technology into your living room? Very, very tiny LEDs. MicroLEDs.

MicroLED screens have been rumored to be around the corner for almost a decade now, which means that the time is almost right for them to actually become a reality. And certainly display technology has come a long way from the early cathode-ray tube (CRT) technology that powered the television and the home computer revolution. In the late 1990s, liquid-crystal display (LCD) technology became a feasible replacement for CRTs, offering a thin, distortion-free image with pixel-perfect image reproduction. LCDs also allowed for displays to be put in many new places, in addition to finally having that wall-mounted television.

Since that time, LCD’s flaws have become a sticking point compared to CRTs. The nice features of CRTs such as very fast response time, deep blacks and zero color shift, no matter the angle, have led to a wide variety of LCD technologies to recapture some of those features. Plasma displays seemed promising for big screens for a while, but organic light-emitting diodes (OLEDs) have taken over and still-in-development technologies like SED and FED off the table.

While OLED is very good in terms of image quality, its flaws including burn-in and uneven wear of the different organic dyes responsible for the colors. MicroLEDs hope to capitalize on OLED’s weaknesses by bringing brighter screens with no burn-in using inorganic LED technology, just very, very small.

So what does it take to scale a standard semiconductor LED down to the size of a pixel, and when can one expect to buy MicroLED displays? Let’s take a look. Continue reading “MicroLEDs: Lighting The Way To A Solid OLED Competitor”

Three Tales Of Making It In Electronics Design And Manufacturing

Having found success in different areas, it’s a pleasure to hear from Erika Earl, Paul Beech, and Spencer Owen during a panel discussion at the 2019 Hackaday Superconference. Led by Tindie’s Jasmine Brackett, the panel covers some of the background needed to develop a product and get it into the hands of your customers.

Erika’s origin story begins with an interest in electronics during her teenage years that led to work in recording studios. It seems nobody on staff there was interested in repairing anything. Every company needs a hacker to make sure everything continues to work and she decided to take on the role.

From there Erika found her way into the world of manufacturing and has never looked back. You may remember hearing some of her experiences in her 2016 Hackaday Supercon talk on turning your manufacturing mistakes in a learning experience. During this panel she recounts one particularly painful experience when over-torque on a six-layer PCB damaged traces and led to extensive manual rework; always include a torque-spec!

Continue reading “Three Tales Of Making It In Electronics Design And Manufacturing”

Pedal Far With A Solar Powered Tricycle

More and more electric bikes have been rolling out into the streets lately as people realize how inexpensive and easy they are to ride and use when compared to cars. They can also be pedaled like a normal bike, so it’s still possible to get some exercise with them too. Most have a range somewhere around 10-30 miles depending on battery size, weight, and aerodynamics, but with a few upgrades such as solar panels it’s possible to go much, much further on a charge.

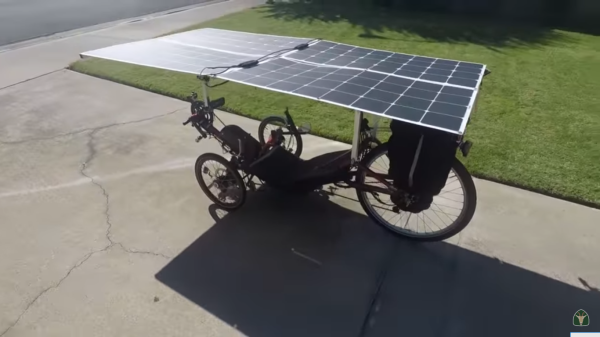
[The Rambling Shepherd] had a tricycle (in the US, generally still considered a bicycle from a legal standpoint) that he had already converted to electric with a hub motor and battery, and was getting incredible range when using it to supplement his manual pedaling. He wanted to do better, though, and decided to add a few solar panels to his build. His first attempt didn’t fare so well as the 3D-printed mounts for the panel failed, but with a quick revision his second attempt survived a 50-mile trip. Even more impressive, he only had his battery half charged at the beginning of the journey but was still able to make it thanks to the added energy from the panels.

If you’re thinking that this looks familiar, we recently featured a tandem tricycle that was making a solar-powered trip from Europe to China with a similar design. It has the advantage of allowing the rider to pedal in the shade, and in a relatively comfortable riding position compared to a normal bike. Future planned upgrades include an MPPT charge controller to improve the efficiency of the panels.

Continue reading “Pedal Far With A Solar Powered Tricycle”

Weather Station Is A Tutorial In Low Power Design

Building your own weather station is a fun project in itself, but building it to be self-sufficient and off-grid adds another set of challenges to the mix. You’ll need a battery and a solar panel to power the station, which means adding at least a regulator and charge controller to your build. If the panel and battery are small, you’ll also need to make some power-saving tweaks to the code as well. (Google Translate from Italian) The tricks that [Danilo Larizza] uses in his build are useful for more than just weather stations though, they’ll be perfect for anyone trying to optimize their off-grid projects for battery and solar panel size.

When it comes to power conservation, the low-hanging fruit is plucked first. [Danilo] set the measurement intervals to as long as possible and put the microcontroller (a NodeMCU) to sleep in between. Removing the power from the sensors when the microcontroller was asleep was another easy step, but the device was still crashing overnight. Then he turned to a hardware solution and added a more efficient battery charger to the setup, which saved even more power. This is all the more impressive because the station communicates via WiFi which is notoriously difficult to run in low-power applications.

Besides the low power optimizations, the weather station itself is interesting for its relative simplicity. It could be built with things most of us have knocking around. Best of all, [Danilo] published the source code on his site, so most of the hard work has been done already. If you’re thinking he seems a little familiar, it’s because we’ve featured some of his projects before, like his cheap WiFi extender antenna and his homemade hybrid tube amplifier.