Sand Cast Banana For Scale Is So Metal

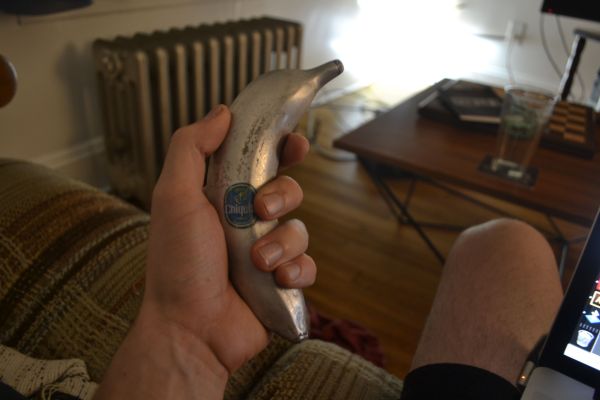
If you’ve been on Reddit over the past year, you’ve likely encountered the “banana for scale” meme. [BFG121] felt that the size variation of bananas would not do – there needed to be a standard. He decided to make a metal banana out of re-purposed aluminum. He created his own furnace out of everyday objects including a hair dryer, metal bucket, cement, fire clay, and sand. [BFG121] used a typical banana as the reference for his sand casting mold. After melting the aluminum in his homemade furnace, he poured it into the empty mold, making sure there was an extra hole for the displaced air to escape. The end result is a perfect replica of a banana. [BFG121] made two aluminum bananas, and stamped each one with a serial number. One was given to Imgur headquarters while the other was auctioned on eBay. The winning bid (#39) was $67 USD, a very good ROI.

If you want to learn more about metal casting, check out myfordboy’s channel on YouTube.  You can also see an example of the “banana for scale” in this Hackaday article about a giant spirograph. Our only suggestion to [BFG121] is to send some to ASTM, NIST, and BIPM!

[via Reddit]

Hackaday Reddit AMA (ask Me Anything) Happening Right Now

hackaday-szczys-reddit-proof_1Today we’re interacting on an “Ask Me Anything” over at Reddit.

Now’s the time to ask your question about all-things-Hackaday. No topic is off limits. Wonder how the Blog operates? What’s the deal with Hackaday Projects? Need an answer to questions about The Hackaday Prize? Just ask!

[Mike Szczys] started the thread and I’ve provided proof as seen here, but most of the writing staff are Reddit regulars so questions for specific writers are welcome as well. What’s on your mind?

Hackaday AMA: Thursday Morning At 10am Eastern Time

hackaday-szczys-reddit-proof_1Come one, come all, to an epic Reddit AMA.

It’s been almost two years since our last “Ask Me Anything” and it’s an understatement that ‘sort of a lot has happened’ since then. We changed parent companies, expanded our writing staff, hosted our first live event (and a few smaller ones since), launched Hackaday Projects, and now we’re in the middle of The Hackaday Prize.

Any question is fair game (that’s why they call it an AMA) so now’s the time to get that query that’s been bugging you answered.

You will need a Reddit account to ask questions or to vote them up and down. But anyone can read the thread without logging in. Speaking of threads, we can’t give you a link yet because it won’t be available until we start at 10am Eastern Time on Thursday, June 26th. But watch the top of the blog, we’ll publish another post as soon as the link is ready!

UPDATE 6/26/14 9:25am Eastern: The Reddit thread is now live. Please feel free to start adding questions. Answers will start in 35 minutes.

Electronic Puzzle Box Uses Only Discrete Components

Puzzle box

Do you need an idea for a fun do it yourself gift for a friend or significant other? Look no further, [conductance] has you covered. He put together an awesome electronic puzzle box using all analog electronics. The puzzle case is shaped like an over sized die and is made out of wood. It also requires a small jumper cable and an external magnet to complete the puzzle.

This is a six-sided die, where each side has something different to offer. The “five” side of the die shows the progress you’ve made in completing the puzzle. Each of the five dots contains a green LED that will light up when the corresponding puzzle has been successfully completed.

The “one” side is completed by placing the included magnet over the dot. The magnet activates a reed switch which lights up the first LED. The “two” side contains a tilt switch. In order to solve this piece of the puzzle you must ensure the two side is facing up, as if you rolled a two. The “three” side contains three key switches. Each switch must be turned to a particular orientation. Once all three keys are configured properly, a third LED lights up.

The “four” side contains four sockets that fit the included jumper cable. This puzzle is solved by jumping the two correct sockets together. Finally, the number “six” side just has six momentary push buttons. All six buttons must be pressed simultaneously in order to light up the final LED. The tricky part is pressing all six buttons while simultaneously “rolling” a two in order to ensure the tilt switch is also activated.

Once all five LED’s are lit up, a relay is triggered which then activates a solenoid. The solenoid unlocks the door and reveals the prize. It’s always great to see electronics circuits like this that use all discrete components. This could have been accomplished any number of ways, but there’s something satisfying about a simple circuit that’s just right for the job. Be sure to check out [conductance’s] schematic if you want to see how this puzzle works.

[via Reddit]

Upgrade Your Garage Door With Arduino And RFID

RFID Garage Door Opener

[Jason] really wanted to build an RFID controlled garage door opener and decided to turn to Arduino to get the job done. For someone who’s never worked with an Arduino before, he really seemed to know what he was doing.

The Arduino acts as the brains of the operation while an off-the-shelf NFC/RFID reader module is used to read the RFID tags. To add new keys to the system, [Jason] simply swipes his “master” RFID key. An indicator LED lights up and a piezo speaker beeps, letting you know that the system is ready to read a new key. Once the new key is read, the address is stored on an EEPROM. From that point forward the new key is permitted to activate the system.

Whenever a valid key is swiped, the Arduino triggers a relay which can then be used to control just about anything. In this case, [Jason] plans to use it to control his garage door. The system also has a few manual controls. First is the reset button. If this button is held down for two seconds, all of the keys from the EEPROM are erased. This button would obviously only be available to people who are already inside the garage. There is also a DIP switch that allows the user to select how long the relay circuit should remain open. This is configurable in increments of 100ms.

For now the circuit is wired up on a couple of breadboards, but it might be a good idea to use something more permanent. [Jason] could always take it a step further and learn to etch his own PCB’s. Or he could even design a board in Eagle CAD and order a real printed board. Don’t miss the video description of the RFID system below. Continue reading “Upgrade Your Garage Door With Arduino And RFID”

Defeating Reddit’s CAPTCHA

cap

Here’s something we’re sure SEO specialists, PR reps, and other marketeers already know: how to write a script to game reddit.

The course of upvotes and downvotes controls which submission makes it to the front page of reddit. These submissions are voted on by users, and new accounts must log in and complete a CAPTCHA to vote. [Ian] discovered that reddit’s CAPTCHA is not really state-of-the-art, and figured out how to get a bot to solve it

The method exploits the 8-bit nature of the distorted grid in the CAPTCHA. Because this grid isn’t pure black or pure white, it’s at a lower intensity than the letters in the CAPTCHA. Putting the CAPTCHA through a threshold filter, deleting any blocks of pixels smaller than 20 pixels, and running it through a classifier (PDF there), a bot can guess what the letters of the CAPTCHA should be.

Out of the 489 CAPTCHAs [Ian] fed into his algorithm, only 28 – or 5.73% – were guessed correctly. However, because he knows which CAPTCHAs had failed segmentation, ignoring those can increase the success rate to 10%. Theoretically, by requesting new CAPTCHAs, [Ian] can get the accuracy of his CAPTCHA bot up to about 30%.

Combine this with a brilliant auto voting script that only requires someone to enter CAPTCHAs, and you’ve got the recipe for getting anything you want directly to the front page of reddit. Of course you could do the same with a few memes and pictures of cats, but you knew that already.

Karma Controller Makes Reddit A Game

karma-controller-reddit

[Will] likes Reddit so much he built this dedicated controller that lets him play the social website like a video game.

He calls it he Karma Controller. In this case, ‘Karma’ refers to ability to accumulate a large number of net up-votes on a Reddit post. The device features seven buttons which are all it takes to up and down vote, navigate up and down on the Reddit listings, toggle images, as well as open and close new tabs for the comments section. We’re wondering if it allows you to follow a link to the post source too?

One of the reasons that we’re featuring this is that it’s only [Will’s] second electronics project. If you’re still reluctant to get your hands dirty we hope this acts as inspiration. He started by building the first version on a hunk of protoboard. The Digispark microcontroller seen at the top reads from his button network and communicates with the computer via USB. Once the design was proven he had some help etching this circuit board which is version 2. He shows it off in the clip after the jump.

If you just want some buttons for voting you should take a look at this project which includes a 3D printed enclosure and button covers.

Continue reading “Karma Controller Makes Reddit A Game”