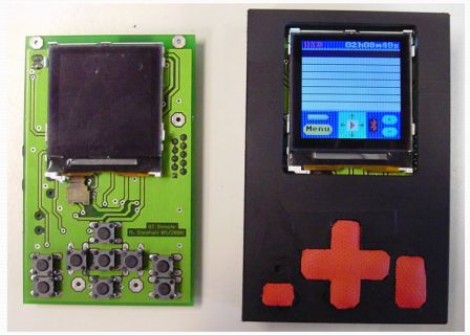
[Mathieu] spent three months developing this multimedia remote control. It connects to a PC via USB or Bluetooth and communicates with Winamp to pull down track information for display on a Nokia LCD screen. It can also be used as a wireless headset via the two on-board jacks. [Mettieu] thinks it’s just a small hop away from working as a Skype client if you take the time to write a plugin for that API.
Day: August 5, 2010
RGB VU Meter
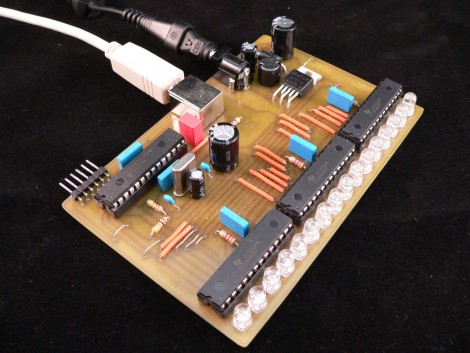
[Simon Inns] turned out this VU meter with a 16 RGB LEDs. He’s using three 16-bit TLC5940NTG LED drivers for the project. They’re not cheap chips but they do a great job. If you were looking to save on parts [Simon] found there’s more than enough brightness and any loss due to multiplexing would not be a problem. The device connects to a computer via USB thanks to the PIC 18F2550 which he’s used in his past VU meter projects. One of the design choices he made was to use a switching power supply. The LM2576 (datasheet) has no problem sourcing 3A at 5V and in addition to two electrolytic capacitors which are commonly used with linear regulators, you just need to add a diode and an inductor.
The meter offers several different configurations which are set on the PC side of things. These include the colors that are used and if the entire bars is used as one meter or split into sections to display both audio channels. Check it out after the break.
TxtBomber
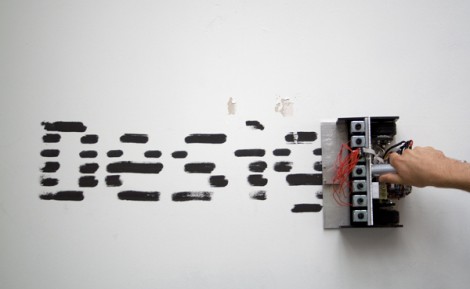
The txtBomber is a high-tech graffiti printer developed by [Felix Vorreiter]. Details are a bit scarce but the video clip after the break proves that this works quite well. [Felix] admits this is Arduino powered but we’re going to have to guess at the rest of the setup from the pictures. He says there are built-in-pens so we’d bet there’s a felt-tip type of thing going on and those look like seven solenoids that actuate them. He posted a picture of the handle side of the device and we can make out two wheels that are connected to LEGO gears. This tracks movement of the txtBomber across a surface in order to synchronize the printing process. There’s no sign of an LCD so it looks like you have to pre-program the messages before you go out into the field.
This is akin to the Chalkbot, but the messages that leaves wash away with the rain. This one seems like it might get you into some trouble if you get caught leaving permanent tags around the neighborhood.
Using Makerbot For Dishwasher Repair
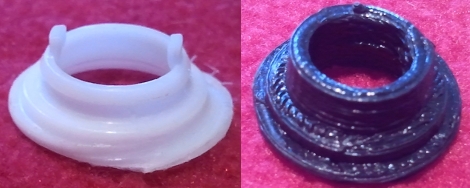
[Daryll Strauss’] dishwasher had some problems that he traced to a worn out part on the upper spinning arm. The hackerspace he belongs to has a Makerbot and he though this would be the perfect opportunity to print his own replacement part. He picked up some inexpensive digital calipers and set to work mapping out the dimensions of the broken piece. He took his hand-drawn cross section and built a replica part in Blender. Once he had it just right he generated the g-code and printed the part. His replacement works very well, and it’s a bit thicker (by design) than the original so hopefully that means it will hold up longer.
Android Development 101 – Part 5:DroidDraw & Information Tracker Completed
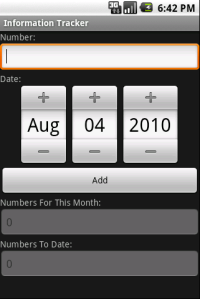
In this tutorial we are going to cover completing the Information Tracker using DroidDraw to design the layout of this project. This will give you insight into an alternative to the stock layout manager in the eclipse environment and how DroidDraw functions. DroidDraw can be your best friend when designing Android applications or your worse enemy if you don’t know the layout of the application and how it works. This will show you the basics to this program and how to incorporate it into your development process. This is significantly easier than the previous post but will teach skills on other programs to help development such as DroidDraw.
Continue reading “Android Development 101 – Part 5:DroidDraw & Information Tracker Completed”
Cray-inspired PC Case
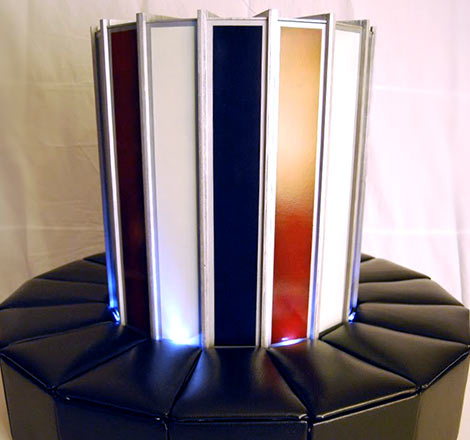
35 years following its introduction, and despite fewer than 100 systems deployed, the Cray-1 remains one of the most recognizable computers in history; it is a timeless icon of pure supercomputer badassery. Custom case builder [Daryl Brach] pays homage to this classic with his third-scale model housing two modern PC motherboards.
In an interesting reversal, the base of the model — the upholstered bench that housed cooling and power distribution for the original Cray — holds the PC motherboards and storage, while the upper section is currently just for show but may house a water cooling rig in the future. The paint scheme is inspired by the Cray-1 on display at the Smithsonian, though Daryl’s model does make a few modern concessions such as LED lighting. Hinged panels in the base flip open to access the systems’ optical drives (perhaps to watch Tron on DVD).
The Cray-1 ran at 80 MHz and could house up to eight megabytes of memory…just about unfathomable performance in its day. It’s not clear what processors [Daryl] chose to outfit his system with, but regardless, even an entry-level modern PC doesn’t just run circles around its progenitor, it runs ray-traced glass spheres around it. Technology marches on, but good design never goes out of style.
Recyclebot Digests Milk Jugs To Feed MakerBot
The old saying, “garbage in, garbage out” may need to be re-evaluated. Students at Victoria University of Wellington are developing a machine that recycles old milk jugs, extruding an HDPE plastic filament that can then be fed into a MakerBot for 3D printing.
The process involves grinding the plastic into small pieces, then pressing these through a heater and extruder plate to produce a continuous bead of the proper diameter for the MakerBot. Nichrome wire — the stuff of hair dryers and toasters — forms the heating element, and this must be regulated within a specific temperature range for different plastics. The initial grinder design is hand-cranked, but they are working toward a fully automated system. It appears that the machine could also recycle old MakerBot output, provided the grinder has sufficient torque.