Automatic Lock Cracker Makes Breaking And Entering A Breeze

automatic_lockcracker

For most people, forgetting the combination on a lock means breaking out the bolt cutters and chopping off the lock. Some students at the [Olin College of Engineering] decided there was a far more elegant way to do the job, so they built an automated lock-cracking machine.

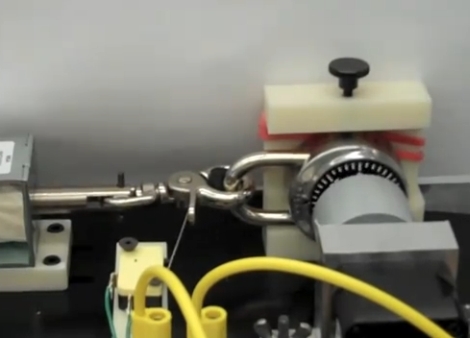
The machine consists of a clamp to hold the lock, a solenoid to pull the lock open, and a stepper motor to run through the combinations. Most of the processing is done on the attached computer, using software they created. The application will brute-force all of the possible combinations if you request it, but it also allows you to enter the first, second, or third numbers of the combination if you happen to remember them.

Once the machine is started, the motor begins spinning the lock and the solenoid yanks on the latch until the combination is discovered, which takes a maximum of about two hours to complete. The opening of the latch trips a limit switch and causes the mechanism to stop. A simple button press then returns the lock’s combination to the user.

Be sure to check out the video embedded below of the lock cracker in action.

[via Wired]

Continue reading “Automatic Lock Cracker Makes Breaking And Entering A Breeze”

Lightweight Robosuit Is Like Stilts On Steroids

What would you do if you were a foot or two taller? How about if you had an arm span two times as wide as you have now?

A group of Japanese engineering students asked themselves the same question and built a wearable chassis that does just that. Their project is called “Sukerutonikusu”, which we believe roughly translates to: “This is freaking awesome, we’ll take two!”. [Thopter] however informs us that it translates to “Skeletonics”, a fusion of the words “skeleton” and “mechanics”.

The suit is comprised of lightweight aluminum pipes and sheeting, allowing for it to be powered solely by the person wearing it. Stepping inside the chassis looks like it lifts the wearer about a foot and a half off the ground, while increasing their wingspan by nearly 6 feet! In the video embedded below you can see that while in the suit, the wearer is quite agile, and even has the ability to run at a decent tick.

If this ever comes to market, you can bet we will buy one in a heartbeat – until then, we will have to settle for making RoboCop sounds as we walk about the office.

Continue reading “Lightweight Robosuit Is Like Stilts On Steroids”

A 555 Synthesizer

Inspired by the memory of a childhood electronics kit, [Frank] decided to make a new 555 Synthesizer and enter it into the 555 contest. [Frank’s] remake is played with a stylus, and sports an attack and release envelope circuit, housed in a quick but effective acrylic case.

Using a single 555 timer, a hand full of capacitors, two transistors, and a healthy dose of resistors and potentiometers, the sound is quite impressive thanks to optional filtering, enveloping, and a lot of fine tuning. Full schematics, bill of materials, formulas, and board files are all available along with sources for some of the more specialized potentiometers.

Join us after the break for a ~13 minute long video, which is pretty cool, as it shows the device from prototype, and does some fast forward action though to the final product pictured above, though if you just want a demo of the 555 synth fast forward to 10:44

Continue reading “A 555 Synthesizer”

Arduino Thermo-cam

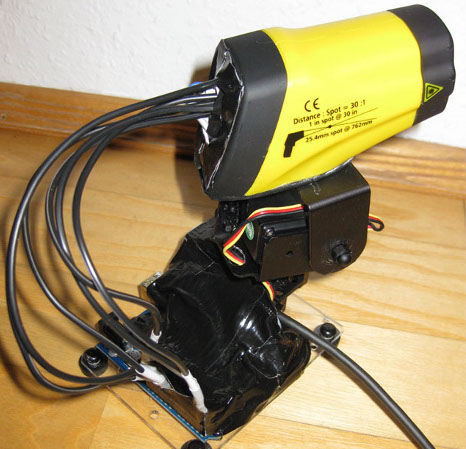
[Maxbot] wanted a inferared themo-cam that he could use to scan an area and display the results on his computer, the result is this Cheap-Thermocam. This little device is a inexpensive thermal sensor mounted on a pair of servo’s for XY scanning, custom java software and an Arudino to mate the two.

The sanner does a limited but still useful resolution of 42×32 pixels. To help out with smoothness of the colors, every other line of the finished product is interpolated against its neighbors. It takes the device about two minutes to measure each of the 1344 points, but what it lacks in speed it more than makes up for in cost, boasting around 100$ build cost, and ease of construction.

While exact details of what parts you need and how to hook everything up is lacking at this moment, there is a page in the works that will let you know all the good details “soon”, though if you are inspired to replicate one of these nifty devices it seems the most difficult part would be tapping into the sensor’s electronics and the custom software.

Cheap, hacky, and even comes with its own roll of duct tape. We have a short video for you after the break.

Continue reading “Arduino Thermo-cam”

DSLR Bellows-mounted Lens Retrofit

dslr_lens_retrofit

While digging through a pile of old camera equipment, [Jake] stumbled upon a camera that belonged to his grandfather and was curious to see what sorts of images the old lens would produce. He wasn’t interested in messing around with a film-based camera for his experiments, so he needed to find a way to mount the vintage lens on his newer Canon DSLR.

After considering several options including custom machined adapters and mounting rings built from old Canon lenses, he found a much cheaper solution. He purchased a lens adapter made to mount a particular type of lens to a modern DSLR, and then modified it to fit his lens. It worked perfectly, though he admits the resulting images are not that different than those taken with his regular lens.

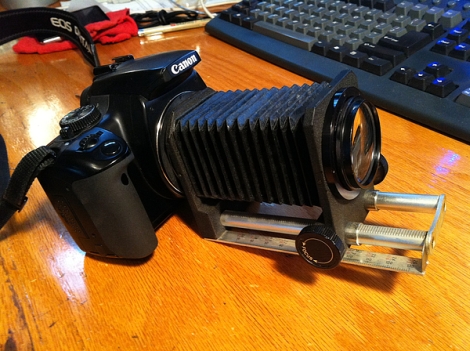
Underwhelmed with the images, he decided to mount the lens on a set of bellows he picked up at the local dump. It looks pretty neat, but he has yet to get a chance to take any pictures with his new setup. Hopefully we’ll see some test shots soon.

If anyone has experience with using bellows lenses on a modern DSLR, we’re always up for seeing some sample pictures. In the meantime, check out this other DSLR/bellows hybrid project we featured a short while back.

[via BoingBoing]

Beginner Concepts In Electronics And Arduino

arduino_tutorial_series

[Jeremy] is all about the Arduino, but also into helping people get started working with electronics. He has put together a series of videos on his web site which discuss the basics of using an Arduino. Having just published his tenth tutorial, he dropped us a line to let us know. His videos cover a wide range of topics and include source code, schematics, and a full parts list to help you follow along with him.

While the core of his lessons focus specifically on how to use the Arduino to perform particular tasks, he does introduce the viewer to many different concepts along the way. He covers PWM, button debouncing, interrupts, SPI communications, analog inputs, and more – all of which are must-know topics that extend beyond the realm of experimenting with Arduinos.

The videos run anywhere from 6 to 20 minutes in length, so you will want to set a block of time aside if you plan on checking them out.

If Arduino-specific videos aren’t your thing, he also has a series of general tech-related videos on his site as well which may be of interest. Otherwise, stick around to see the latest in his series of tutorials.

Continue reading “Beginner Concepts In Electronics And Arduino”

CNC-built R2-D2 Brings Childhood Dreams To Life

r2d2_build

As a kid, [Wes] always dreamed of building a full-size, functional R2-D2 droid from Star Wars. While most youthful aspirations such as this fall to the wayside amid adult responsibilities and commitments, he did not allow his dreams to disappear along with his childhood.

He began his droid-building journey armed only with his dreams and some assistance from the friendly folks over at R2Builders. The entire replica was built using MDF, wood, and styrene sheeting, along with just one tool: a CNC machine. He walks you through the every step of the construction, stopping to give recommendations on CNC hardware, software, etc. along the way. He also provides Gcode files for each of the pieces he has constructed, which should be a huge help to anyone looking to build a R2-D2 clone of their own.

It looks like he is just getting around to fitting motors into the leg housings of his R2-D2 replica, but we can’t wait to see what it looks like once he has all of the electronics and other details finished.

If you are interested in more R2-D2 coverage, look no further than right here.