ATtiny13 Powered Handheld Helicopter Game

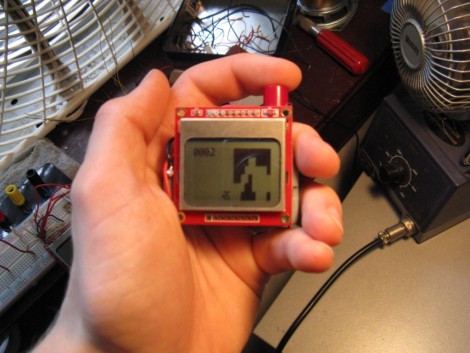
[Owen] just finished putting together a portable helicopter game. It’s pretty impressive, especially since he used an ATtiny13 microcontroller. That chip uses an 8-pin dip package, offering only five I/O pins (six if you use the reset pin) and 1k of programming space.

The game runs on a small cellphone-type LCD screen. The helicopter remains somewhere in the center column of the screen as the maze that makes up the game board approaches one step at a time. The single button that controls the helicopter will raise it with each step of the maze when held down, or allow it to fall when released. The player’s progress is shown as a hex value in the upper left corner of the screen. When you hit a wall, your score will be shown next to the high score for the game and will be saved in EEPROM if it’s a new record. As the game progresses, the maze gets harder based on the score. Check it out in a video clip after the break.

Continue reading “ATtiny13 Powered Handheld Helicopter Game”

Pulse Width Modulation With Microcontrollers

Those following the ProtoStack tutorials will be happy to hear that there is a new installment which explains Pulse Width Modulation. If you’ve never heard of PWM before, it’s a method of generating a signal that is logic 1 for a portion of the time and logic 0 for the remainder of the time. It is the most commonly used method for dimming an LED, and that’s [Daniel’s] example in this tutorial. But you’ll also find it used in many other applications such as servo motor control and piezo speaker control.

[Daniel] starts off with a brief explanation of duty cycle, then moves on to some examples of hardware and software PWM. Many of the AVR microcontrollers have a hardware PWM feature that allows you to configure a pin that toggles based on a target timer value. This is demonstrated using an ATmega168, but a method of using interrupts and your own code is also covered in case you don’t have a hardware PWM pin available.

Digitized Retro LCD Games Played Using An Arduino As A Controller

This one’s a bit abstract. Remember those LCD games that became quite popular sometime in the 1990’s? You know, the ones that had only one game, usually a character that could be moved back and forth to catch, hit, or block objects falling from the sky or being thrown by some villain? [Tobie Nortje] sure remembers them and has built an Arduino controller to play virtual versions of the games.

He started off by finding a website that is digitizing the old games. That is to say, they’ve taken images of each state of the LCD, then implemented the game play using those images and an approximation of the original physics. Unlike NES or Sega Master System games the ROMs of these devices can’t just be dumped because of the specialized screen. Instead, a virtual version of the hardware has been built into a web interface.

[Tobie’s] part of the hack is to use an Arduino and a few buttons as the controller. It’s easy to set up and we think the breadboarded controller approximates the size and weight of an LCD game pretty well. Check out the video after the break and let us know what you think in the comments.

Continue reading “Digitized Retro LCD Games Played Using An Arduino As A Controller”

A Badge Without A Conference

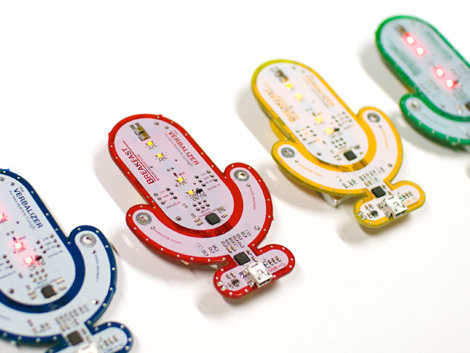
We saw this one a few days ago when it was first bouncing around the interwebs but never took a close look at it. Today, when we ran across a direct link in the tips box it was the promo video (embedded after the break) that won us over. Once you dig into the particulars of The Verbalizer we think you’ll agree that this is a hackable conference badge without the pesky need to attend a conference.

As you probably guessed from the design of the PCB, this is a microphone. It’s intended for use with Google’s new voice search feature, and connects to a computer via a Bluetooth module. But really it’s just another roll-your-own Arduino with a few extra bits. You’ll find an ATmega328 and an FTDI chip which provides a USB connection for programming. The real fun starts with the microphone and speaker circuitry which is just waiting to be breadboarded at home. We found a few other things while poking around in the schematic (available by downloading their Product Docs and Schematics package). It looks like there’s some capacitive touch… you what? Isn’t it more fun if you find this stuff yourself, kind of like the hidden gems of the DEFCON badges?

Continue reading “A Badge Without A Conference”

DIY Battery Reconditioner Saves Old Rechargeable Batteries From The Landfill

rechargeable_battery_reconditioner

Instructables user [msuzuki777] had amassed quite a collection of batteries over the years, but was finding that some of his rechargeable AA and AAA cells seemed to be at the end of their useful life. After reading some information at the Battery University regarding the restoration process for nickel-based batteries, he figured he might as well try building a battery reconditioner of his own.

He worked through several designs that either flat-out did not work, or had issues that limited the number of batteries he could simultaneously recondition. After reading about this rechargeable battery capacity tester we featured a few months back, he was ready to give the project one more try.

It seems that the third try was the charm, because his FET-based design worked quite well. He ended up wiring two FETs to each battery, which are connected via a relay. The batteries get discharged until the voltage drops down to 1V, at which point one FET is turned off, allowing the batteries reach their target voltage of 0.4V more slowly.

Despite the self-proclaimed messy layout of his circuit, [msuzuki777] is quite happy with the results. He has been able to recover several batteries, which is a fantastic alternative to letting them decay in a landfill.

Electronics Lessons For Beginners

electronics

Hackaday reader [grenadier] wrote in to share a series of tutorials he is working on, where he discusses the basics of electricity and electronics. The first lesson titled, What is Electricity?” has been wrapped up, and is available for free on his site.

For any of our regular readers, the lesson will seem pretty basic (and likely full of things to nitpick). However, we imagine his lessons would be quite helpful to anyone looking to expand their electronics know-how.

Now don’t get us wrong, we love the series of electronics tutorials that Jeri has been periodically releasing, but we think there’s plenty of room on the Internet for other willing teachers as well. If his first lesson is any indicator, his tutorials will be easy to understand, sprinkled with a little bit of humor, and chock full of fun videos that demonstrate the subject at hand.

Take a quick look his way if you get a chance – you or someone you know might find his tutorials and reference guides insightful.

[Image courtesy of Electronicsandyou]

Automotive Backup Alarm

[Dino’s] project of the week is a backup alarm for your car. This is a feature that has become popular on many large vehicles like SUVs where visibility is an issue when moving in reverse. But it doesn’t sound like he was motivated by the need to have this in his own car. Instead, he was looking for something to build using a laser range finder.

[Joe Grand] (the brains behind DEFCON badges) has been working on an inexpensive laser range finder for Parallax. He sent one of the first-run prototype boards to [Dino] for beta testing and we’re glad that [Dino] decided to show it off. It uses a small red laser diode and a camera module to measure distance in millimeters. The board communicates serially and this particular project uses an Arduino along with a character LCD and speaker to display distance and sound an alarm when the car is within a meter of an object.

Check out the video after the break to see the build in its entirety. The system works reasonably well, if the object you’re about to hit is perfectly lined up with the laser dot.

Continue reading “Automotive Backup Alarm”