Video: Everything You Wanted To Know About DC Motors

Continuing on with our series of Hackaday original videos, this week we are presenting a video all about DC motors. DC motors are relatively simple electromechanical devices that turn electrical energy into rotational movement. In this video, [Jack] takes apart a small DC motor and shows off all of the parts inside and describes how it all works. He also talks about how to modify DC motors to increase their speed or torque as well as how to change their directional preference. In this video, he rewinds a motor and shows how this changes the performance characteristics of the motor.

Is mechanical stuff not your thing? Stay tuned for next week when we launch into a series of videos where we show how to program for the Atmel ATmega328 processor using C. In this series, we’ll show you the real nuts and bolts of programming for this processor by working with its I/O pins,timers, A/D, interrupts, and more.

Video after the break.
Continue reading “Video: Everything You Wanted To Know About DC Motors”

Vetinari Clock Will Drive You Insane

Sometimes we need more psy ops in our life. Being an eminent fan of the Discworld series, Reddit user [rdmiller3] decided he needed to build Lord Vetinari’s clock. This fictional clock was placed in the waiting room for Lord Vetinari in several of the Discworld books. Although the clock keeps accurate time overall, it sometimes tics irregularly and out of sync. The reason? To whittle away the minds of whoever waits for Lord Vetinari.

The build uses a standard battery-powered analog clockwork. The ticking mechanism is just a magnet mounted inside a coil driven iron core. The coil leads were disconnected from the clock circuit and connected to digital inputs of an Arduino. With a few random() calls, the clock keeps accurate but random time.

Unfortunately, the clock stopped working after a few weeks because the 5 V from the Arduino was, “pounding it way too hard.” [rdmiller3] says a few resistors and LEDs for the voltage drop would make for a more reliable circuit, though. Check out the hard to watch video of the clock in action after the break.

Continue reading “Vetinari Clock Will Drive You Insane”

Reclaiming Waste Heat From Appliances

Here we see [Christopher Suprock] hanging out in his basement laundry area in order to show off his intelligent heat exchanger. The reason for the device is simple, when you use your clothes dryer , hot water heater, other other utilities that generate heat, energy is often wasted in the form of hot exhaust gases. Why not get the most for you clothes drying dollar by sourcing that hot air to warm your house.

The block you see on top of the dryer is a heat exchanger. The exhaust from the dryer passes through a radiator assembly before being vented outside the house. Some control hardware monitors the temperature of the input side and switches on the fan when it detects a higher temperature than the ambient air. Air then flows through the radiator, picking up heat energy from the exhaust gas. See [Christopher’s] explaination, and some thermal readings while the dryer is running, in the video after the break.

This makes us wonder, if the heat exchanger drops the exhaust gas fifty degrees before being vented, will this cause any issues with condensation?

Continue reading “Reclaiming Waste Heat From Appliances”

A Masochistic Video Card

Have a penchant for pain? Why not destroy your fingertips with a wire-wrap tool building a video card made entirely out of discrete components.

When [Chris] decided to build an entry for the Dangerous Prototypes 7400 logic competition he already had his hands full. The 74xx chips he had on hand had a maximum clock frequency of 25MHz, but the VGA pixel clock runs at 40MHz. dividing the H sync timing by 4 means the maximum speed required of the video card is only 10MHz, albeit with a reduced resolution.

The video card was constructed on perfboard with wirewrap sockets. An 8-bit DAC was included, allowing the card to display 256 separate colors but only the three primary lines were wired up to the VGA cable. As is, the card cycles through 8 different colors in a constant loop, not bad for a pile of chips.

VGA out has been done on everything from an ARM to an ATtiny, but rarely, if ever, has VGA been done with discrete components. While this video card may not be our first choice for bitcoin mining, it’s still a very impressive build. Check out the walk through video after the break.

Continue reading “A Masochistic Video Card”

Decorate Your House In Vacuum Tubes

vacuum_tube_creations

[Autuin] wrote in to share a few things he’s put together using spare vacuum tubes he had sitting around. With no other practical use for the tubes in mind, he fiddled around and came up with a couple of items that could be neat to have around the house, depending on your style of decor.

The first item is a vacuum tube night light. While the tubes were not originally built with the express purpose of putting out light in mind, they do happen to throw out a nice warm glow when plugged into a suitable power supply. [Autuin] mounted one in a wall wart, driving it at double the rated voltage, which provides a decent amount of light.

His second creation is similar to the first, but meant for your tabletop rather than your wall. He stuffed a vacuum tube into a candle holder, added a power source, and called it a day. The vacuum tube candle actually looks pretty nice, and with a bit of tweaking could easily be made to behave like a candle as well.

The final item he shows off is a vacuum tube flash drive. Little more than a carefully hollowed out tube with flash drive guts inside, it is more suited as a permanent fixture than as a portable storage device. Even so, we think it looks pretty cool.

Have you done anything neat with old vacuum tubes? Let us know in the comments!

Hardware-based Keyboard Remapping

[Nav] wanted to change his keyboard mapping for one particular keyboard, rather than on each operating system. He used an AT90USBKey as a replacement PCB by soldering to all of the contacts on the key matrix. This allows him to remap the keys by following onscreen prompts.

The board enumerates as an HID device, and has a special mode which is accesses by plugging the keyboard in while holding down any key. If a text editor window is active you’ll see prompts from the microcontroller to press a series of keys. This is a routine used to learn how the key matrix is organized, and it’s your opportunity to change how each key is mapped. Since the mapping is saved to EEPROM, you can use any computer to map the keys, then plug the device into a systems that don’t offer software remapping. It could also be useful as a gaming keyboard, assuming there aren’t latency issues

As with the AVR-based arcade controller, this project uses the LUFA package to handle the USB stack.

magic_music_table_accessible_jukebox

Magic Table Gives Disabled Child Control Over Her Music

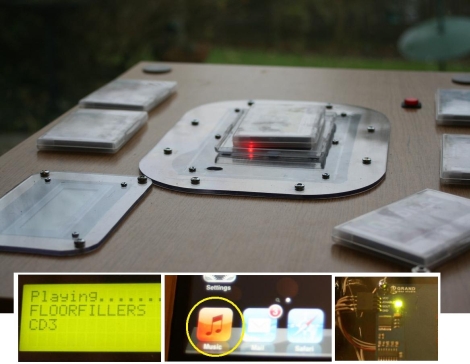
Instructables user [XenonJohn] recently put together a fantastic tutorial detailing how he made an RFID-controlled jukebox. The Magic Music Table was created for a disabled child, who is unable to use a CD payer, nor navigate small buttons and menus on MP3 players. He originally though about making the buttons more accessible a la the Frankenkindle, but ultimately settled on making the table instead.

Embedded in the center of the Music Table under a piece of plexiglass is a small project box containing an iPod, Arduino Mega, and a Parallax RFID reader. He crafted small RFID “bricks” that can be waved over the RFID reader, triggering the iPod to play a specific album from a large playlist. The Arduino acts as the middleman, controlling the RFID reader and relaying the appropriate information to the iPod when required.

The system looks pretty sturdy, and [XenonJohn] says that it works great. We think it’s a wonderful use of technology – you certainly can’t argue with brightening up a child’s day.

Continue reading to see a video of the Magic Music Table in action.

Continue reading “Magic Table Gives Disabled Child Control Over Her Music”