Who Knew Jacob’s Ladder Builds Had So Many Options?

[Grenadier] has a thing for the high voltage and, as you can see, he’s found multiple ways to build the icon of HV toys – a Jacob’s Ladder.

The three look similar, but they use different means of generation the voltages necessary to get a spark to jump through the air. The exhibit on the left uses a neon sign transformer, the one in the middle is based on a transformer from an X-ray machine, and the example to the right uses a microwave oven transformer. [Grenadier] discusses the pros and cons of each method, then links to his in-depth posts about working with each one them. There are also videos for all three. We’ve embedded the video for the microwave oven transformer after the break. That version of the Jacob’s Ladder requires some way to start the spark and in the video he’s doing it manually. There is always the option to add a solenoid to do the job but he does mention that you can’t just let it run because that cheap transformer will burn out before long.

If you like what you see here, perhaps you’ll be entertained when he runs HV through some soda cans.

Continue reading “Who Knew Jacob’s Ladder Builds Had So Many Options?”

A Stackable Motor Driver Shield For The Arduino

The Arduino has been used for many purposes, and  “shields” are available to make many common tasks easier.  However, [Nick] wanted a stackable motor driver shield, so he build one himself!. There are many motor driver shields available for the Arduino, however, there aren’t any that allow one to drive as many motors as were needed for his project, and none that were stackable.

[Nick] had no experience designing and fabricating a custom board, but decided to try his hand at it anyway. Armed with a free version of [Eagle] PCB design software, he designed the board that he needed then sent it to [Seeed] to be manufactured. According to his article, a quantity of 10 Arduino-sized boards can be purchased for the price of $25. At that price point, some hobbyists may want to consider this option rather than manually creating their own circuit.

According to [Nick], he was able to manufacture his first board with no errors on his first run! Not bad for his first try at something like this.

DIY PCB Exposure Box Looks Professionally Made

diy_double_sided_exposure_box

[Stynus] was frustrated with the fact that he would have to flip his PCBs over mid way through the exposure process, so he decided the best course of action would be to build his own double-sided PCB exposure box.

He scored some UV LEDs on eBay, and after waiting a few weeks for PCBs to arrive, he was ready to start construction. The box contains a sliding glass shelf, which is positioned between two sets of LED panels. The setup lets him simultaneously etch both sides of any PCB, up to 20cm x 30cm in size. The exposure box is run by a PIC 16F628P and features an LCD status panel as well as a small handful of controls. [Stynus] programmed the box to retain the length of the last exposure, making it easy to replicate his results time after time.

Towards the end of the build log he shows off some pictures of the completed exposure box, which looks very professionally done. It’s a great job all around, and we would gladly take one for our workshop in a heartbeat.

Clicking And Counting With Push Wheel Switches

getting_started_with_push_wheel_switches

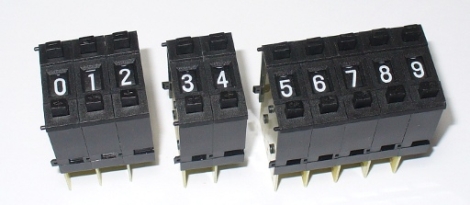
Push-wheel switches are somewhat older technology, but [John Boxall] from the Little Bird Electronics blog shows us that they are still quite useful today.

In a quick but thorough demonstration, he discusses how this input technology works, showing off both single digit and multi digit inputs. The former is pretty straightforward, with each of the counter’s outputs tied to an I/O pin on his Arduino. Using multiple counter units is ever so slightly more complicated, but the job is made easier through the use of an NXP 74HC4066 bilateral switch. He shares a snippet of Arduino code that toggles through each of the switches, reading in their values one by one.

His walkthrough is a must-see for those who are just getting their feet wet with Arduinos and various input methods. These counters are great for 1-4 digit input needs, but if you require more digits [John] says that a 12-digit keypad would probably be a better way to go.

Stick around to see a short video demo of the switches doing their thing.

Continue reading “Clicking And Counting With Push Wheel Switches”

Amazing 60 Year Old Robot Dog Is A Mystery

The robot dog you see above is a mystery. [Daneil Dennet], a professor of philosophy at Tufts University found this in an antique shop in Paris.  Apparently it has no identification and no one has been able to tell him anything about it. It was made in the 50s, and that seems to be all he knows. He’s offering a reward to whomever can reveal its secrets. There’s a full gallery of pictures to browse through that reveal some of the construction, but not a whole lot of the function.

We are just blown away by the construction here. Look at all those switches! Can you imagine how easy to reverse engineer things would have been back then? Surely in the right hands, someone could get this thing working again. Then again [Daniel] might like it kept completely original. If you know something about this robot, you can find [Daniel]’s contact information here.

Oh, and yes, we realize it looks just like k-9.

I Have Seen The Future, And It Has Swarmanoids

swarmanoid_robots_rescue_book

Imagine that you want a book that is located on a shelf several rooms over, but you do not want to get out of your chair. Short of developing telekenesis on the spot, there’s little you can do other than get up and fetch the book yourself – that is, unless you have an army of Swarmanoids to do your bidding.

This robotic swarm is the pet project of [Dr. Marco Dorigo] from the Université Libre de Bruxelles, Belgium, and is impressive to say the least . As the Mission: Impossible-esque video plays out, you see several different robots working in concert, flying, climbing, and driving around to fetch a book from a shelf. The robots have no information regarding their surroundings, forcing them to learn and “speak” to one another in order to reach their goal once the target has been located.

It really is amazing to watch these robots work together, but don’t take our word for it. Check out the Swarmanoids in action below.

[via Geek.com]

Continue reading “I Have Seen The Future, And It Has Swarmanoids”

PS2 To USB Keyboard Converter Also Logs Your Keystrokes

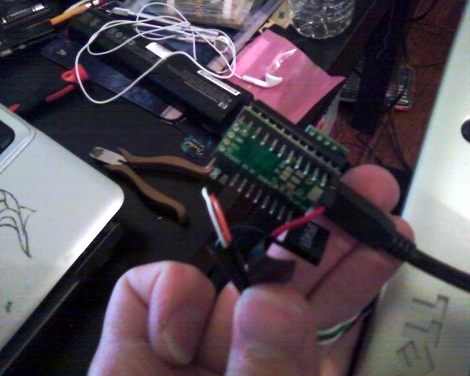
[Shawn McCombs] is up to no good with his first Teensy project. The board you see above takes the input from a PS2 keyboard and converts it to a USB connection. Oh, and did we mention that it also keeps track of everything you type as well?

From the beginning the project was intended to be a keylogger. It’s a man-in-the-middle device that could be hidden inside the case of a keyboard, making it appear to be a stock USB keyboard. Data is stored to an SD card so an attacker would need to gain access to the hardware after the data he’s targeting has been typed.

It works mostly as [Shawn] expected. He is, however, having trouble handling the CTRL, ALT, Windows, and Caps Lock keys. If this were actually being used maliciously it would be a dead giveaway. Many secure Windows machine require a CRTL-ALT-DELETE keystroke to access the login screen.