Quit Monkeying About!

Monkey Business

This friendly little monkey is the latest creation from [Jan Sieber] and [Ralph Kistler]. Yes it’s another Kinect Hack, the Kinect tracks the users stance using the OpenNI Framework and OSCeleton. The information is sent to an Arduino crammed inside the monkey, also inside the poor little monkey are 10 servo motors and a nightmarish wire skeleton. The monkey is left dangling from the Kinect sensor by several cables, ready to follow your every move. The monkey seems fairly sprightly for someone who has had all their insides removed, it is able to copy a multitude of stances quite swiftly.

The video after the break shows the monkey in action for about 1 minute. Then the team go through the build and application of the clever little monkey in a musical/documentary style video. There is also a creepy section where the monkey draws its own skeleton then freaks out.. Enjoy..

Continue reading “Quit Monkeying About!”

Hacking QR Codes For Fun And Profit

QR codes are everywhere these days, from being printed onto receipts to chiseled into granite tombstones. [Will] came up with a way to modify existing QR codes, and his hack has the potential to cause quite a bit of harmless mischief.

[Will]’s hack involves a little photo editing, transparency film, and some white-out/Liquid Paper/Tippex. After the ‘target’ and ‘destination’ QR codes have been imported into Gimp, the differences are found and the result printed out on a transparency sheet. After that,  hang the transparency over the original and the QR code now goes to the URL of your choice.

Continue reading “Hacking QR Codes For Fun And Profit”

Gain Wizardly Knowledge About Crystals

Make sure your test equipment is handy, then give this video series about crystal oscillators a spin. [Shahriar] of the Signal Path Blog put together a four-part video blog post totaling about an hour. In the discussion he covers the ins and outs of crystal oscillators and ring oscillators. His focus is on how these parts are used as timekeeping devices for microcontrollers. This isn’t a lecture that skims the surface of the topic, it takes you down the rabbit hole, discussing theory, how the devices are built, how to use them, and the pitfalls of doing so.

Our favorite part is in the fourth segment when [Shahriar] measures the effect that temperature has on crystals by spraying them with an inverted compressed air canister. We always thought we were just screwing around when freezing stuff like that. It didn’t occur to us that we were conducting serious experiments.

We’ve embedded the first segment of the video after the break. Continue reading “Gain Wizardly Knowledge About Crystals”

Ever Wonder Where Cool Interactive Museum Exhibits Come From?

[Victor’s] girlfriend works at a museum and enlisted his expertise in designing an interactive detective game for kids visiting the museum. The vision was for the kids to discover phone numbers that they could call for clues. Originally he planned to display the clues on a character LCD, but obviously it’s much neater to hear the clues in the handset of the phone.

Quickly switching gears, [Victor] dropped the ATtiny2313 and started over with an Xmega chip — in fact, it was our recent Xmega post that inspired him to document his project. The microcontroller is responsible for a lot of goings-on. It scans the key matrix for inputs, simulates the DTMF touch tones, reads audio files from a FAT file system on an SD card, and plays them back over the hand set’s speaker. Since most of the hardware is already built into the phones, it was not hard to fit his add-ons inside the case. A simple audio amplifier circuit joins the microcontroller, which is patched into the rows and columns of the keyboard. Take a gander at the video after the break to see the device in action.

Continue reading “Ever Wonder Where Cool Interactive Museum Exhibits Come From?”

Sous Vide Crock Pot Controller

Tempted by what sous vide cooking has to offer, but balking at the price for a unitasker, [Lee’s] father in law set out to see if he could rig up his own precision temperature controlled cooking system on the cheap. He immediately hit eBay and shelled out about around $75 to get his hands on a solid state relay, PID controller, and temperature probe.

As you can see above, a crock pot serves as the cooking vessel. We’ve seen this method before, either splicing into the power cord, or providing a single outlet on the controller. This version provides a PID controlled outlet to which the appliance can be plugged in. The other outlet in the socket is always on and powers an aquarium pump that circulates the heated water during the cooking process.

The result works quite well, even though it wasn’t a huge cost savings. There are a few issues with positioning of the temperature probe, but that may be where experience comes into play.

A Robotic Turtle Platform To Buy Or Build

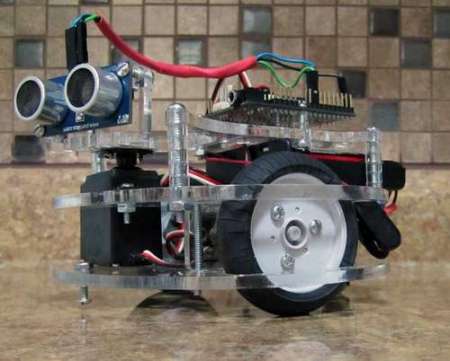
This electric turtle bot instructable describes a fairly simple turtle-style robot meant to be laser cut out of acrylic (although other materials such as aluminum, MDF, or polycarbonate should work just as well). This frame is also optionally for sale, which should appeal to those that would like a mechanical robotics platform to play with, but don’t have access to machine tools. The build instructions include a detailed bill of materials which should come in handy.

As displayed in the video after the break, the robot uses a sonar sensor to navigate. This sensor is set up on a servo in order to scan the terrain, and, depending on how it’s programmed, hopefully avoid obstacles. As of when the video was taken, the little robot appears to sense an obstacle then scan with the servo left and right to see what the best way to turn is.

[youtube http://www.youtube.com/watch?v=vA_kIY3MvTE&w=470&h=349%5D

If this little turtle robot doesn’t have enough power for your taste, check out this autonomous ATV sentry.

DIY Orb Display Puts The Earth In Your Hands

diy_spherical_projection_globe

[Nirav] liked the idea of having his own personal Earth at the tip of his fingers, and since that’s not happening any time soon, he decided to build the next best thing. Sure, he could have simply gone out and purchased a globe, but there is no fun in that. Instead, he shows us how he put together an interactive spherical display that won’t break the bank.

The sphere uses a Microvision SHOWWX to drive its display, which projects an image inside of a frosted glass light fixture. The pico projector gets some help from a 180° fisheye lens along the way, enabling the picture to be stretched across the entire inner surface of the globe.

[Nirav] used his 3D extruder to build a base for the globe, which attaches to the projector via a printed mounting plate. A GorillaPod was used to keep things upright while he dusted off his trigonometry skills in order to figure out how to get the image just right.

We think that he did a great job – it definitely looks to be on par (albeit a bit smaller) than the eye of Sauron globe we saw a while back. We can’t wait to see a video of this thing in action once it’s completely finished!