Inside Globus, A Soviet-Era Analog Space Computer

Whenever [Ken Shirriff] posts something, it ends up being a fascinating read. Usually it’s a piece of computer history, decapped and laid bare under his microscope where it undergoes reverse engineering and analysis to a degree that should be hard to follow, but he still somehow manages to make it understandable. And the same goes for this incredible Soviet analog flight computer, even though there’s barely any silicon inside.

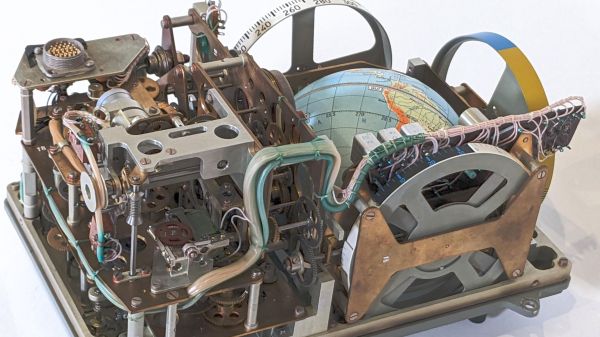
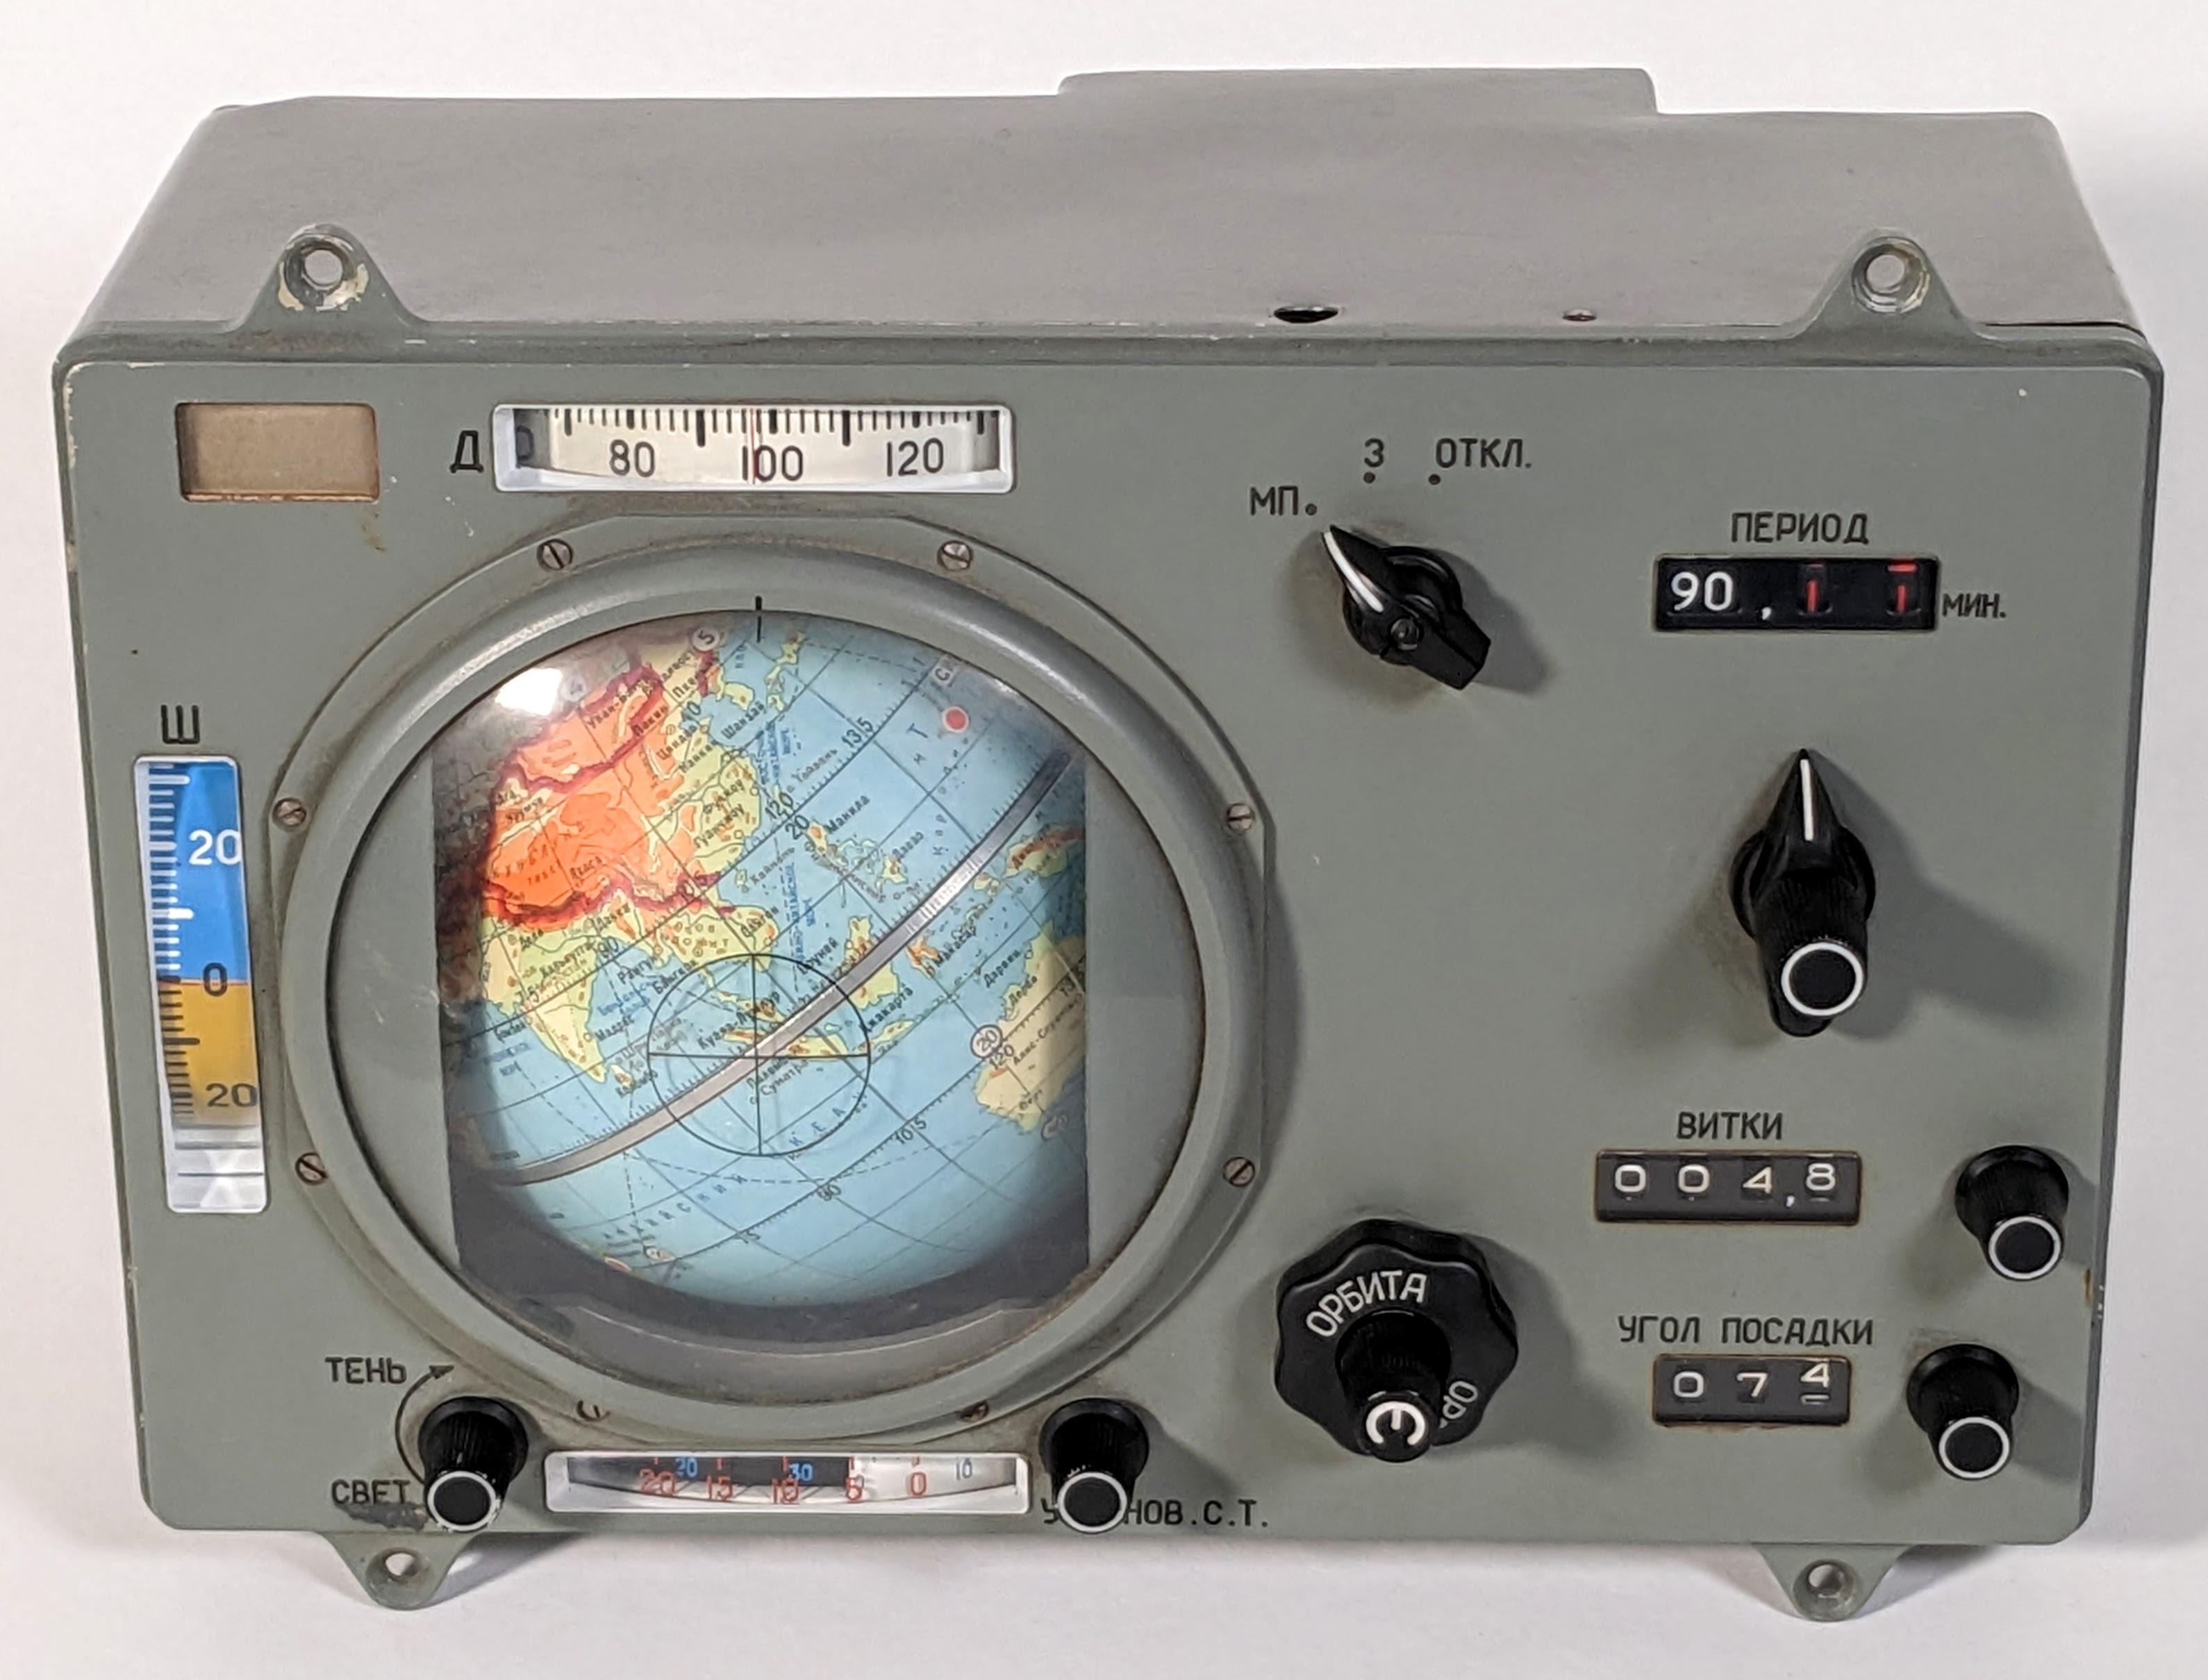
The artifact in question was officially designated the “Индикатор Навигационный Космический,” which roughly translates to “space navigation indicator.” It mercifully earned the nickname “Globus” at some point, understandable given the prominent mechanized globe the device features. Globus wasn’t actually linked to any kind of inertial navigation inputs, but rather was intended to provide cosmonauts with a visual indication of where their spacecraft was relative to the surface of the Earth. As such it depended on inputs from the cosmonauts, like an initial position and orbital altitude. From there, a complicated and absolutely gorgeous gear train featuring multiple differential gears advanced the globe, showing where the spacecraft currently was.

Those of you hoping for a complete teardown will be disappointed; the device, which bears evidence of coming from the time of the Apollo-Soyuz collaboration in 1975, is far too precious to be taken to bits, and certainly looks like it would put up a fight trying to get it back together. But [Ken] still manages to go into great depth, and reveals many of its secrets. Cool features include the geopolitically fixed orbital inclination; the ability to predict a landing point from a deorbit burn, also tinged with Cold War considerations; and the instrument’s limitations, like only supporting circular orbits, which prompted cosmonauts to call for its removal. But versions of Globus nonetheless appeared in pretty much everything the Soviets flew from 1961 to 2002. Talk about staying power!

Sure, the “glass cockpit” of modern space vehicles is more serviceable, but just for aesthetics alone, we think every crewed spacecraft should sport something like Globus. [Ken] did a great job reverse-engineering this, and we really appreciate the tour. And from the sound of it, [Curious Marc] had a hand in the effort, so maybe we’ll get a video too. Fingers crossed.

Thanks to [saintaardvark] for the tip.

World Radio Lets Your Fingers Do The Walking

Listening to radio from distant countries used to take a shortwave rig, but thanks to the Internet we can now pull in streams from all over the globe from the comfort of our own desktop. With a few clicks you can switch between your local news station and the latest in pop trends from Casablanca. But as convenient as online streaming might be, some folks still yearn for the traditional radio experience.

For those people, the Raspberry Pi World Radio by [Abraham Martinez Gracia] might be the solution. Built into the body of a 1960s Invicta radio, this Internet radio uses a very unique interface. Rather than just picking from a list of channels, you use the knobs on the front to pan and zoom around a map of the world. Streaming channels are represented by bubbles located within their country of origin, so you’ll actually have to “travel” there to listen in. The video after the break gives a brief demonstration of how it works in practice.

We’ll admit it might become a bit tedious eventually, but from a visual standpoint, it’s absolutely fantastic. [Abraham] even gave the map an appropriately vintage look to better match the overall aesthetic. Normally we’d say using a Raspberry Pi 4 to drive a streaming radio player would be a bit overkill, but considering the GUI component used here, it’s probably the right choice.

Of course we’ve seen Internet radios built into vintage enclosures before, and we’ve even seen one that used a globe to select the station, but combining both of those concepts into one cohesive project is really quite an accomplishment.

Continue reading “World Radio Lets Your Fingers Do The Walking”

Globe Lamp Tracks The ISS For You

Assuming you don’t work at a major space agency, you probably don’t really need to know the exact location of the International Space Station at all times. If you’d like to know just because it’s cool, this lamp is for you.

The lamp is driven by a Wemos D1, which pulls in data on the space station’s current location from Open Notify. A stepper motor and servo motor serve to control a pan-tilt assembly, aiming a 405nm laser at the inside of a 3D printed globe to indicate the station’s position above Earth. As a nice touch, there’s also a ring of NeoPixel LEDs that are controlled to glow on the sunny side of the planet, too.

This is a fun project that makes it easy to know when to bust out your ham gear to chat to the team overhead, and would also make a great conversation starter. It’s not the first hardware ISS monitor we’ve seen, either! Video after the break.

Continue reading “Globe Lamp Tracks The ISS For You”

Glow In The Dark Globe On A Spherical Screen

Terrestrial globes are almost a thing of the past in an era of Google Earth, but they can still be an exciting object worth hacking together, as [Ivan Miranda] shows with his glow-in-the-dark globe. It’s a globe, it’s a display, and it’s a great use of glow in the dark filament.

For the mechanical part of this build, [Miranda] used glow in the dark filament to 3D print a sphere and a reinforcing ring that hides inside. A threaded rod through the middle secured with screws and bearings make an appropriate spindle, and is attached to a stepper motor in the 3D printed stand. So far, it’s a sphere made of glowey plastic. Where’s the ‘globe’ part coming from?

To project a globe onto this sphere, [Miranda] used a strip of WS2812B LEDs stuck to the inside of the stand’s arc are programmed to selectively illuminate the globe as it rotates on its axis. After a brief hiccup with getting the proper power supply, he was ready to test out his new….. giant light ball.

It turns out, the filament was a bit more transparent than he was expecting so he had to pull it all apart and cover the interior with aluminium tape. [Miranda] also took the chance to clean up the wiring, code, and upgrade to a Teensy 3.1 before another test.

Despite the resulting continental projection being upside-down, it worked! [Miranda] added a USB cable before he closed it up again in case he wanted to reprogram it and display any number of images down the line.

[Thanks for the tip, olivekrystal!]

Foldable Dymaxion Globe

Some time back, we posted about [Gavin]’s laser-cut/3D printed Dymaxion Globe — if you haven’t read about it yet, you should check it out. [noniq] loved the idea, and like a true hacker, built and shared an improved Foldable Dymaxion Globe. It can snap together to form an icosahedron globe, or it can be laid flat to form a map.

Duct tape, stoppers and magnet holders

Like the original, [noniq]’s version is laser cut and engraved, and uses some 3D printed parts. But it does away with the fasteners (that’s 60 pairs of nuts and bolts), and instead uses neodymium magnets to make all the triangle pieces snap together to form the icosahedron globe. The hinges are simply some pieces of gaffer-tape.

This design improvement creates a cleaner globe and also addresses some of the concerns posted in the comments of the earlier build. The design files are available for download on [noniq]’s blog — you need to 3D print some magnet holders and stopper plates, and laser cut the 20 triangle tiles. The stopper plates help ensure that the angle between tiles when it is put together is limited to 138 degrees, making it easier to assemble the globe.

Check out the video after the break to hear the satisfying “thunk” of neodymium magnets snapping together.

Continue reading “Foldable Dymaxion Globe”

Laser Cutting A Wooden Dymaxion Globe

Everyone knows that globes are cool — what else would you use as the centerpiece of your library/study? But, sadly, making your own isn’t a simple process. Even if you had a large (preferably hollow) sphere to work with, you’d still have to devise a clever way of printing the map in sections that can be glued to the curved surface. Wouldn’t it be easier if you could just laser cut flat sections, and assemble them to form a faceted “globe?”

Well, it is, and you can! Because, [Gavin] over at tinkerings.org (a Hackaday favorite) has created the files to do just that! This map projection, originally designed by the very interesting Buckminster Fuller, is designed to be either laid flat or three-dimensionally on an icosahedron (a 20-sided polyhedron). That makes it perfect for laser cutting, as each of the 20 faces can be cut from flat stock.

600px-fuller_projection_with_tissot27s_indicatrix_of_deformation

Continue reading “Laser Cutting A Wooden Dymaxion Globe”

Easy Toy Hack Makes Floating Death Star

It always seems odd to us that magnetic levitation seems to only find use in big projects (like trains) and in toys. Surely there’s a practical application that fits on our desktop. This isn’t it, but it is a cool way to turn a cheesy-looking levitating globe into a pretty cool Star Wars desk toy.

As projects go, this isn’t especially technically challenging, but it is a great example of taking something off the shelf and hacking it into something else. The globe covering came off, revealing two hemispheres. A circular hole cut out and inverted provides the main weapon. Some internal lighting and small holes provide light. Some fiber optic sanded and tinted green make the weapon fire. The rest is all in the painting.

There’s even a tiny imperial ship orbiting the killer man-made (or is that Sith-made) moon. If you want a bigger challenge, you might try bamboo. Or you can go minimalist and let your eyes and brain do most of the work.

Continue reading “Easy Toy Hack Makes Floating Death Star”